BrokeAss Gourmet

BrokeAss Gourmet

Mushroom Steaks

  • Prep Time 35 minutes (including marinating)
  • Cook Time 20 minutes
  • Estimated Cost $2.50
  • 42 Comments

I spent last week in NYC. I had a few meetings, caught up with old friends, and went to the set of The Rachael Ray Show to shoot a few scenes for Young & Hungry (tune in on March 9th at 8/7 Central on Freeform to see it--I'll also be in the episode!).

One evening after working all day, I met up with my NYC-living friends, Jocelyn and Lisa for dinner in Brooklyn at a great restaurant called Flatbush Farm. As the name suggests, the menu was focused on farm-to-table dining; seasonal, fresh, and rustic. 

We decided to share a few entrees, and one of them was a "Carrot Steak." When the dish arrived, it looked to be some thickly sliced carrots that had been roasted, and topped with a hearty grain and kale salad. It was a delicious vegetable dish (and one which I would probably order again) but it did not in any way resemble steak.

I don't have a problem with calling foods something they are not (I often call cauliflower everything from tortillas to rice to pizza), but I do feel strongly that if you are going to do that, you should at least make an effort to serve the food in the same manner as the food you are referring to. Even though the carrot steak we ordered was quite tasty, the restaurant hadn't quite accomplished this.

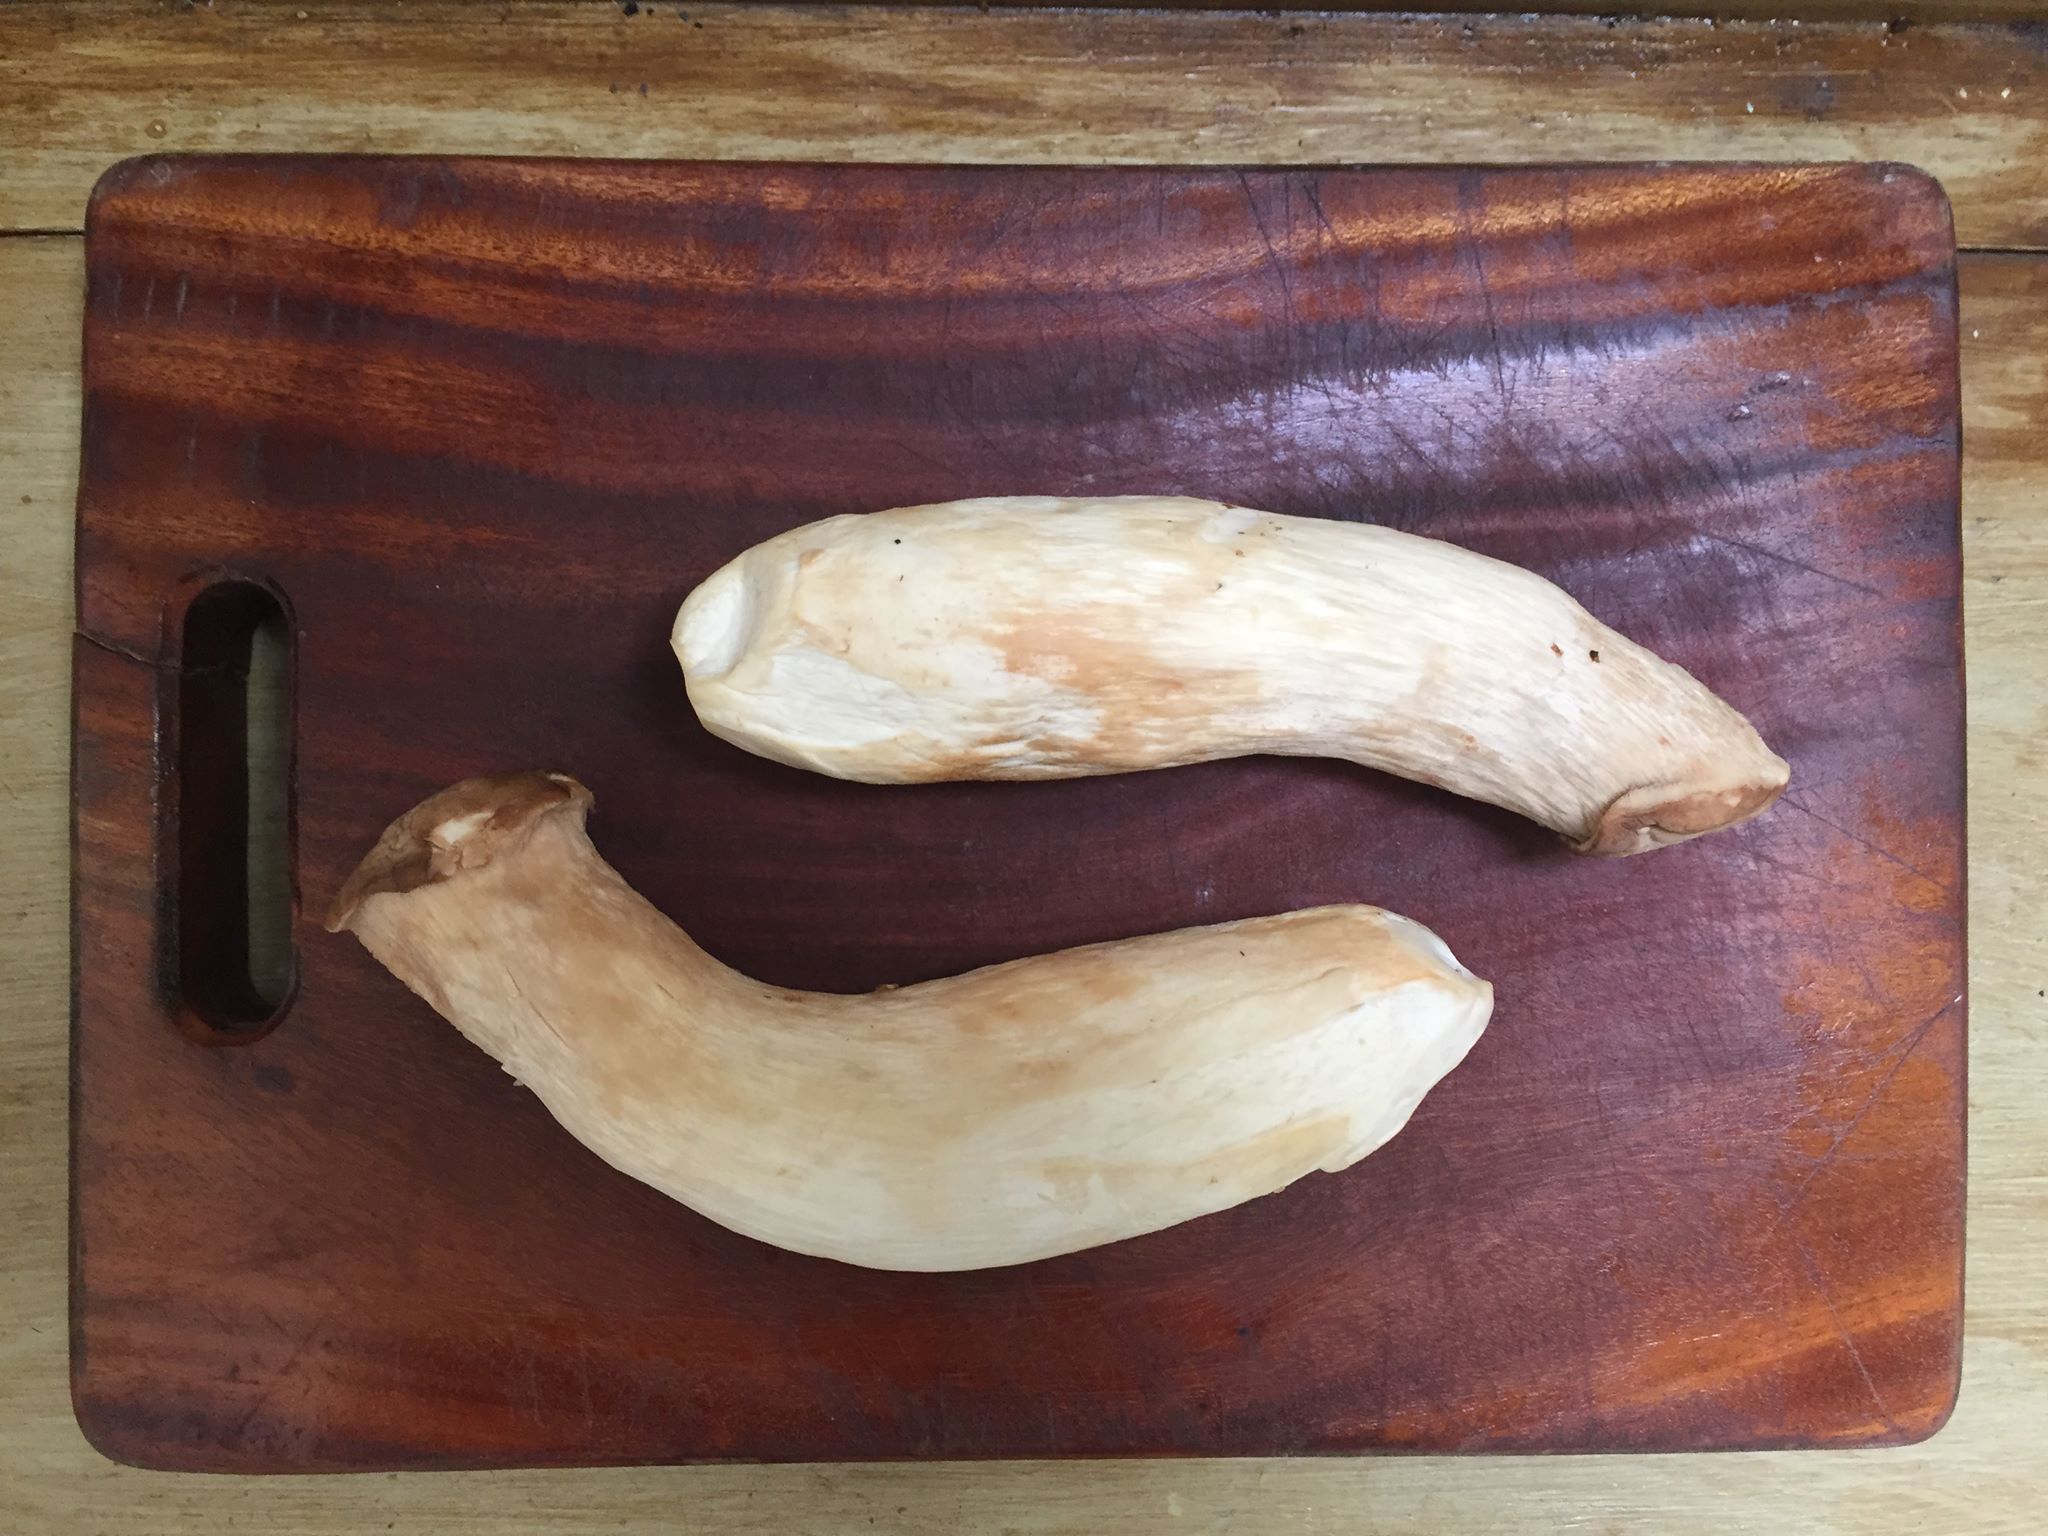
With this in mind, I was inspired to turn the enormous King Oyster mushrooms I bought recently into the steaks I knew they could be. I first discovered the meaty potential of King Oyster mushrooms when I turned them into mushroom bacon a few months ago.

Because mushrooms are meaty but not naturally juicy enough to resemble steak, I knew I needed to add moisture and a bit of umami flavor. To accomplish this, I plunked them, halved, into a simple marinade of soy sauce, smashed garlic, brown sugar, black pepper, olive oil, and water.

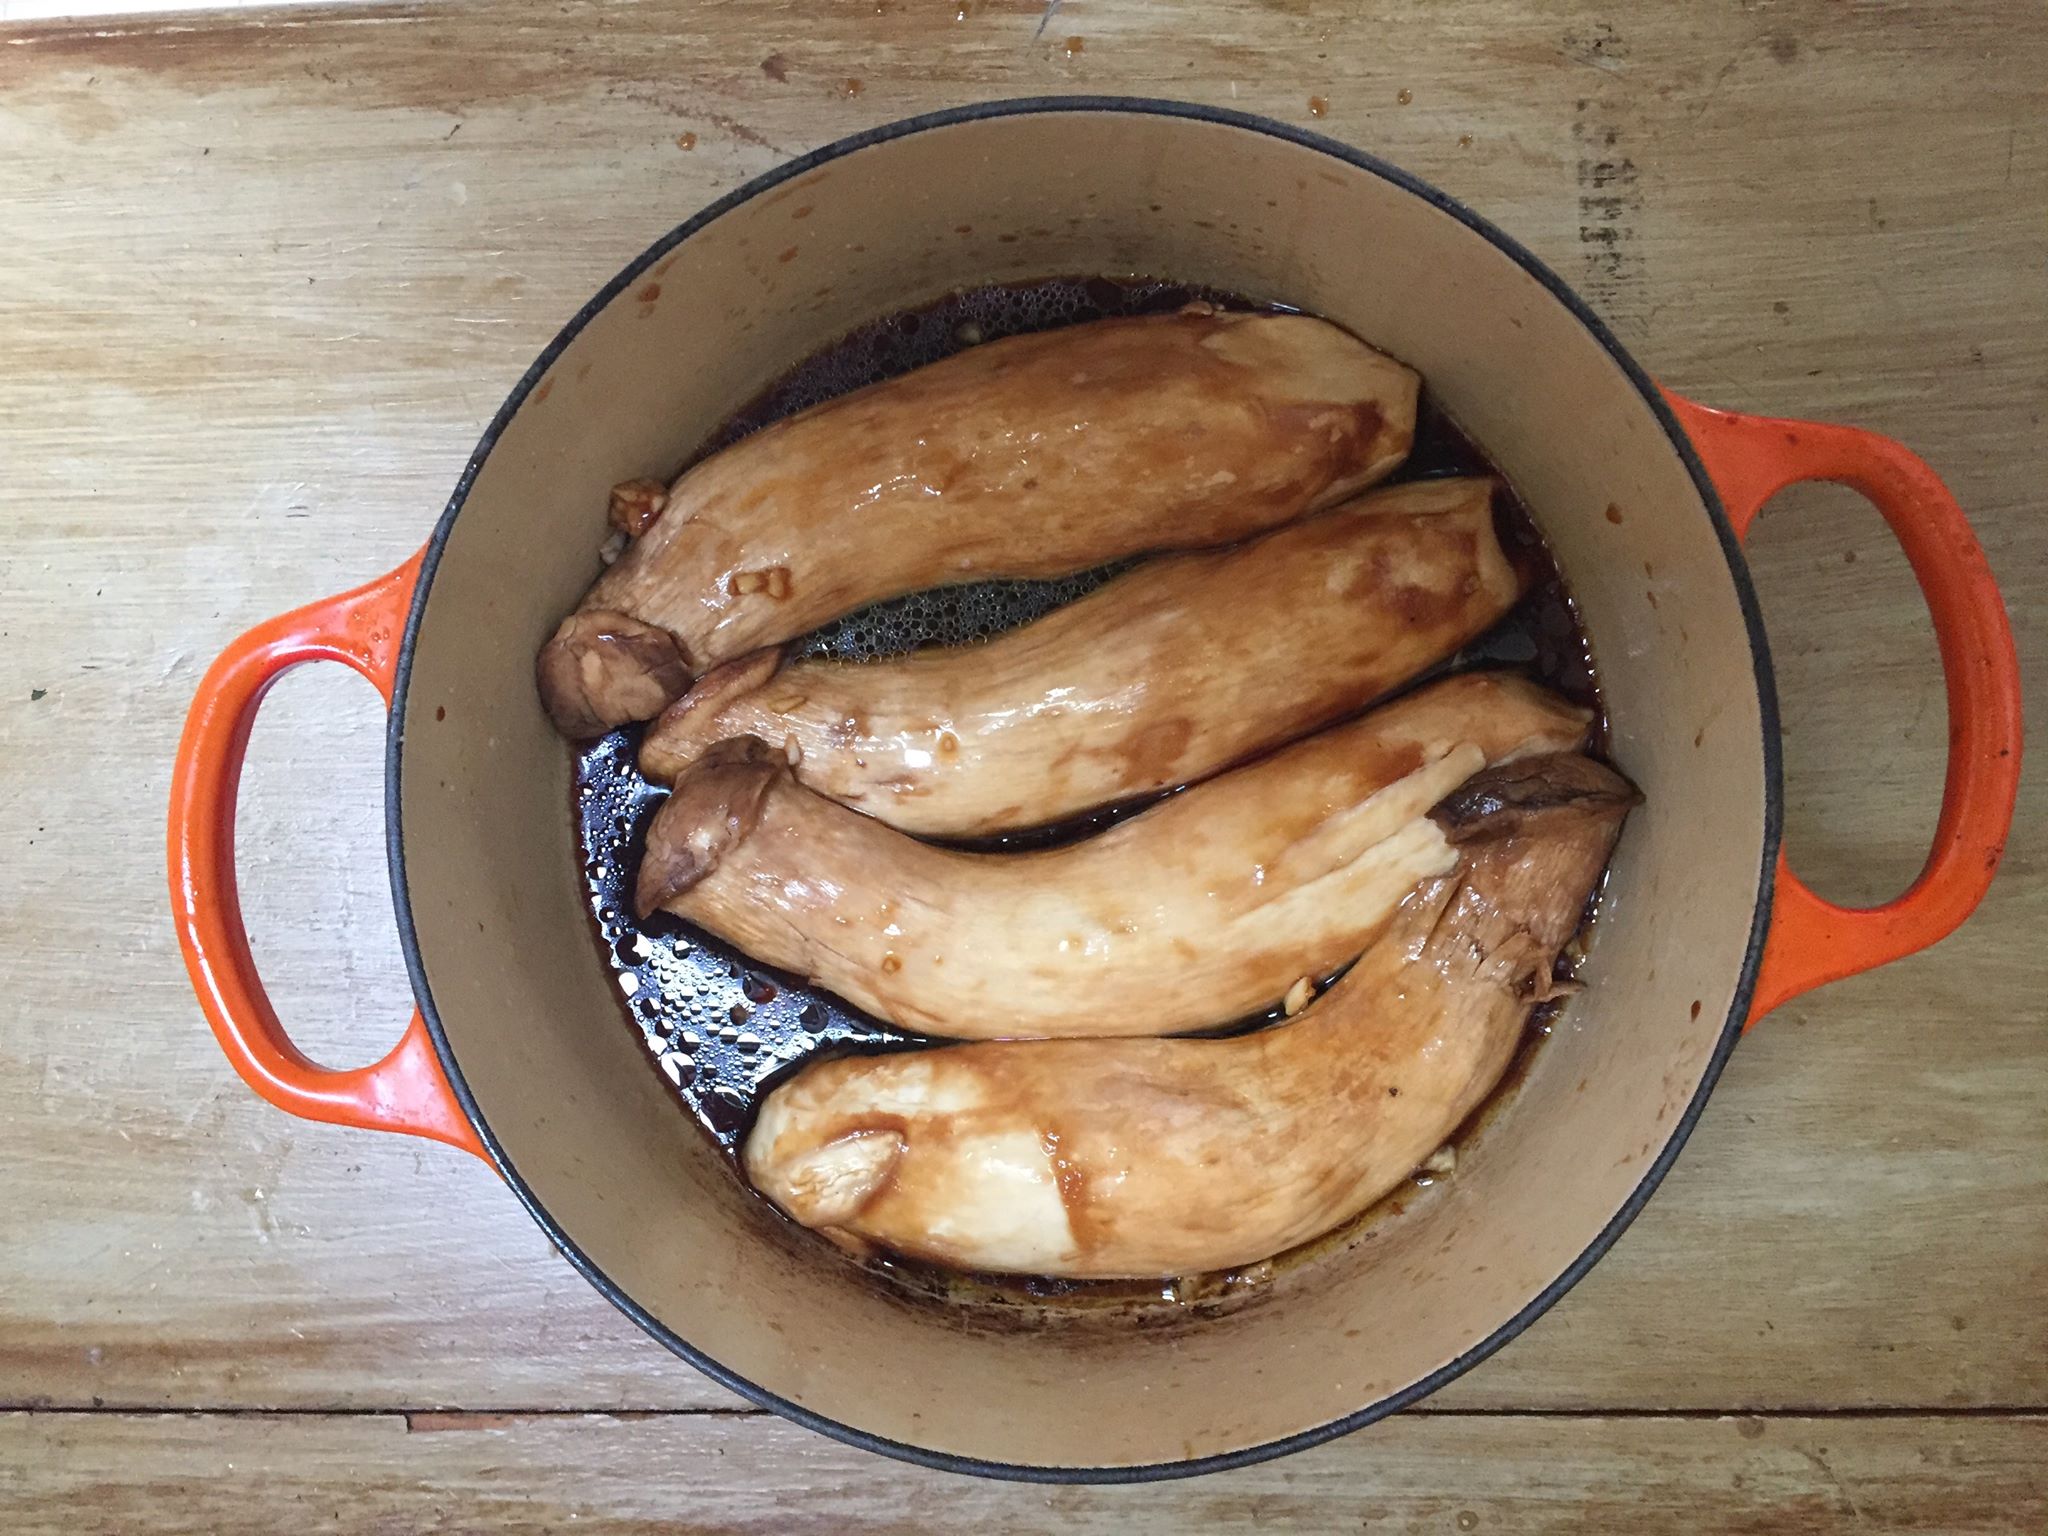
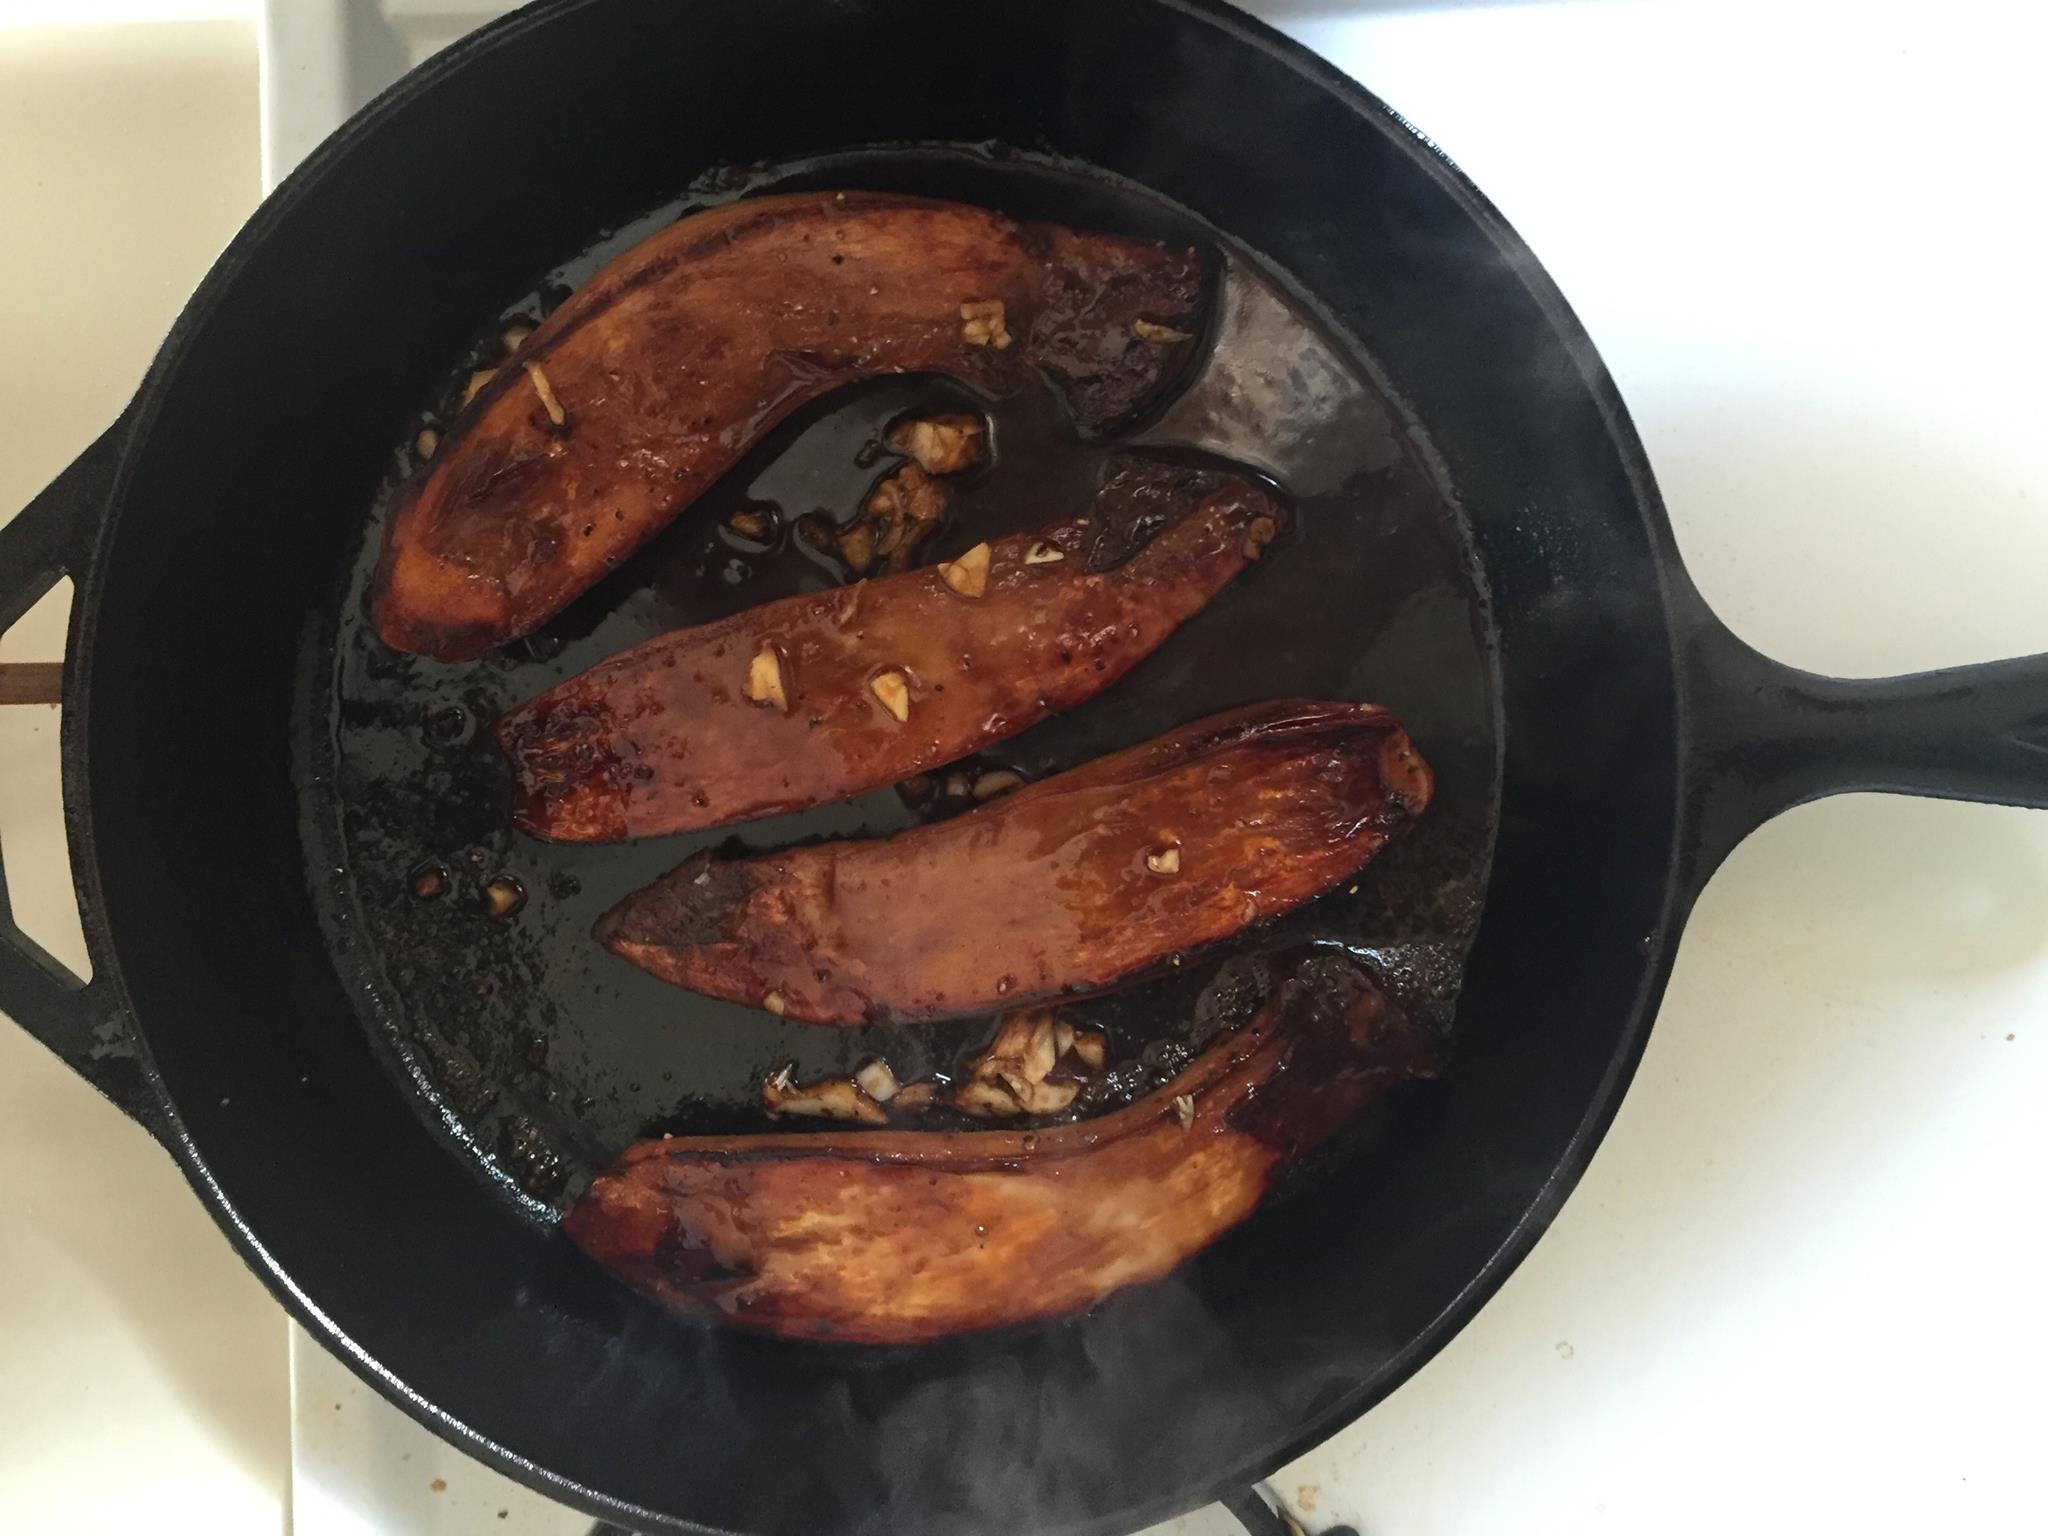
After marinating for about 30 minutes (I could have left them in for longer but didn't want them to start to break down), they went into a hot cast iron (my favorite way of cooking steaks of any kind).

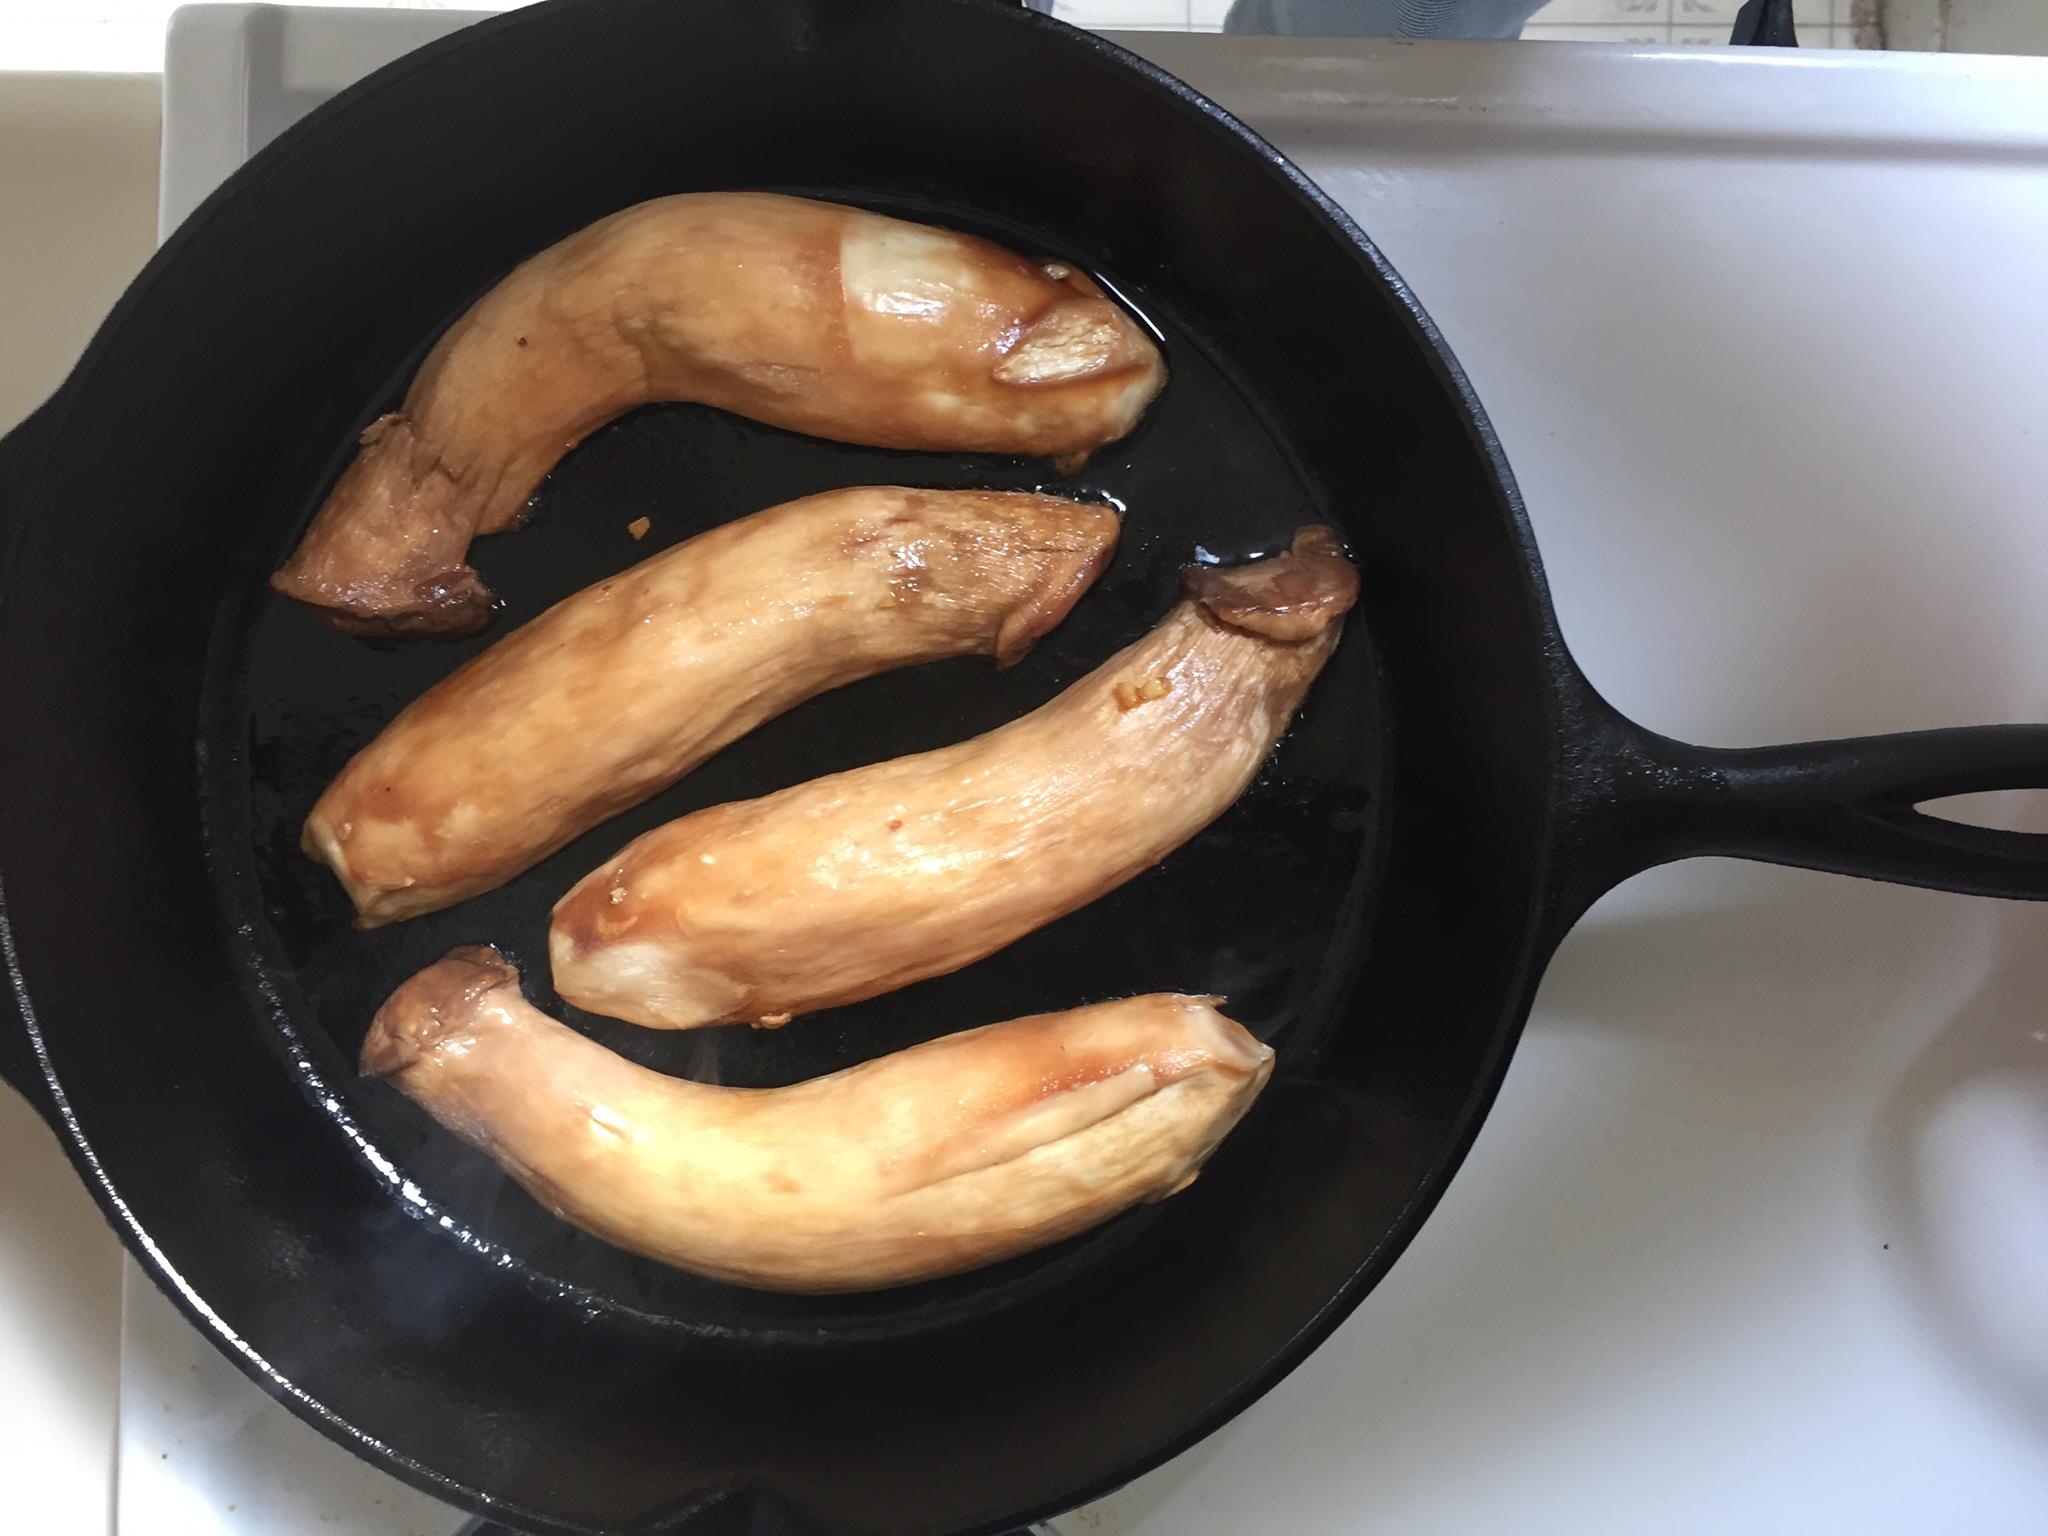
After getting a good long sear, the steaks get flipped and topped with about half of the marinade, just ensure they get as much flavor and moisture as possible.

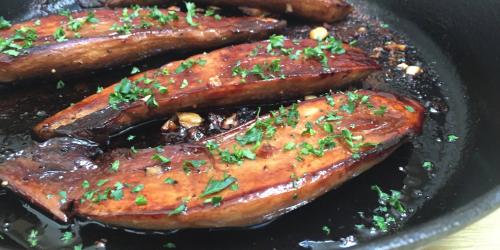
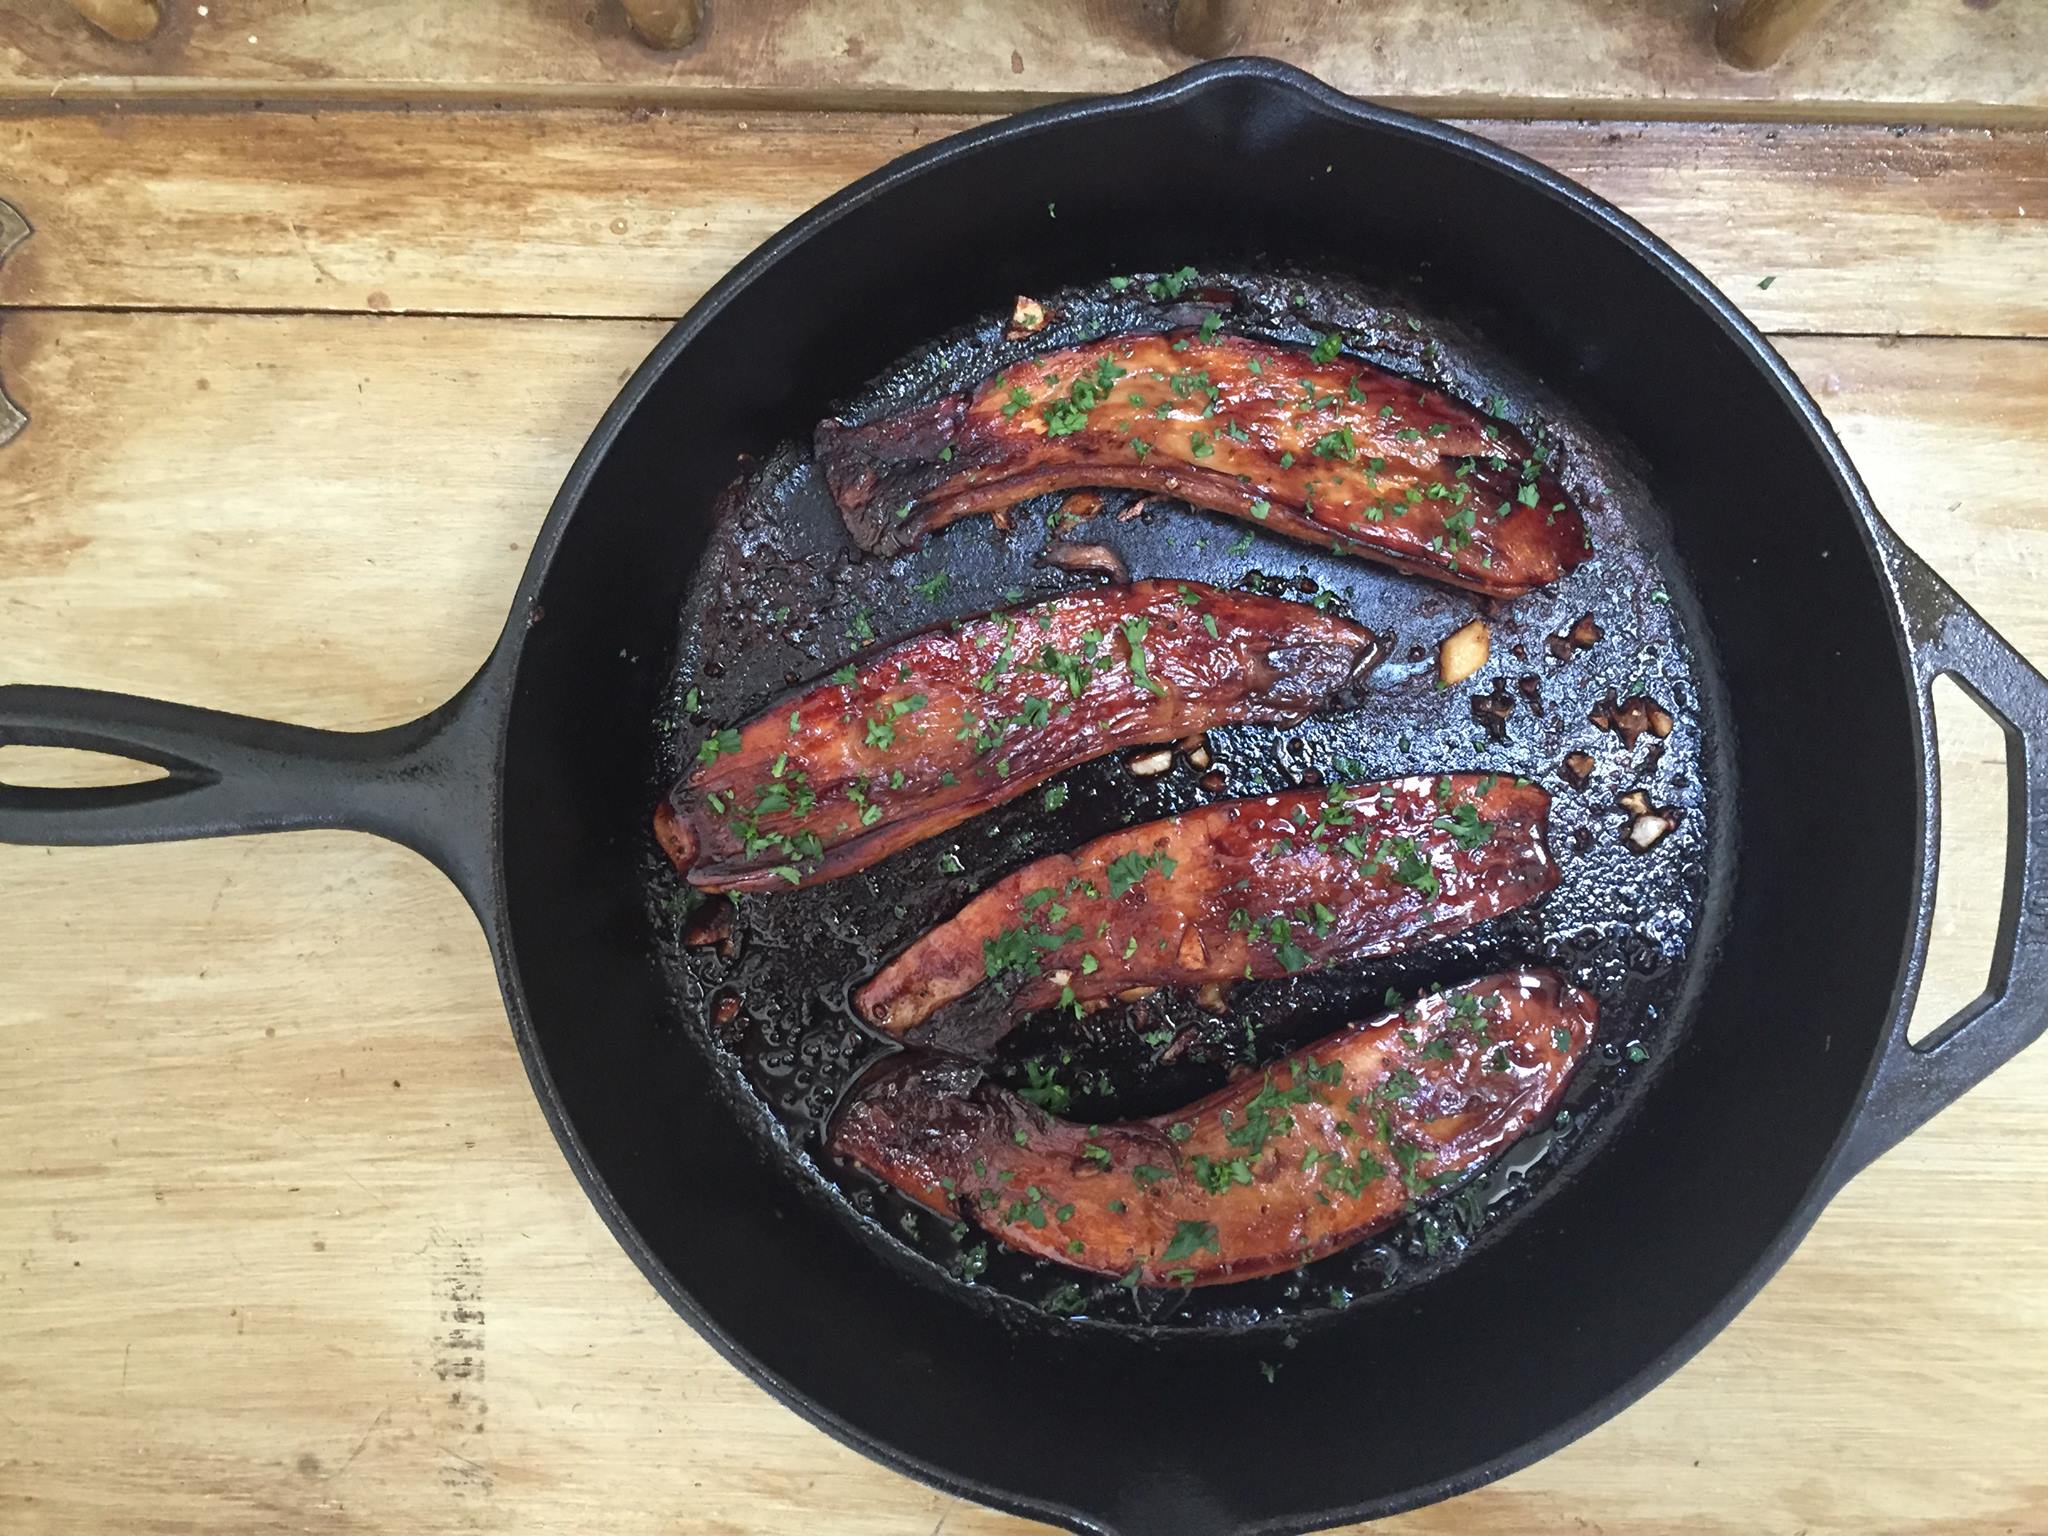
After a good long sear, the get a little fresh parsley. Not required, but adds lovely color and flavor.

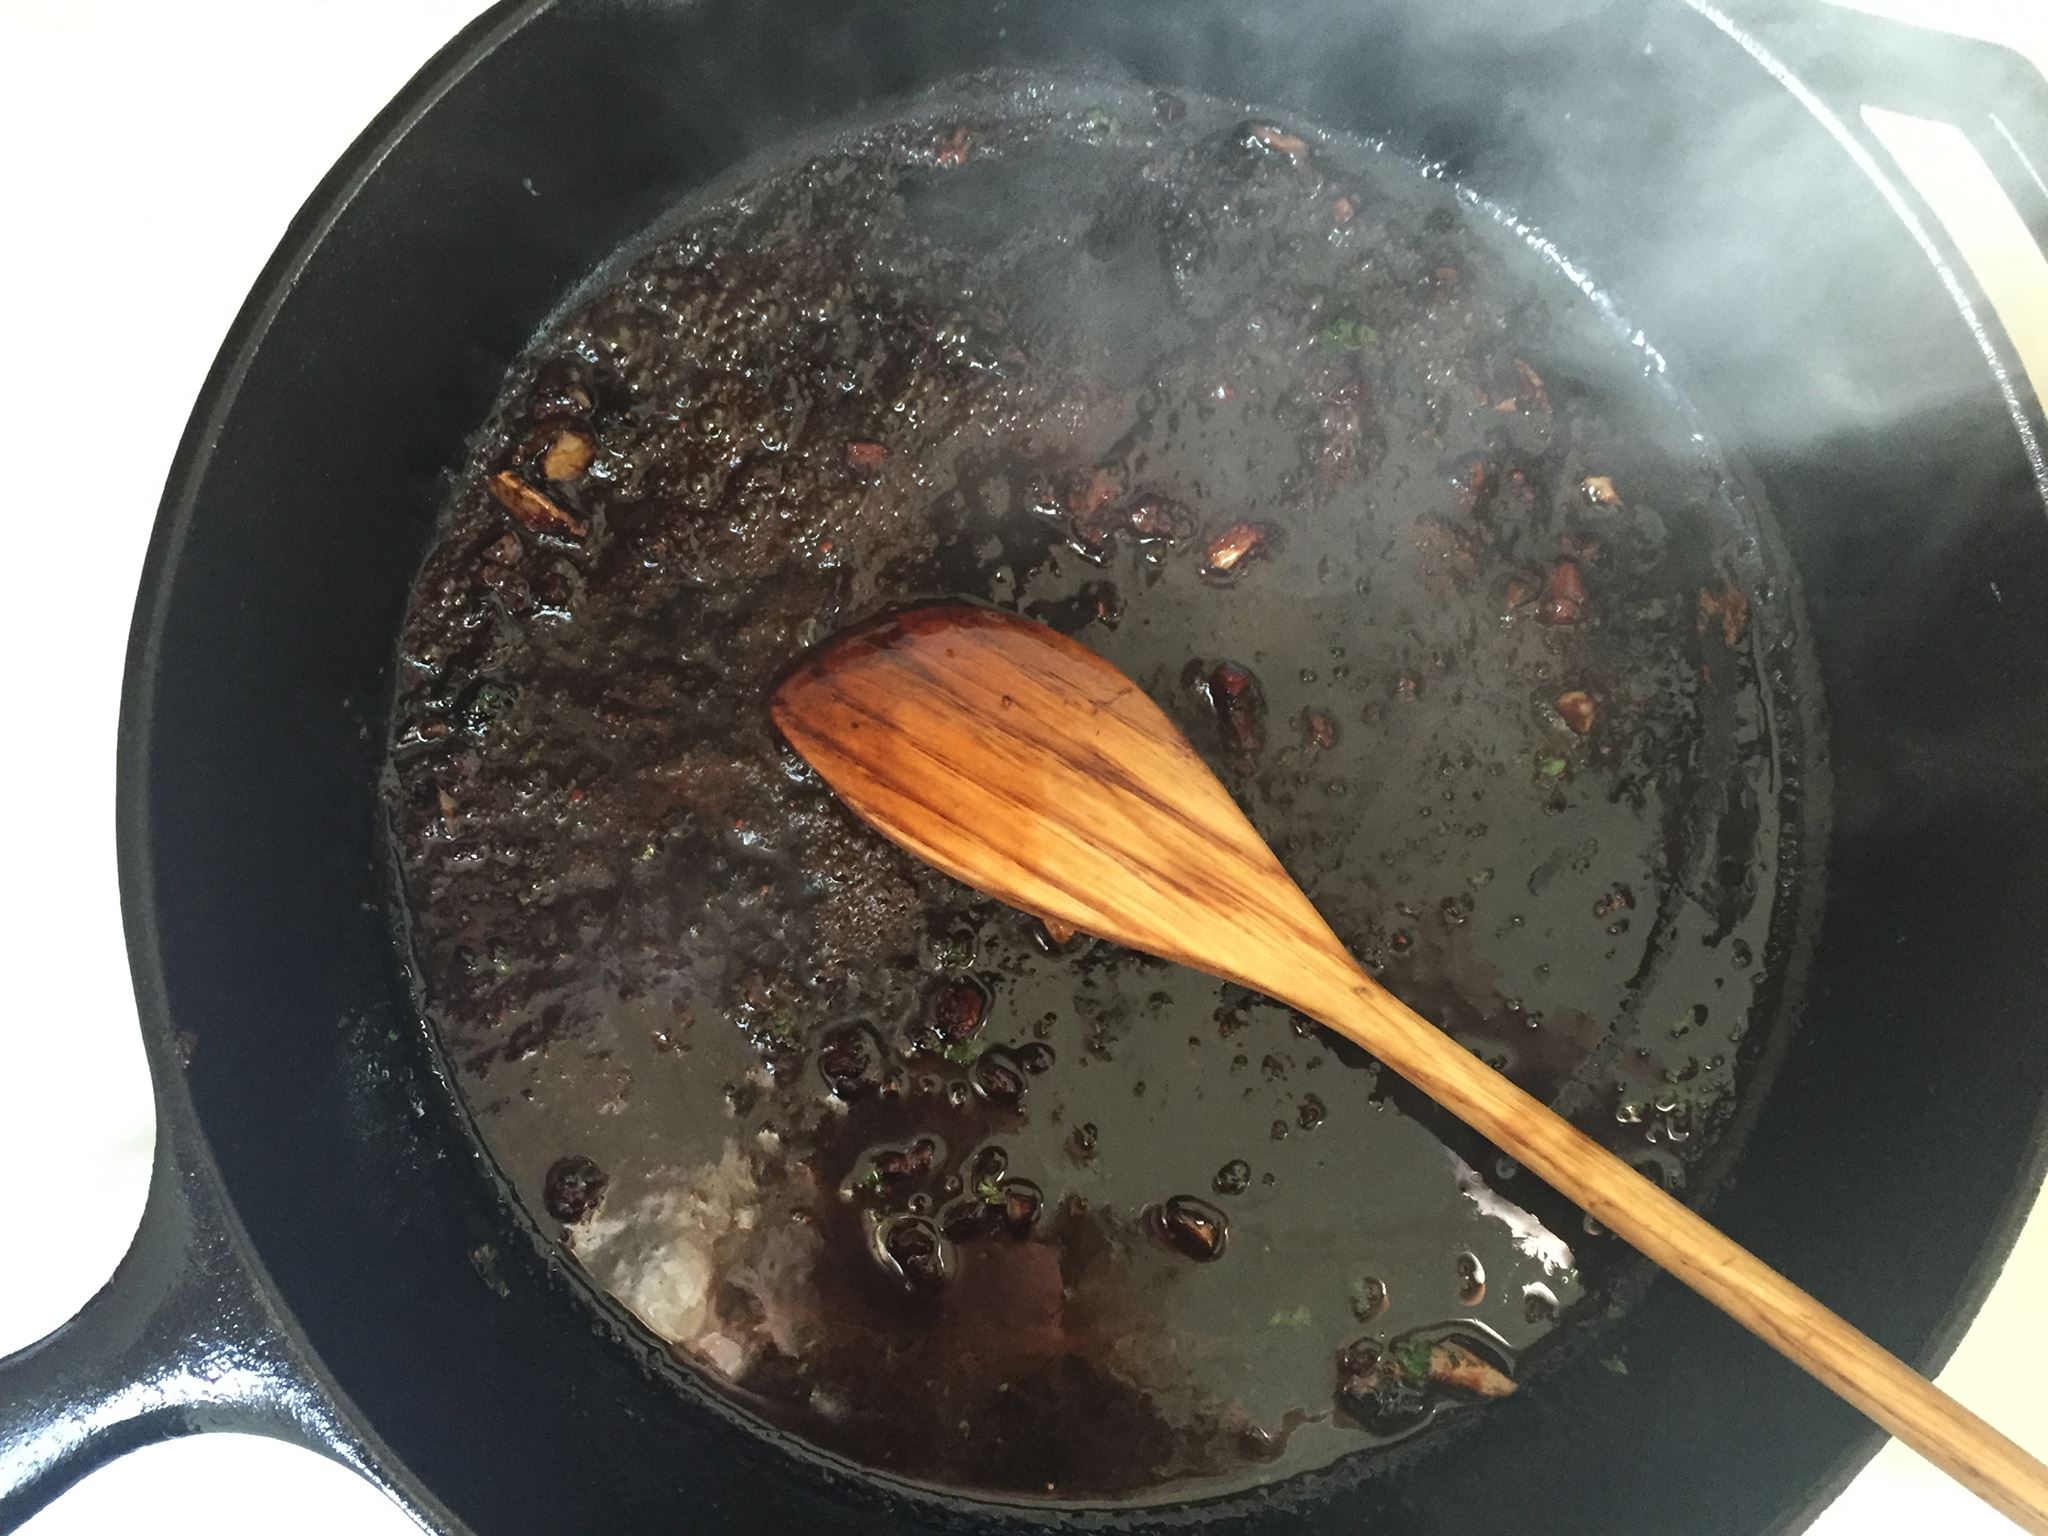
If you really want to put it over the top, add a little vermouth or broth to the empty pan and scrape up those delicious brown bits to make a quick pan sauce (this is optional but quite recommended).

And over the top it goes, giving the 'shrooms a steaky glaze.

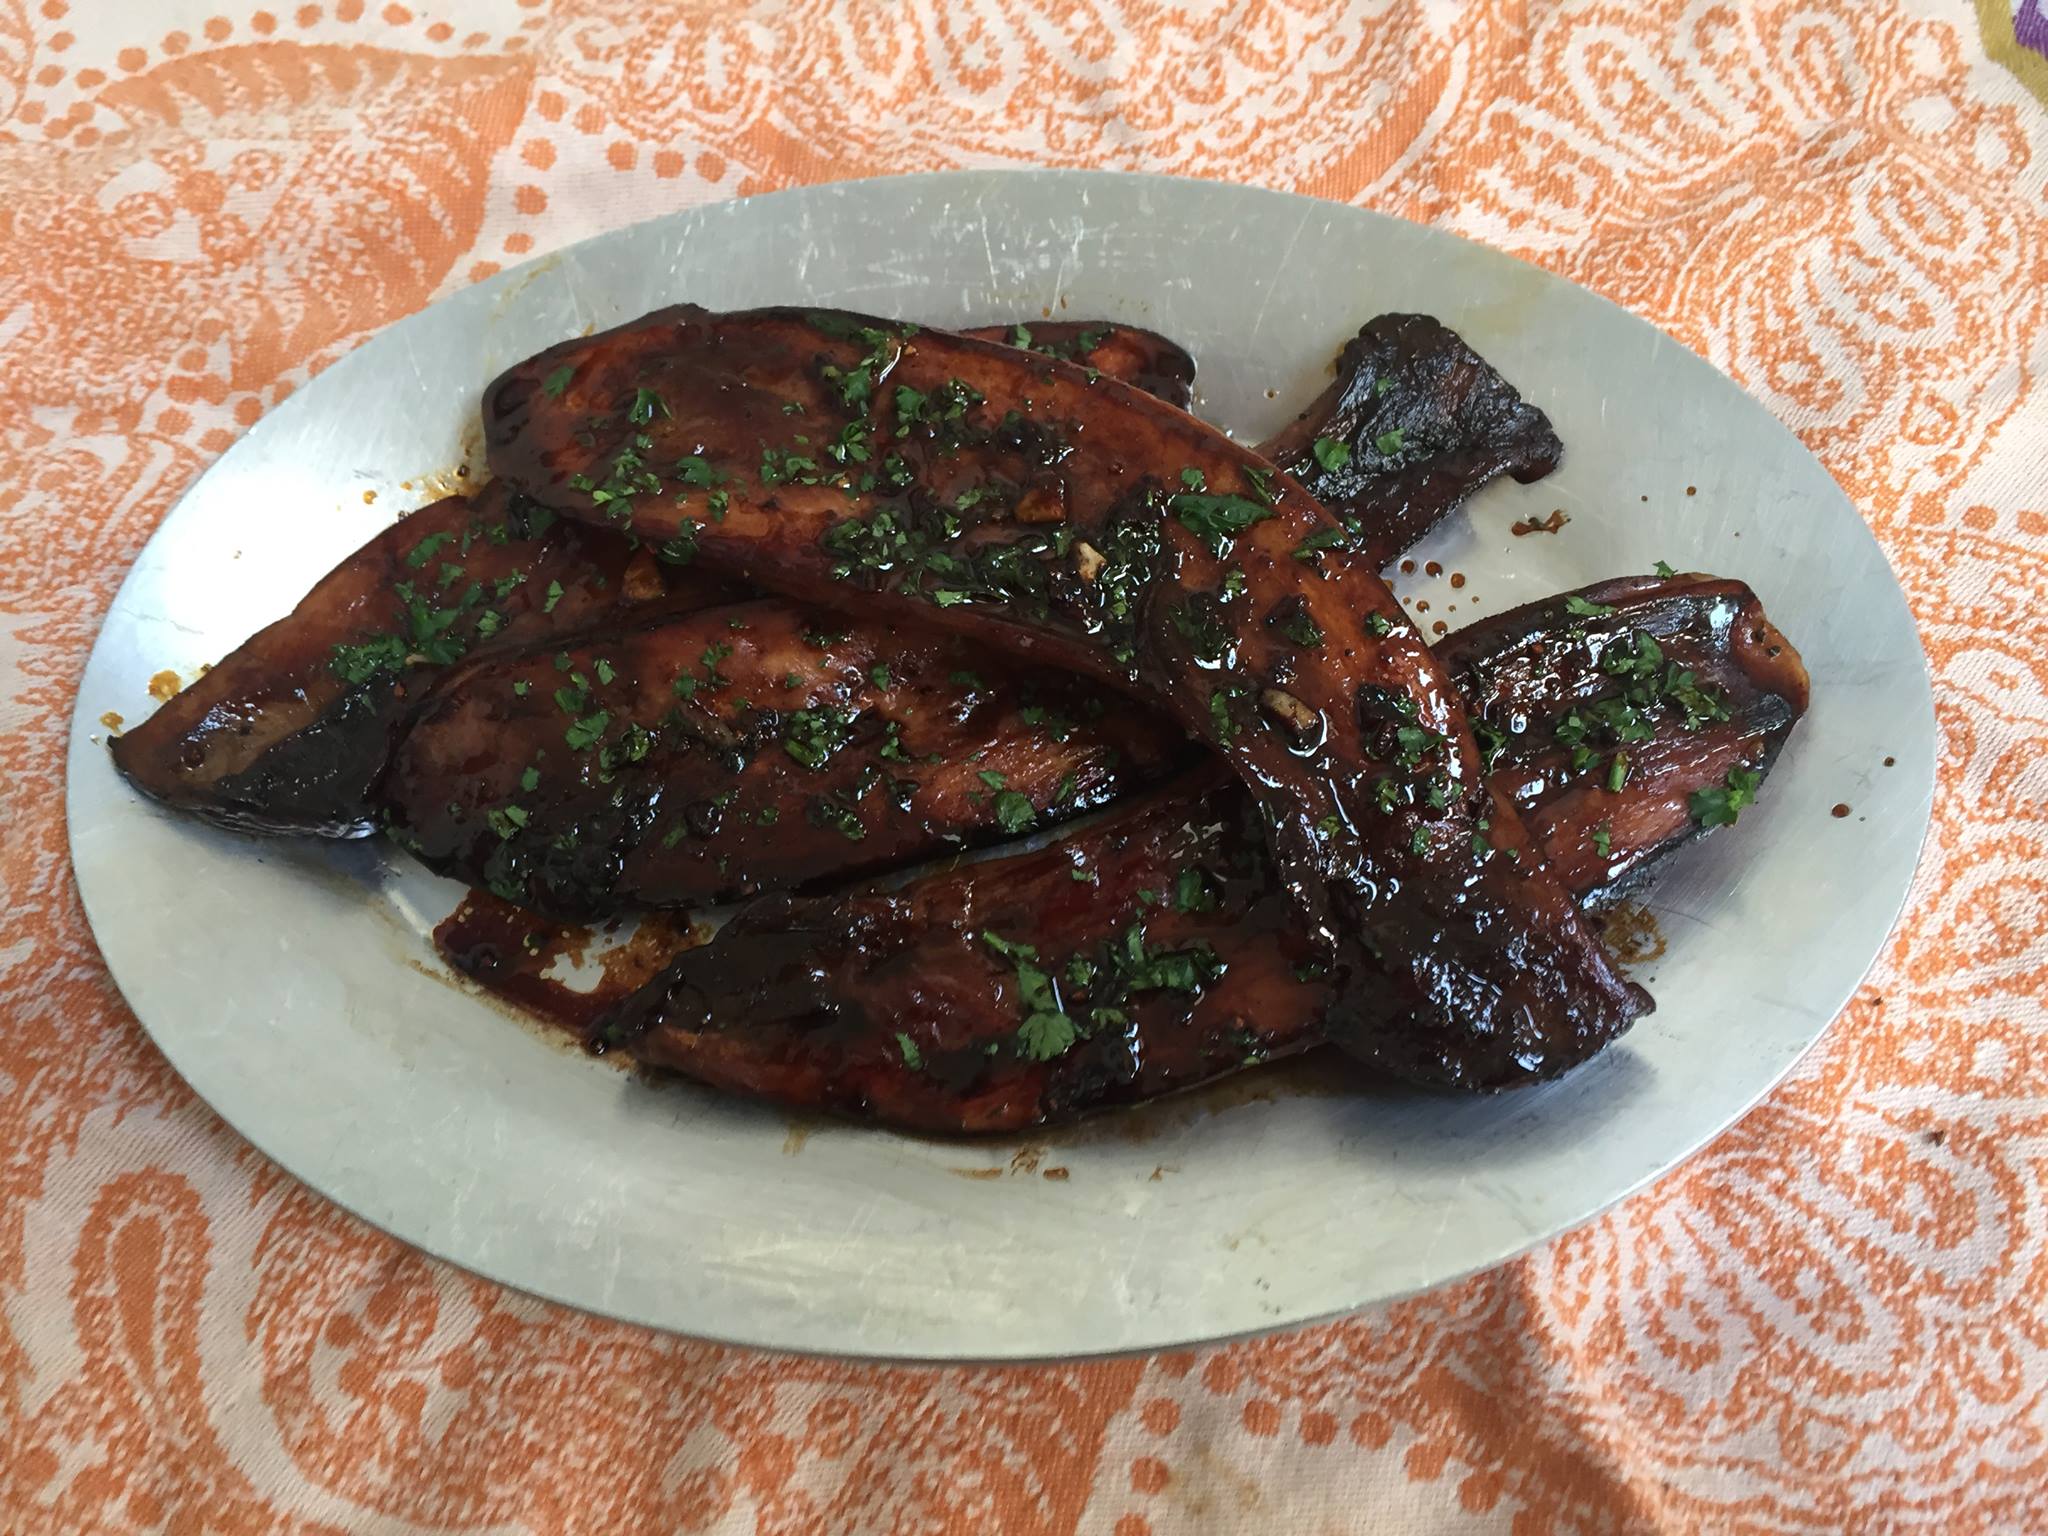
These "steaks" make a great side dish, but I dare you to try them as an entree, maybe with some mashed potatoes and seared broccolini or creamed spinach. I think you'll find that the steaks' meaty texture and juicy, umami flavor is more than enough to satisfy carnivorous cravings. 

Ingredients

  • 1/8 cup soy sauce or tamari Pantry
  • 2 cloves garlic, smashed Pantry
  • 1/2 teaspoon ground black pepper Pantry
  • 1 tablespoon brown sugar or honey Pantry
  • 1/3 cup water
  • 1 tablespoon extra virgin olive oil, plus more for cooking Pantry
  • 2 very large or 4 medium King Oyster mushrooms (the ones pictured measure about 9 inches in length), halved lengthwise $1.50
  • 1 small handfull fresh parsley, chopped (about 1 tablespoon chopped) $1 for a bunch
  • 1/4 cup vegetable broth, vermouth or other wine (red or white) optional

Recipe Serves 2

Directions

  1. Stir together the first 6 ingredients in a wide, shallow dish.
  2. Place the mushrooms in the dish, flat-side down.
  3. Cover the dish and let marinate at room temperature for 30 minutes.
  4. Heat enough olive oil to thinly coat the bottom of a large frying pan (preferably non-stick) over medium-high heat.
  5. Remove the mushrooms from the marinade and shake off excess. Reserve marinade.
  6. Cook flat-side down in the pan for 8-10 minutes, until very brown (check periodically to avoid burning).
  7. Flip and let cook for another 2-3 minutes to sear.
  8. Add about 1/2 of the marinade to the pan and cook until it is almost completely absorbed.
  9. Remove the mushrooms from the pan and top with the parsley.
  10. If you want to make a pan sauce, add the broth, vermouth, or wine, and stir, scraping the brown bits off the pan and into the liquid. 
  11. Once the sauce has thickened (about a minute), pour it over the mushrooms. 
  12. Serve warm. 

Cauliflower Crust Pizza

  • Prep Time 15 minutes
  • Cook Time 1 hour
  • Estimated Cost $15
  • 18 Comments

I don't believe in ruling out any foods. As soon as you do that, in my experience, you are bound to think of nothing but forbidden delicacies all day long, until you inevitably crack and eat whatever you swore you wouldn't on the kitchen floor at 3 o'clock in the morning. Rather, I like to make a practice of eating healthfully most of the time so that when I'm invited to a 9-course pasta dinner, or a donut shop opening, or, more likely these days, a wedding cake tasting, I can freely partake without any guilt. An 85% virutous/15% decadent rule tends to work well for me.

The key to staving off cravings when it's not quite time to indulge in that 15%, I have found, is to replicate white, starchy, not-so-good-for-you foods with the king of vegetables, cauliflower. So far, I've done this with tortillas, ricea pizza like this one, and even my beloved Brown Butter Pumpkin Mac & Cheese. These dishes knock out cravings (I've even begun to develop cravings for the cauliflower versions of my favorite starchy carbs), and keep you satisfied with plenty of fiber, thanks to their vegetable base. Of all the knock-off white carb cauliflower recipes in my arsenal, this is my favorite, and the one I make most often (generally at least once a week).

It starts with about half a cauliflower, cut into florets. I puree it in the food processor until it resembles ricotta cheese, and each piece is about the size of couscous (check out my tip in the recipe for how to deal with cauliflower that just doesn't want to be processed correctly).


The cauliflower gets microwaved until it is very soft, then dumped onto a clean dish towel.

Then I gather up the corners of the towel to make a bundle, and carefully squeeze as much liquid as possible from the cooked cauliflower. The drier the better. It's important to be really careful here, as the cauliflower may be quite hot to the touch, even through the towel.

The squeezed-out cauliflower goes into a mixing bowl with a beaten egg, some olive oil, a pinch of salt, and 1/2 cup grated Parmesan. You can use other cheeses, but I find that Parmesan yields the crispest crust. If you are avoiding dairy, try a mix of almond or coconut flour and nutritional yeast in place of the Parmesan.

I scrape the "batter" onto a parchment-lined baking sheet (do NOT skip this part--an oiled or floured surface will not work; parchment is essential).

With wet hands (very helpful in keeping the cauliflower mixture from sticking), I pat the mixture into a circle (you could probably do any shape you want), about 1/4-inch thick. I top it with a drizzle of olive oil, which helps get it nice and golden brown.

Into the oven it goes, until it's brown and crisp. This is very important. If you take it out too early, it will make for limp pizza.

If you think you can fip it by hand, go for it. I don't trust my hand-eye coordination enough to do that, so I top it with a second piece of parchment and carefully turn it over.

Then I carefully peel the now-on-top layer of parchment off (save it for the next time you want to make this pizza--you can usually get 2 or 3 uses out of each piece of parchment).  


And here is my pizza base! 

Now it's time for toppings. I recommend going light, so as not to overload the crust with toppings it can't adequately hold. I usually just do sauce and cheese--maybe some sauteed greens or caramelized onions now and then. 

Start with sauce all over, leaving a 1-inch border for the crust. Here I'm using some leftover romesco sauce, but this is great with pesto, tomato sauce, or even just a little olive oil and garlic.

And since this is pizza, I top it with shredded mozzarella cheese and a light touch of Parmesan (feel free to experiment with other cheeses though--I've used cheddar or dollops of ricotta and goat cheese in place of the mozzarella). Again, don't overload it. A single layer will suffice.

Bake until brown and bubbly.

Check out that bottom crust. So crisp.

I add a smattering of fresh herbs and maybe some red chili flakes, and I'm ready to slice.

It's pizza time.

Say hello to your new favorite.

Ingredients

  • 1/2 large cauliflower, cut into florets $4 for a whole cauliflower
  • 1 egg, lightly beaten $2.50 for 6
  • 2 tablespoons extra virgin olive oil Pantry
  • 1/2 cup grated Parmesan, plus more for topping the pizza $3.50 for 12 ounces
  • pinch of salt Pantry
  • 1/4 cup sauce of your choice (tomato, pesto, romesco, etc) $2.50
  • 1 cup shredded mozzarella cheese $3.50 for 8 ounces
  • fresh herbs, Optional
  • red chili flakes, Optional

Recipe Serves 2-3

Directions

  1. Preheat the oven to 400 degrees F.
  2. Place the cauliflower in a food processor and puree until it resembles ricotta cheese and each grain is about the size of couscous. Tip: If you can't seem to get the right consistency, or if a few whole florets remain after pureeing, try adding enough water to cover (usually about 2 cups) and puree as if you are making soup. When all the cauliflower has been completely processed, strain it in a fine-mesh strainer.
  3. Scrape the cauliflower into a heat-proof bowl and microwave it on High for 5 minutes.
  4. Carefully scrape the microwaved cauliflower purée onto a clean dish towel.
  5. Very carefully (using a second towel if necessary to protect your hands) squeeze out as much liquid as possible. Get it as dry as you possibly can.
  6. In a mixing bowl, combine the cauliflower, egg, 1 tablespoon of the olive oil, Parmesan, and salt.
  7. Mix together to make a thick batter.
  8. Line a baking sheet with parchment paper.
  9. Scrape the batter into the center of it. Gather the batter into a ball shape.
  10. Wet your hands and carefully pat the batter into a circle, making it as thin as possible.
  11. Drizzle the cauliflower circle with second tablespoon of olive oil and use your hand or a pastry brush to spread it all over the circle.
  12. Bake for 30 minutes, or until the crust is nicely browned and a little crisp.
  13. Remove the crust from the oven, but leave the oven on.
  14. Place a piece of parchment paper over the top of the cooked crust.
  15. Carefully flip the whole thing so the bottom is facing up.
  16. Remove the top layer parchment (which was previously the bottom layer).
  17. Top your pizza with sauce, cheese, and anything else you like (I encourage you to go light on the toppings--the crust is sturdy but not as sturdy as conventional pizza crust).
  18. Bake for 20-22 minutes, until the cheese is browned and bubbly. 
  19. Slice and serve.

Cast Iron Chicken and Sweet Potatoes

  • Prep Time 5 minutes
  • Cook Time 50 minutes
  • Estimated Cost $7
  • 12 Comments

But if I'm honest, I know it doesn't have to be that hard. After all, I have a cast iron pan. The holy grail of cookware. The simplest and yet most useful of any pan I've ever owned. Cooking with it is not only a great way to get extra iron into your diet (truly--it seeps into the food and is very good for you), it also produces gorgeously browned, crisped food. It's a great place for the Maillard Reaction to play out. 

When I think about how much I have to get done over the next few months, I want to cry.

(In case you're interested: finishing the manuscript for my third cookbook, freelance pieces for The Washington Post and The Bold Italic, and planning my wedding).

And also scream with glee because it's fun and exciting stuff.

But also hide under the covers and refuse to come out, both because reality is overwhelming and because it is freezing in my apartment. 

Of course, I'm going to rally. I'm going to get it all done. I might have to do it wearing three sweaters and consuming enough caffeine to wake up a small village, but it'll happen. 

When I am deep in work, there's this severely annoying thing that happens around 5:30 PM: I realize I have absolutely no idea what the plan for dinner is. I haven't shopped. I haven't prepped. I certainly haven't preheated the oven. And the amount of work that I know will go into getting dinner for two on the table feels like more than I can bear. 

But if I'm honest, I know it doesn't have to be that hard. After all, I have a cast iron pan. The holy grail of cookware. The simplest and yet most useful of any pan I've ever owned. Cooking with it is not only a great way to get extra iron into your diet (truly--it seeps into the food and is very good for you), it also produces gorgeously browned, crisped food. It's a great place for the Maillard Reaction to play out. 

If you don't have a cast iron pan, I recommend getting one immediately. Specifically this one. When you get it, keep it clean, but don't wash it down with soap. Oil it lightly before storing. Use it often, but treat it gently. Love it and it will love you back. Hard.

Oh, and make this chicken. Especially when you feel overwhelmed by deadlines, pressure, and the world at large. Because at the end of the day (literally and figuratively), there is nothing better than a dinner that takes just minutes of hands-on effort, is healthy, and tastes like it was made with love.

I love making this with sweet potatoes (because if you know me, you know I love a sweet potato), but it would also be great with regular potatoes, cubed, peeled butternut squash, or even chunks of eggplant. 

Start with a cast iron pan.

Slick it with extra virgin olive oil, then land a couple of juicy chicken legs in the center of it.

Add some olive oil-coated chopped vegetables, salt, pepper, and some cherry peppers, if you dare.

Roast, garnish with parsley, and sigh a deep sigh of relief. Dinner is served.


Ingredients

  • extra virgin olive oil Pantry
  • 2 medium sweet potatoes, scrubbed and cut into 1-inch pieces (leave the peel on) $2
  • 1/2 medium onion, cut into 1" pieces $0.50
  • 6-8 whole cloves garlic Pantry
  • 2 whole chicken legs $3.50
  • 1 teaspoon each of salt and pepper Pantry
  • 6-8 cherry peppers, halved Optional
  • chopped parsley, for garnish Optional

Recipe Serves 2

Directions

  1. Preheat the oven to 475 degrees F.
  2. Lightly coat a 12-inch cast iron skillet (or another heavy-bottomed, oven-proof frying pan) with olive oil.
  3. In a mixing bowl, combine the sweet potatoes, onion, and garlic cloves.
  4. Drizzle with 2 tablespoons of olive oil and mix well to coat.
  5. Place the chicken legs skin-side-up on the oiled pan.
  6. Arrange the vegetables around the chicken, making sure the chicken is mostly exposed.
  7. Top the vegetables with the halved cherry peppers, if using.
  8. Sprinkle the chicken and vegetables with the salt and pepper.
  9. Bake for 45-50 minutes, until the chicken skin is golden brown and crispy.
  10. Let rest for 2-3 minutes, then serve hot.

Spicy Sweet Potato Latkes

  • Prep Time 30 minutes
  • Cook Time 25 minutes
  • Estimated Cost $7
  • 12 Comments

When it comes to traditional Jewish food, people love to grouse about how it's really only worth eating when it's made traditionally. These are the same people who wax poetic about how it's impossible to find a good bagel outside of New York. "It's the water," they'll tell you. "You can't replicate New York City water."

Well I live in San Francisco and my water comes from the Hetch Hetchy dam, and it somehow produces Marla Bakery's bagels, which are the best I've ever had, in or outside of New York City. And speaking of defying tradition, I also happen to prefer sweet potato latkes to traditional potato ones.

I have no problem with traditional potato latkes, lest you accuse me of betraying my Eastern European roots. But if you follow my blog, you know that just about any time I can replace a regular potato with a sweet potato I'll do it without shame. And while I love the idea of a crispy potato, I love the idea of the crispy sweet, earthy depth of a sweet potato even more.  

And of course, because I can't just shred sweet potatoes, fry them in oil, and call it a day, I have to add a little flavor, and, yes, a little heat. I'm bring the heat to these latkes with straight up sriracha (though you could use your favorite hot sauce), and my new favorite ingredient, sweet-hot chilies, also known as peppadews. I buy them where I buy almost everything else, Trader Joe's, but they can usually be found in jars or at the olive bar of well-stocked grocery stores.

I hand-shred (feel free to use a food processor, but I think hand-grated potatoes get crispier) my sweet potatoes (and one Russet potato, to give it some starch, which helps make for crispy latkes), right onto a clean dish towel. I salt them to release their moisture (essential), and then gather up the corners of the dish towel and squeeze the daylights out of it.

Then I add sriracha for more spice (I eyeball it, but start with one tablespoon and go from there) green onions for freshness, pepper, the sweet-hot chilies, eggs, and flour. And yes, you may use gluten-free flour. Either GF all-purpose, or coconut flour, which adds a nice background flavor which complements the sweet potato.

It's important to mix well between each step. I use my hands or a wooden spoon. Then, once the mixture is well incorporated, I form nice little patties. 

It's important to fry the latkes in a decent amount of oil. Like, more oil than you think you need. It's not deep-frying, exactly, but it's not...not deep-frying. Remember, we're celebrating the miracle of the oil, here

It's tempting to crank up the heat and really sear them, but medium-heat oil is best. It cooks the latkes evenly and thoroughly. It's important to let time do the work. 

Draining the latkes well helps make for an even crispier exterior. 

Keeping them warm in the oven encourages even more crispness, so these can even be made ahead. Just make sure you don't stack them--stacking leads to sogginess, and that is the antithesis of what we're looking for here.

Then just plate 'em up, put out bowls of applesauce and sour cream (see recipe for details), and crank up your favorite Hanukkah tunes (this year it's this song by Rachel Bloom, on repeat). Happy Hanukkah!

Ingredients

  • 2 medium orange-fleshed sweet potatoes, shredded (leave the skin on) $1.50
  • 1 medium Russet potato, shredded (leave the skin on) $0.50
  • 1 teaspoon salt Pantry
  • 1 teaspoon ground black pepper Pantry
  • 1 tablespoon sriracha (or more to taste) Pantry
  • 5 green onions, chopped (green and white parts) $1 for a bunch
  • about 8 sweet-hot chilies (also known as peppadews), chopped $2.50 for a jar
  • 2 eggs, lightly beaten $1.50 for 6
  • 2/3 cup all-purpose flour Pantry
  • vegetable, peanut, grapeseed, or coconut oil, for frying Pantry

Recipe Serves 6-8

Directions

  1. Preheat the oven to 200 degrees F.
  2. Spread the shredded potato and sweet potato on a clean dish towel.
  3. Sprinkle with the salt, and let sit for 10 minutes (this helps release the moisture in the potatoes, which yields a crisper latke). 
  4. Gather up the corners of the dish towel, hold over a sink, and twist to squeeze as much liquid as possible out of the potatoes.
  5. Transfer the potatoes to a mixing bowl.
  6. Add the pepper, sriracha, green onions, and chilies and mix well with your hands or a wooden spoon.
  7. Stir in the eggs and mix well
  8. Stir in the flour and mix well.
  9. Cover a couple of large baking sheets with paper towels, newspaper, or parchment paper. Set near the stove.
  10. Pour 1/2 inch of oil into a large non-stick or cast iron frying pan (or 2, if you are cooking a large batch and want to speed things up). I know it seems like a lot, but you'll need it. 
  11. Heat the oil over medium heat until it reaches 350 degrees (if you don't have a thermometer, let the oil heat up until you think it's hot enough, then make a little test latke. If it browns nicely, it's ready).
  12. Wet your hands with cool water, then form a little patty, using about 1/4 cup latke batter. Press it together in your palm to make sure it's cohesive.
  13. Carefully slide the patty into the bubbling oil.
  14. Working in small batches (you really don't want to overcrowd the pan), repeat with the remaining batter. Depending on the size of your pan, you'll likely cook 5-6 latkes at a time.
  15. Cook the latkes for 2-3 minutes per side, or until they are golden-brown and crispy. Don't be tempted to turn up the heat and rush the process--you'll get latkes that are burnt on the outside and raw inside. Add more oil as necesary.
  16. Once the latkes have finished cooking, transfer them with a spatula to the prepared baking sheets. Once the sheets have filled up, transfer them to the oven to keep them hot.
  17. Serve the latkes hot with applesauce (my go-to is my Orange-Cardamom one) and sour cream (I added a touch of lime juice to my sour cream and it was lovely).  

Perfect Piecrust

  • Prep Time 5 minutes plus 1 hour refrigeration
  • Estimated Cost $3
  • 23 Comments

Welp, I am going to delcare it officially pie season.

I have no problem with storebought piecrust (the kind from Marie Callender's is actually pretty great), but it cannot be overstated that there is just nothing like a homemade piecrust. 

Whether you're making pot pie, empanadas, quichesweet fruit pie, tomato pie, or a custard-filled cream pie, it's cheaper and frankly more delicious to make piecrust at home. And if you have a food processor, it's actually pretty darn easy.

There are a few things to keep in mind when you make piecrust:

1. Have your ingredients totally measured and ready before you start mixing. There are only 4 ingredients in this recipe including the ice water, so this shouldn't be hard. The recipe moves quickly, so you'll want to have everything right there.

2. The colder the better. The cardinal rule of piecrust making colder your butter and ice water, the flakier your crust will be when it bakes. I always keep the butter in the refrigerator until the moment I'm ready to use it, and I start icing down the water well in advance so it has a chance to get really chilly.

3. A food processor is helpful but not required. Home cooks made flaky, buttery pie crusts for centuries before Cuisinart came to town. That said, if you can get your hands on a food processor, it sure makes piecrust making easy.

4. Handle your pie crust gently and quickly. Warm hands warm up the butter, and that is bad. Work fast and use a tender touch to keep this from happening.

I start by combining flour, a pinch of salt and (super cold) butter.

I get the ingredients mixing until they look like buttery sand.

Next the cold water goes streaming in, a little at a time.

Until the dough starts to stick together.

Then onto a floured surface it goes, to be tamed.

At this point, I wrap it tightly in plastic wrap and refrigerate it for at least an hour. Once that's done, it may be rolled out.

This recipe makes enough for two open pies or one pie with a top.

Just trim the excess and re-roll. 

Make pretty, decorative pleats if you wish. Then pre-bake (if necessary for your pie recipe) or simply fill, bake, and serve. 


 If you're as corny as I am, you might say it's easy as pie.

Ingredients

  • 2 cups all-purpose flour, plus more for rolliing Pantry
  • 2 sticks very cold unsalted butter, cut into cubes $3
  • 1 large pinch salt Pantry
  • 3-4 tablespoons ice water

Recipe Serves 6-8

Directions

 
  1. Put the flour, butter, and salt in a bowl of a food processor (or in a mixing bowl).
  2. Pulse until the mixture looks like coarse sand. If you're working by hand, use your hands to work the ingredients together until the mixture resembles coarse sand.
  3. Stream in the water with the machine running, 1 tablespoon at a time, just until the mixture comes together. For me, this usually means 3 to 4 tablespoons. Again, if you're doing this by hand, work in the water 1 tablespoon at a time, until the mixture starts to stick together.
  4. Dump the dough onto a floured surface.
  5. With floured hands, pat it into a circle about 6 inches in diameter.
  6. Wrap the dough tightly in plastic wrap, and refrigerate for at least an hour. You may also freeze it for up to 2 months. When you're ready to use it, defrost it in the fridge overnight.
  7. Once the dough has been refrigerated for at least an hour, it's ready to be rolled, filled, and baked.