BrokeAss Gourmet

BrokeAss Gourmet

Creamy Sweet Potato Leek Soup

  • Prep Time 15 minutes
  • Cook Time 20 minutes
  • Estimated Cost $5.50
  • 12 Comments

You may recall that I am of the somewhat unpopular opinion that regular, starchy potatoes aren't all that great. It's not even a health thing; I just don't get what the fuss is all about. I mean, sure, if they're covered with cheese and other flavorful stuff I can get into them, but even then, it's in a, "hmm, this potato is a viable vehicle for these other things I'd like to put in my mouth right now," not in an, "OMG, please smother me with buttery potato starch immediately" kind of way. They just don't do very much for me. I'd rather have sweet potatoes any day.

So when I got a bushel of beautiful leeks in my CSA box this week, I knew I wanted to make a creamy leek soup, and I also knew that regular potatoes wouldn't be involved. Enter this bowl of farm-fresh magic.

There is very little to this soup, and yet, thanks to a few simple techniques, it tastes like much more than the sum of its parts.

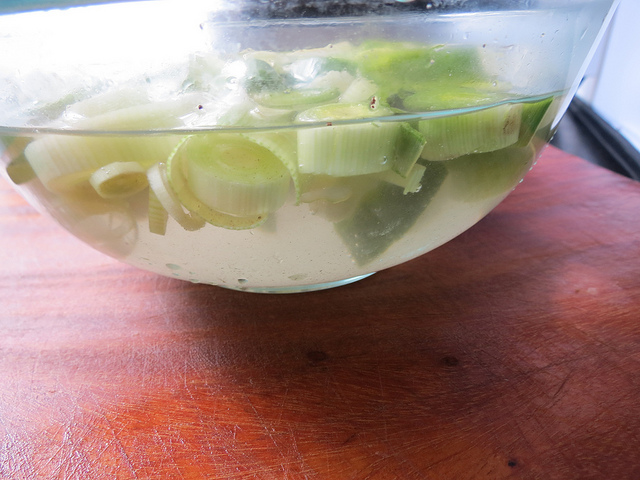
And speaking of techniques, whenever you work with leeks, it's very important to clean them well. I do this by soaking them in a bowl of cool water for 10 minutes, and then rinsing them several times until they're completely free of grime. 

Next, they get melted down in a generous amount of butter until silky and soft, then cooked with sweet potatoes and water. I really could not be easier.

The resulting soup is ultra-creamy, but not heavy as with traditional potato-leek soup. Since I always have half-and-half on hand (for coffee, and every other time I need a creamy element in a dish), that's what I use here, but if you happen to have milk or heavy cream in your refrigerator, any of the above will work. I've even seen a similar soup prepared with soymilk.

I like to reinforce the oniony flavor of the leeks by garnishing each bowl with thinly sliced scallions or chives, but a shower of chopped fresh parsley or thyme would also be lovely.

As a sidenote, if you don't already own an immersion blender, I implore you to consider buying one. They're relatively cheap, and beyond making pureed soups a snap, they're also great for sauces, smoothies, hummus, mincing garlic, onions, ginger and fresh herbs, whipping cream, and so much more. If you have limited funds and limited space in which to cook, this is an investment you should absolutely make. 

Ingredients

  • 3 medium leeks $1.50
  • 2 tablespoons unsalted butter $1 for a stick
  • 3 cups peeled, diced garnet yams (don't by white-fleshed sweet potatoes) $1.50
  • salt and pepper to taste Pantry
  • 1/8 cup milk, half-and-half or heavy cream $1.50 for a pint

Recipe Serves 4

Directions

  1. Rinse the leeks and remove any dirty outer layers.
  2. Cut off the ends of the leeks as well as the dark, tough top leaves, and discard.
  3. Slice the leeks into 1/4" rings.
  4. Fill a mixing bowl with water. Add the sliced leeks, and soak for about 10 minutes. This will help loosen any remaining dirt or sand.                                                      
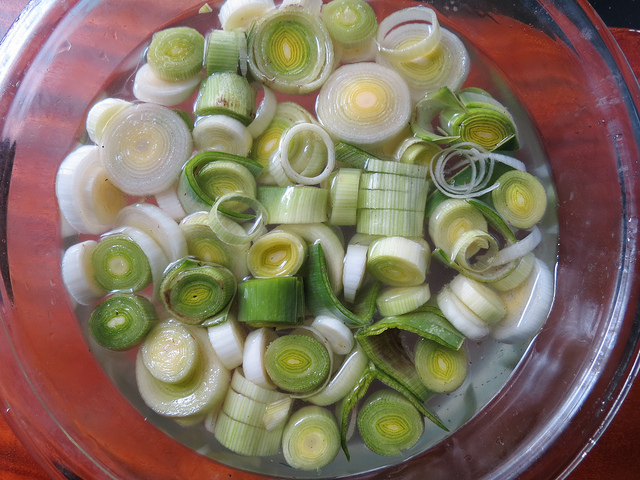
  5. Once the leeks have soaked, drain and rinse them several times until they are completely free of dirt.
  6. Heat the butter in a large soup pot over medium heat.
  7. Add the leeks and reduce heat to medium low.
  8. Stir the leeks to comletely coat them in the melted butter, then let cook, undisturbed for 15 minutes. Make sure they do not brown.
  9. To the pot, add the peeled, diced sweet potato and water to cover.                          
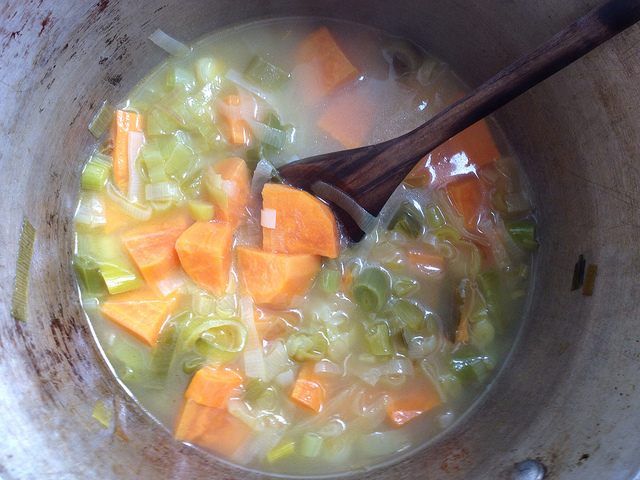
  10. Cover and turn the heat up to high to bring to a boil.
  11. Once the mixture boils, reduce heat to medium low and simmer for 12-13 minutes, or until the sweet potatoes are very soft. 
  12. Remove the soup from heat and use an immersion blender, regular blender or a food processor to puree until completely smooth.                                                       
  13. Add the milk, half-and-half or cream and stir to fully incorporate.                                   
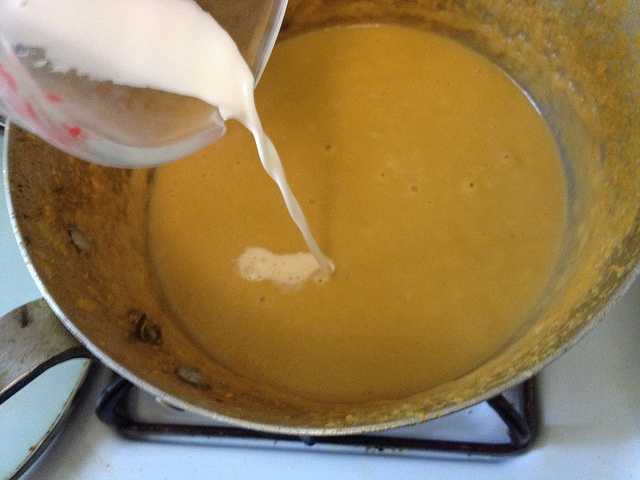
  14. Return to the stove and simmer over medium heat for 3-4 minutes, stirring occasionally, until soup is very creamy.
  15. Season with salt and pepper to taste.
  16. Ladle into bowls and garnish with sliced scallions, if desired.                                   
  17. Serve immediately.

Guacamole Deviled Eggs

  • Prep Time 10 minutes
  • Estimated Cost $5.25
  • 8 Comments

Deviled eggs are kind of having a moment, and for good reason: Not only are eggs inexpensive and highly nutritious, but deviled eggs are gluten-free, paleo and generally vegetarian (sorry, vegans. Here, check out this delicious beet soup). Even better, deviled eggs are super-customizable. Here, I swap out traditional mayonnaise for creamy avocado (which I prefer over mayo on sandwiches anyway), mash it together with my egg yolks and add in classic guacamole flavorings.  

Since these are a riff on guacamole, I mash the filling by hand with a fork, rather than pureeing in a food processor, so as to keep some of those delicious lumps that guacamole is so famous for. If, however, you prefer silky-smooth yolks, feel free to use a blender or food processor.

I love these on their own, as part of an array of appetizers, or atop lightly-dressed greens for a high-protein, low-carbohydrate lunch. Whatever you do, be sure to eat these soon after you make them, since the avocado will start to brown slightly if you wait too long. I don't think it'll be a problem though--I barely got through taking photos of these without devouring them. 

Ingredients

  • 6 eggs, hardboiled $1.50  
  • 1/2 ripe avocado $1.50 for 1
  • 2 green onions, minced $0.50
  • 1 tablespoon minced fresh cilantro leaves (a very small handful)$1 for a bunch
  • 1/4 jalapeño (seeds intact if you like spicy--discard them if not), finely chopped $0.25
  • juice of 1/4 lime $0.50 for a whole lime
  • salt to taste Pantry
  • red pepper flakes Optional

Recipe Serves 2-3

Directions

  1. Let the eggs cool completely after hard-boiling them.
  2. Slice each egg lengthwise and gently pop out the yolks. place the yolks in a bowl and arrange the eggs on a serving platter.
  3. In a mixing bowl, combine the egg yolks, avocado, green onions, cilantro, jalapeño, lime juice, and salt. Use the back of a fork to smash well. (It's OK to leave a few lumps: you want the mixture to be creamy, but not perfectly smooth).
  4. Use a spoon to heap the guacamole mixture into the egg whites. 
  5. Top with a thin slices of lime, jalapeño, and/or red pepper flakes, if desired.

Here's our final Reuse Roundup post! This one comes from Kaitlyn Breedlove, of Durham, NC.

Read on for her tip! I'll announce the Reuse Roundup winner this Monday :)

Kaitlyn Says:

I love your idea of tips to limit waste. We so often waste things that may seem insignificant to us, but with a look work can become something extremely valuable. 

I pretty regularly make homemade Mozzarella cheese.

After the cheese is finished, you are left with a huge pot full of whey. Most people dump it down the drain; the thought of that pains me. Whey is incredibly versatile and can be used in more than just the kitchen which is why I love it so much. Here are a few ways to use it…

 1. Homemade Ricotta cheese - Ricotta is one of the simplest cheeses to make, especially when using whey. Simply heat the whey up to 200 degrees, take it off the heat and allow it to cool to 140 degrees, strain it, and you have Ricotta (I’d suggest looking up more detailed instructions if making it, but that’s the gist of it). 

 2. Add protein to a smoothie/milkshake - I have a smoothie pretty much every morning, and adding whey gives it a boost of protein without having to buy protein powder. 

3. Lacto-fermented Pickles (or other vegetables) - if you’re a fan of lacto-fermented vegetables but usually make them with salt, try making them with whey instead. The fermentation time is usually faster, and you don’t run the risk of getting vegetables that are super salty. 

 4. Water your garden - your vegetable plants will greatly benefit from being watered with whey (just make sure to dilute the whey with water)


5. Substitute for liquids in baking - I have used whey as a substitute for milk and/or water in countless recipes. Breads, muffins, pancakes, you name it. If it has a liquid in it, whey can be substituted at a 1:1 ratio. It tends to give your baked goods a taste more similar to sourdough.

 6. Whey Lemonade - homemade lemonade that has whey in it is full of probiotics and is great for the flora in your gut. There are lots of good recipes for whey lemonade on the web.  

 7. Feed it to your chickens - while this probably won’t apply to a ton of people, for those of us who have backyard chickens whey is a great supplement for chicken feed as it contains a lot of protein. This is especially beneficial when chickens are molting

 There are a ton of other ways to use whey, some of which I have tried and some which I haven’t. From chicken broth substitute, to a substitution for water when cooking rice/oatmeal/quinoa, etc, to skin moisturizer, it seems like whey can be used for just about anything. And it can be frozen and saved for a later date, which is just an added bonus. 

All from a gallon of milk!  


Today's Reuse Roundup post comes from Audrey Dang of Nashville, TN.

I hope her tip inspires you to send me your best kitchen tip(s) for waste minimizing--you could win a Google Nexus 7 tablet and signed copies of both of my cookbooks. Only 1 day left to enter the contest (it ends tomorrow, March 7th)!!

Email tips to gabi@brokeassgourmet.com. 

Audrey says:

Since I share a refrigerator with roommates, it is especially easy for me to forget about ingredients long enough for them to spoil.  To help me remember and encourage me to plan meals, I keep a list of perishable food on my computer desktop. Then, I plan my next meal based on the ingredients or few on my list that are closest to spoiling.  

Right now, the list has avocado, red bell pepper, celery, and sweet potatoes.  I'm thinking about making an egg frittata topped with avocado, your sweet potato and black bean tacos, or potato soup.  If I have multiple ingredients that need to be used up, I do an internet or Pinterest search with the names of the ingredients and the word "recipe" to see if there is a dish that can combine them all.    


Today's Reuse Roundup post comes from Kate O'Neill of Toronto, Ontario.

I hope her tip inspires you to send me your best kitchen tip(s) for waste minimizing--you could win a Google Nexus 7 tablet and signed copies of both of my cookbooks. Only 1 day left to enter the contest (it ends tomorrow, March 7th)!!

Email tips to gabi@brokeassgourmet.com. 

Kate says:

There always seems to be the tail end of something green in my fridge, not enough for a full side dish but to much for the green bin.

I use up the ends of salad lettuce, spinach and other greens in my pasta. About three minutes before the pasta has finished cooking I toss any leftover veggies (cut to the same size for even cooking) into the boiling pasta water. Over the years I have added all types of lettuce, all leafy greens, any colour of pepper, diced carrots, you name it, you can put it in. Think of it as a quick blanche.

Drain with the pasta, toss in the sauce, sprinkle the cheese and enjoy!

Category: Articles

Tags: , ,

Share this Recipe: Share on Facebook Tweet This! Pin it on Pinterest