BrokeAss Gourmet

BrokeAss Gourmet

Cold Cherry Soup

  • Prep Time 0:45 (including fridge time)
  • Cook Time 0:10
  • 8 Comments

It’s hard to say whether this unique soup is, at its core, a starter or a dessert. Its bright fruit flavor is accented by red wine and just touch of honey and mellowed by creamy crème fraiche, making it a perfect pairing for a low-key table red. It’s sweet, but also quite tart.

If you’re serving it as a starter, I say top it with a whisper of cracked black pepper and serve alongside a piece of creamy, pungent cheese. For dessert, maybe add a small scoop of good vanilla ice cream and/or a dark chocolate biscotti.

  • ingredients
  • 2 cups pitted, de-stemmed cherries $3.50 for 2 lbs
  • 1 cup inexpensive red wine $3 for a bottle
  • 1 cup water
  • 2 tsp honey (or more to taste) Pantry
  • 1/4 cup crème fraiche or Greek-style yogurt $4 for 2 cups
Total Cost of Ingredients $10.50

Directions

Combine cherries, wine, water and honey in a medium pot over medium heat. Cover and cook for 8-10 minutes, or until liquid boils and cherries soften. In a food processor or blender, or using an immersion blender, puree the mixture until smooth. Transfer to a heat-proof bowl and refrigerate until cold (at least 30 minutes).

Serve the soup cold in small bowls, wine glasses or shot glasses with the crème fraiche or yogurt swirled in on the top. Garnish with additional cherries, black pepper or mint sprigs, if desired.

Serves 3-4.

Creme Fraiche

Crème fraiche (also known as cultured cream) over fresh blueberries is my new favorite treat. It’s summery, decadent and easy to throw together. However, storebought crème fraiche is kinda pricey, usually around $4-$5 for a tiny container. I knew I needed to figure something out.

So, wannabe-homesteader that I am, I figured out how to make it fresh for less money (and higher quality, if you ask me). Use it to top fruit, granola, tacos, eggs or anywhere you would use sour cream.

Store it in an airtight jar in the fridge for up to 7 days.

  • ingredients
  • 2 cups heavy whipping cream $2.50 for a pint
  • 2 1/2 tbsp buttermilk $1.50 for a pint
Total Cost of Ingredients $4

Stir the cream and buttermilk together gently, place in a glass jar and cover tightly. Allow to sit at room temperature for at least 16 hours, and up to 24. Cream will be very thick.

Once cream has thickened, use immediately or refrigerate until ready to use.

Makes: about 2 cups crème fraiche.

Coconut Flour Blueberry Pancakes

These incredibly fluffy, golden-brown (and gluten-free!) pancakes get their sweetness from just a touch of honey (agave or a few drops of stevia would work well too) and antioxidant-rich blueberries. The basic batter lends itself well to improvisation though. I’ve also made these with fresh strawberries, toasted almonds and even dark chocolate chips.

Note: The key to making these pancakes puff is to make sure to adequately beat the eggs before adding the rest of the ingredients. If you don’t have an electric beater, whisk vigorously by hand for 2 minutes.

  • ingredients
  • 4 eggs $1.50 for 12
  • 1 cup milk (I’ve also used coconut milk with good, more coconut-y results) $1.50 for a pint
  • 2 tsp honey Pantry
  • 1/2 cup coconut flour $5 for 16 oz.
  • 1 tsp. baking powder Pantry
  • 1/2 tsp salt Pantry
  • 1 cup frozen blueberries (fresh work too but are more expensive) $2.50 for 10 oz.
  • butter for frying $1.50 for a stick
Total Cost of Ingredients: $12

Directions

Beat eggs until fluffy (an electric mixer works well for this). Whisk in milk and honey until well-incorporated.

In a separate bowl, combine coconut flour, baking powder and salt. Pour in liquid ingredients and stir just until combined.

Heat a griddle or large frying pan (i find cast iron works best) and melt enough butter to coat over medium heat.

Working in batches, pour batter in 1/8-cup increments (I scraped my batter into a large spouted measuring cup, poured directly into the pan and found it worked well) into the hot buttered pan. Top each batter mound with 8 or 9 blueberries, evenly spaced. Cook until pancakes are brown on the bottom and the edges begin to dry out (2-3 minutes—these take a bit longer to cook than regular pancakes). Gently flip and cook until the other side is golden-brown.

Serve hot with butter, syrup, honey, jam or on their own.

Serves 2-3.

This is not a health blog.

(I mean, obviously.)

Still, since I write the material in it and I’m the one who generally eats the results of its posts, it does tend to reflect the food/health choices I’m making at the time of each entry. Lately, you might have noticed (or, you may not have—very few people have actually said anything to me about it) that I’ve been focusing a bit on grain-free, high-protein dishes. Maybe you thought this was cool (one of my health heroes, Mark Sisson did!), maybe you were left longing for carb-ier days.

Here’s my deal: I cook, eat and write for a living. It’s awesome and I wouldn’t trade it for any other career. I am absurdly lucky to get to live my dream and make money doing it. That said, such an occupation has the potential to wreak havoc on one’s waistline. The more opportunities come my way, the more I have to cook, eat and write to keep up. I’m an avid runner, but as I’ve gotten older I’ve found that burning calories isn’t always enough.

So for about a month now, I’ve been experimenting with reducing my grain intake, increasing the amount of protein I eat and adding even more vegetables to my already veggie-heavy diet. I’m sorta-kinda following The Primal Blueprint, but in a very flexible, dairy-embracing kind of way. The results? Well, it’s still early, but I gotta tell you, my energy levels have been awesome, my skin is incredibly clear and I’ve even lost a few pounds.

That said, my mantra, when it comes to food and health (as well as a whole lot of other things in life) is moderation, moderation, moderation. No food is inherently bad, you just have to exercise control and not eat it all the time. This is by no means the end of breads, ice cream or pasta on this site—just the introduction of something new.

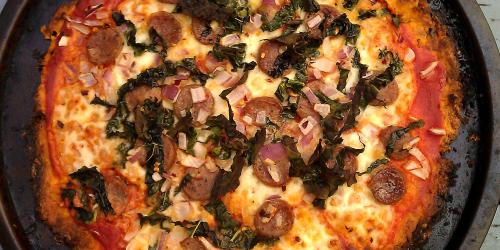
But anyway, on to the pizza! Even if you aren’t into the sort of eating I’m doing these days, you’ll love this recipe. Roasted, mashed cauliflower makes for a slightly nutty, flavorful pizza base (it’s different from regular pizza dough, but still very yummy). I adore this topping combination—the spicy Andouille sausage goes nicely with the mellow mozzarella, and the kale crisps up, adding a nice crunch. The cauliflower base is great for pretty much any other topping combination you can think of though, so feel free to get creative!

  • ingredients
  • extra virgin olive oil Pantry
  • 1 head cauliflower, cored and cut into florets $1
  • 2 cloves garlic, minced Pantry
  • 1/4 tsp salt Pantry
  • freshly-ground pepper Pantry
  • 1 egg $1.50 for 12
  • 2 cups shredded mozzarella cheese, divided $3.50
  • 1/2 cup tomato sauce $1.50 for a 15-oz can
  • 1 Andouille sausage, sliced into thin rounds $1.50
  • leaves from 2 stalks Tuscan kale (or 1 stalk Dino kale), sliced very thinly $1.50 for a bunch
  • 2 tbsp finely-chopped onion (about 1/8 medium onion) $0.50 for a whole onion
Total Cost of Ingredients $12

Directions

Preheat oven to 450 degrees F. Brush a baking sheet generously with olive oil.

Spread the caulflower on the baking sheet and roast for 18-20 minutes, until soft and slightly browned. Use a potato ricer or food processor to mash cauliflower until it resembles mashed potatoes. Reduce oven to 400.

Transfer mashed cauliflower to a mixing bowl and add garlic, salt, a few grinds of the pepper, the egg and 1 cup of the shredded mozzarella. Stir well to for a very soft “dough.”

Brush another baking sheet (or pizza pan) with more olive oil and use clean, wet hands to pat your cauliflower “dough” into a 10” circle. Brush circle lightlty with olive oil.

Bake pizza crust for about 20 minutes, until golden brown and slightly crisp.

Spread a thin layer of sauce (no need to use it all if you don’t want to) over the crust, leaving a 1/2” border plain. Top with the remaining cup of shredded mozzarella, followed by the sausage slices, kale and chopped onion.

Bake for 23-25 minutes, or until crust is golden-brown and cheese is bubbly.

Let cool slightly before cutting into wedges and serving.

Serves 3-4.

Kimchi

I fell in love with kimchi several years ago when an old boyfriend took me to his favorite Korean restaurant in Boston. I was a vegetarian at the time, and so was less-than-enthralled by the array of char-grilled meats before me (don’t worry, I have since seen the light), but I was enraptured by the seemingly endless little bowls of condiments and nibble-ables, the tastiest of which, I thought, was spicy fermented cabbage or kimchi. Since moving to San Francisco, I’ve been buying kimchi for some time, always too intimidated to make it. Finally, after a Korean friend clued me in that it’s actually pretty simple to prepare at home, I decided to stop dropping $6-$10 every week on my beloved kimchi and learn to make it myself.

I adapted this from David Leibovitz’s reliable recipe, making this one purely from cabbage and not also daikon and green onions as he did, but I’m thinking that maybe next week I’ll try adding them in for a little variety.

Note: Hit up your local Asian grocery store for the best variety and prices on cabbage, Sambal Oelek and fish sauce.

  • ingredients
  • 1/2 cup salt Pantry
  • 1 gallon water
  • 1 large Chinese or Napa cabbage, cored and sliced $0.50
  • about 10 cloves garlic, peeled and minced Pantry
  • 1 1” piece ginger, peeled and minced 0.50
  • 1/4 cup Sambal Oelek or Korean chili paste $2 for 8 oz.
  • 1/4 cup Asian fish sauce $2 for 16 oz.
  • 1 tsp honey Pantry
Total Cost of Ingredients $5

Directions

In a very large container (or smaller containers) dissolve the salt in the water. Submerge the cabbage into the salt water and weight it down with a plate or frying pan (so it stays submerged). Let cabbage soak for 2 hours.

A few minutes before the cabbage finishes soaking, combine the minced garlic and ginger, the Sambal Oelek or Korean chili paste and honey in a large bowl. Stir well to combine.

Once the cabbage has finished soaking, drain, rinse it and squeeze it gently to remove excess liquid.

Use your hands (wear gloves or use tongs instead if you have any open cuts as the chilies and garlic can sting) to thoroughly incorporate the chili mixture with the cabbage.

Pack the kimchi into a 24 or 25 oz. jar (I used an old, scrubbed-clean tomato sauce jar) and screw the lid on tightly. Set in a cool, dry place, out of direct sunlight (my pantry worked well for this) for 3-4 days. After 3 days, open the jar and look for tiny bubbles. If it’s begun to bubble, it’s ready to serve or to be refrigerated. If it hasn’t yet begun to bubble, leave it for another day. After 4 days, you should notice a few tiny bubbles throughout the jar and can either serve your kimchi or put it in the refrigerator.

The kimchi will continue to ferment in your refrigerator. I find that after 3-4 weeks, it’s a bit too fermented for me, so I try to eat it within that time (it’s usually gone before then anyway).

Makes about 22 oz. kimchi.