BrokeAss Gourmet

BrokeAss Gourmet

My friend Randy Clemens wrote an absolutely epic cookbook last year, The Sriracha Cookbook featuring creative and well-written recipes, all of which contain (you guessed it!) the infamous spicy “rooster sauce,” Sriracha. There is a recipe in the book for one of the most extraordinary burgers I have ever had, The Ultimate Sriracha Burger. The Sriracha-infused beef is spicy and incredibly flavorful, and it’s topped with a creamy blue cheese-sriracha sauce, crisp bacon, Swiss cheese, arugula and caramelized onions cooked in bacon fat.

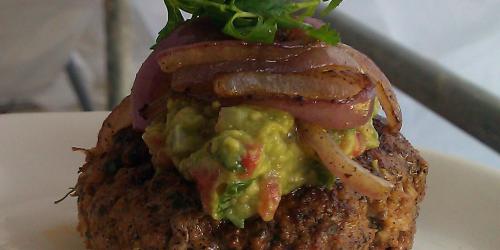
It’s a burger you are unable to forget (and subsequently fantasize about eating again immediately). I wanted to take its essence and translate it into an easier-to-make, weeknight burger (also, I had no bacon or blue cheese dressing, which Randy’s recipe calls for). So I caramelized my onions in butter instead of bacon fat and made fresh guacamole instead of the blue cheese sauce. It was different from the original for sure, but still really, really delicious. I served these bunless, but these would definitely be good on buns or even wrapped in butter lettuce, like a Thai lettuce wrap.

  • ingredients
  • 2 tbsp butter $1 for a stick
  • 1 medium onion, half sliced thinly, half diced finely $0.50
  • 1 lb ground beef (80/20 is fine) $5
  • 2 tbsp Sriracha (or more if you it extra-spicy) $2.50 for 17 oz.
  • 2 tbsp soy sauce Pantry
  • 1 handful fresh cilantro leaves, chopped finely $1 for a bunch
  • 3 cloves garlic, minced Pantry
  • 1 tsp freshly-ground black pepper Pantry
  • 1/2 recipe guacamole $3.50
Total Cost of Ingredients: $13.50

Directions

Preheat a grill, grill pan or cast iron frying pan over medium-high heat.

Melt butter in a medium frying pan over medium-low. Add the sliced onions and cook for 18-20 minutes, until caramelized.

While onions cook, combine the chopped onions, beef, sriracha, soy sauce, cilantro and garlic. Use your hands to mix well and form into 4 equal-sized patties.

Cook the burgers to desired doneness and serve (on buns if desire, over mixed greens or alone), topped with a generous dollop of guacamole and a few caramelized onions (as pictured).

Serves 4.

Banana-Walnut Flax Pancakes

Seriously, you can keep your sugary, carb-laden, white flour pancakes. My shrinking waistline and I will stick with these naturally yummy, Paleo/Primal-friendly, gluten-free ones.

  • ingredients
  • 1 cup flax seed meal $3 for 16 oz.
  • 2 tsp baking powder Pantry
  • dash of salt Pantry
  • 2 tsp cinnamon $1.50 for 1 oz.
  • 2 tsp vanilla extract $4 for 4 oz.
  • 2 bananas, peeled and mashed $0.50
  • 4 eggs, lightly beaten $1.50 for 12
  • 2 tbsp melted butter (use coconut oil if you’re avoiding dairy), plus more for frying $1 for a stick
  • 1/2 cup chopped walnuts $1.50 (buy in the bulk section)
Total Cost of Ingredients $13

Directions

Preheat a nonstick griddle or large frying pan over medium-low heat.

In a mixing bowl, combine flax seed meal, baking powder, salt and cinnamon. Stir well to combine.

Whisk in the vanilla, mashed bananas, eggs and melted butter (or coconut oil). Fold in the walnuts.

Scrape batter into a large spouted measuring cup.

Melt a couple of teaspoons of butter or coconut oil in the preheated griddle or frying pan. Working in batches, cook the batter in 1/8-cup increments, a few at a time, for 3-4 minutes on each side (they take a bit longer than regular pancakes). Cooked pancakes may be kept warm in a 200 degree (F) oven.

Serve hot, with butter, honey, maple syrup, jam, yogurt or plain.

Serves 2-3.

On Saturday night, Dominic and I tried Beast and the Hare for dinner. It was, in a word, extraordinary, not to mention an incredibly good deal, considering the quality of the food, the high level of personalized service and the fact that we ordered a bottle of wine to go with our meal.

The first course we ordered was a plate of deviled eggs. Chilled, hard-cooked egg whites were filled with creamy, vaguely chili-scented yolk filling and topped with the tiniest, most perfect cubes of pickled beet. The rest of our meal was delicious (rocket salad with peaches and ricotta, a whole roasted fish for 2 over creamy white beans), but the eggs, though quite simple, stood out to me as the very best part of it.

Wanting to use up my homemade crème fraiche and having a gorgeous, sweet-smelling red bell pepper from Saturday morning’s visit to the farmers market, I got to puttering and this is what I came up with. The creamy filling, deepened by the rich tomato paste almost tastes like it contains butter. It’s difficult to not eat these by the platter.

Note: When garnishing the eggs, try to think of each one as an individual art project. Use a very light touch and pay attention to detail—it will pay off in the final result.

  • ingredients
  • 6 eggs, hard-boiled, peeled and halved lengthwise $1.50 for 12 eggs
  • 1/2 cup crème fraiche (or sour cream) $4 for 2 cups
  • 2 tbsp tomato paste $2.50 for a 3-oz. tube
  • 1 tbsp extra virgin olive oil, plus more for garnish Pantry
  • few dashes of cayenne pepper, plus more for garnish $1.50 for 1 oz.
  • salt and pepper to taste Pantry
  • 1 or 2 strips of red bell pepper, cut into a tiny dice $1 for a whole bell pepper
Total Cost of Ingredients: $10.50

Directions

Using the back of a fork, mash the egg yolks until all the lumps have been broken up. Stir in the crème fraiche or sour cream, tomato paste, olive oil, cayenne pepper, salt and pepper. Stir until smooth and completely combined.

Use a rubber spatula to scrape the yolk mixture into a plastic sandwich bag. Snip a 1/4” off of one of the corners of the bag and push the yolk mixture down, so you have a makeshift pastry bag (or use a regular pastry bag if you have one). Pipe the yolk mixture into the empty egg whites neatly and decoratively. Chill until ready to serve or continue with garnishing (if you’re going to serve them immediately following garnishing).

Just before serving, garnish each deviled egg with the following, in the order listed: a few drops of olive oil, a tiny dollop of crème fraiche or sour cream, a tiny dash of cayenne pepper and 1 or 2 pieces bell pepper.

Makes 12 deviled eggs.

Ohmigoodness. These are so, SO good.

Best of all, they have no gluten and only a little bit of sugar. You can make them with any ripe fruit, but I found the gorgeous peaches available at my farmers market to be just perfect.

  • ingredients
  • 6 tbsp unsalted butter, melted, plus more for greasing the tins $1 for stick
  • 1/2 cup coconut flour $5 for 16 oz.
  • 1/2 tsp salt Pantry
  • 1/2 tsp baking powder Pantry
  • 6 eggs, lightly beaten $1.50 for 12
  • 2 tbsp honey Pantry
  • 1 tsp vanilla extract $4 for 4 oz.
  • 1/2 cup cold heavy whipping cream $2 for a half-pint
  • 2 ripe peaches, pitted and sliced $1.50
Total Cost of Ingredients: $15

Directions

Preheat oven to 400 degrees F. Lightly grease 10 regular-sized muffin cups in a tin and set aside.

Sift together the coconut flour, salt and baking powder into a mixing bowl. Stir in the 6 tbsp melted butter, the eggs, the honey and the vanilla, until just combined (do not overmix). Scrape into the 10 prepared muffin cups and bake for 12-15 minutes, or until golden-brown and firm to the touch.

While shortcakes bake, whip the cream to stiff peaks. Refrigerate until ready to use.

Remove shortcakes from tin and let cool to room temperature (about 20 minutes).

To serve, split shortcakes in half using a serrated knife. Top each half with a large dollop of whip cream and several peach slices. If you need further sweetness top with drizzle of honey.

Serves: 4-5.

Steamed Chicken Nori Rolls

Cutting back my grain intake has surprised me in that it has actually been pretty easy. I don’t crave breads, pastas or pastries nearly as much as I expected to. Once I stopped eating them, I stopped wanting them. Overall, I’m feeling good.

There is, however, one carb-y thing I have been missing hardcore: dim sum. Potstickers, dumplings, egg rolls—you name it. I’ve long loved going out for dim sum on weekend mornings, indulging in the flavorful, bite-sized, dough-wrapped treasures by the plateful. But, in the name of good health (and, awesomely clear skin), I’m not partaking these days. Still, I had to do something about the craving, so after a few failed experiments, I finally came up with this delicious dim sum-stand-in. Steamed nori becomes chewy and soft—its flavor even deeper. The basic chicken-veggie filling I used can definitely be tinkered with. Feel free to fill these with your favorite dim sum combination—shrimp and garlic, BBQ pork, fresh chives and spinach—you name it.

  • ingredients
  • oil for frying (I used olive—coconut would work well also) Pantry
  • 1/2 medium onion, chopped $0.50 for a whole onion
  • 2 cloves garlic, minced Pantry
  • 1 red bell pepper, chopped finely $1.50
  • 1 boneless, skinless chicken breast, chopped into 1/2” pieces $3
  • 2 cups kale or spinach leaves, chopped $1.50 for a bunch
  • 1 small (1/2” piece ginger, minced or grated $0.50
  • 2 tbsp soy sauce Pantry
  • juice of 1 lime $0.50
  • 8 sushi roll-sized sheets nori $1.50 for 10
Total Cost of Ingredients $9

Directions

Heat 2 tsp oil in a large nonstick frying pan over medium heat. Add the onion and garlic and cook for about 2 minutes, until very fragrant. Add the bell pepper and chicken and cook for 2-3 minutes, until chicken begins to turn white. Add the kale or spinach and cook until it begins to break down (this will take longer than kale than spinach). Stir in the ginger, soy sauce and lime juice and cook until mostly absorbed, about 3 minutes. Transfer mixture to a cool plate and refrigerate until it has reached room temperature. Do not wash frying pan, as you’ll be using it again shortly.

To assemble rolls, Lay a nori sheet on a clean, dry surface with the short side closest to you. Make a little mound with about 3 tbsp filling and roll up, tucking in the ends of the nori sheet, as though making a little burrito. Use a little bit of water to seal the edges if necessary. Repeat with the remaining mixture and nori.

To cook, heat the frying pan over medium heat. Place the rolls in the center of the hot pan (not touching each other—work in batches if you have to) with about 1/8 cup water. Cover immediately and allow the rolls to steam for about 2 minutes. Uncover and cook for another minute or so, to encourage any excess water to evaporate.

Serve rolls immediately, sprinkled with sesame seeds if desired.