BrokeAss Gourmet

BrokeAss Gourmet

Well hello there, it’s good to see you. I realize it’s been awhile.

See, last week I went to Portland, Oregon for my cousin Christine’s wedding. I came home on Sunday and was then promptly joined by my best friend Caitlin, visiting from Nashville with her boyfriend Dale. So yeah, I haven’t been doing much cooking. I’ve been doing plenty of eating—too much, maybe—but little actual cooking.

So, as you can see, I’m starting slowly. In an effort to get back on track with the lower-carb eating I’ve been having so much success with lately, I figured a simple egg dish would be a a good way to ease back in to regular stove time. If you aren’t watching your carb intake then, by all means, serve this with buttered rye toast.

Note: if you keep kosher, use beef salami instead of the regular salami, oil instead of the butter and water instead of the half-and-half or milk.

  • ingredients
  • 1 1/2 tbsp butter $1 for a stick
  • 1/2 small onion, sliced thinly $0.50
  • 6 eggs $1.50 for 12
  • 2 tbsp half-and-half or milk $1.50 for a pint
  • about 12 thin slices salami, quartered $4.50 for 10 oz.
  • salt and pepper to taste Pantry
Total Cost of Ingredients $9

Directions

Melt butter in a large frying pan over medium heat. Reduce heat to medium-low, then add onions and let cook for 10-12 minutes, stirring very occasionally, until they caramelize.

While the onions cook, whisk the eggs and half-and-half or milk together. Set aside.

Turn heat up to medium and add the salami. Cook for about a minute, then add the egg mixture. Cook eggs, moving them around in the pan occasionally to scramble them. Once the eggs have set, the dish is cooked. Season with salt and pepper to taste.

Serve hot, alone or with rye toast.

Serves 2-3

If you or someone you love has not yet learned to appreciate kale and/or broccoli steamed or sauteed lightly, topped with little more than a squeeze of lemon juice and some salt and pepper, this recipe is for you. It’s essentially the classier version of broccoli with cheese sauce.

Or, if you, like me, already appreciate simply-prepared broccoli and/or kale and just really like decadent, mac-and-cheese-esque preparations of vegetables, this dish is also for you.

It’s substantial enough to serve as a vegetarian entree, but would also be good served, in a smaller quantity, alongside grilled meat.

  • ingredients
  • 2 medium heads broccoli, florets and stem chopped $1
  • 3 cups kale leaves, chopped (about 1/3 bunch Tuscan kale or 4 leaves Dino kale $1 for a bunch
  • 1 tbsp olive oil Pantry
  • 2 cloves garlic, chopped Pantry
  • 1/2 medium onion, chopped $0.50 for a whole onion
  • 2 cups heavy cream $2.50 for a pint
  • few pinches nutmeg $1.50 for 1 oz.
  • 3/4 cup sharp white cheddar cheese, shredded, plus more for topping $3.50 for 8 oz.
  • salt and pepper to taste Pantry
  • 1/2 cup raw almonds, chopped/crushed $2 (buy in the bulk section)
Total Cost of Ingredients $12

Directions

Preheat the oven to 400 degrees F.

Bring a large pot of lightly-salted water to a boil and add the kale and broccoli. Cook for 4-5 minutes, so they’re tender-crisp and retain their green color. Drain and rinse under cool water. Set aside.

Heat the olive oil in a medium pot over medium heat. Add the garlic and onion and cook for 3-4 minutes, until very fragrant. Stir in the cream and nutmeg and continue to cook, stirring occasionally, until slightly thickened, 3-4 minutes. Add the cheese, stir to melt and season with salt and pepper to taste. Remove from heat.

Stir the cooked broccoli and kale into the cream sauce and combine well. Divide between 4 ramekins or oven-proof bowls. Top each with a few pinches of cheese and a sprinkle of the almonds.

Bake for 22-25 minutes, until golden-brown and bubbly. If desired, place under a broiler set to high for 1-2 minutes to create more of a crusted top.

Let cool slightly, then serve.

Serves 4.

Preserved Lemons

I initially set out to learn how make these because I recently got a tagine and nearly every recipe I found to use with it called for preserved lemons as a garnish. I found a small jar of them at a specialty grocery store for $7.99—which seemed sort of steep to me for what were essentially pickled lemons. I read the ingredients on the back of the jar and found they contained nothing more than lemons, lemon juice and salt. Back on the shelf they went and home I went to try to figure out how to make them myself.

Turns out, it’s easy. All you need is Meyer lemons (regular lemons will work but the peels won’t be as tender or sweet as with Meyer lemons) and kosher salt. And patience, because it’s at least 3 weeks until they’re ready (they’re really better after 4 though).

I’ve been using them all week—sliced thinly in tagines or curries, chopped and mixed with a little mayonnaise, cilantro, garlic, salt and pepper for a flavorful aioli or sliced very thinly and stirred into Greek yogurt with a little honey. They’re great—I’ll be making a much bigger batch immediately so I’ll always have some on hand.

  • ingredients
  • 8 Meyer lemons (choose carefully—you don’t want any with brown spots). $4
  • Kosher or sea salt Pantry
Total Cost of Ingredients $4

Directions

Sterilize a pint-size mason jar with a fitted lid by dunking it, lid and ring unscrewed) in boiling water for a few minutes. Remove carefully and do not touch until it’s time to pack the lemons in.

Slice about 1/4” off of the end of each lemon.

Juice 3 of the lemons and set juice aside.

Score the remaining lemons into quarters lengthwise, through their skin, but don’t cut through the flesh inside. Do the same thing around the circumference of the lemon, so it there are 8 attached segments.

Rub the lemons generously with salt inside the skin you can touch without pulling the lemons apart (be careful if you have any open cuts on your hands, as lemons + salt = ouch!).

Place a couple of lemons into the bottom of the prepared jar. Sprinkle with 2 tbsp of the salt and 1/3 of the lemon juice.

Add 2 more lemons to the jar, using your hands to squish them down over the first two tightly. Top with 2 tbsp salt and another 1/3 of the lemon juice.

Add the final lemon, squishing again, and topping with 2 more tbsp salt and the remaining lemon juice.

Cover with the lid and ring and screw tightly and give it a good shake to distribute picking liquid. Place out of sunlight (my pantry worked well for this for 3 days. Once or twice per day, pick up the jar and turn it over or give it a shake to redistribute liquid.

After the 3 days, place in the refrigerator for at least 3 weeks (4 is better), continuing to give the jar a shake ever couple of days.

Once the lemons have been preserved, gently remove the peels from the flesh in the increments you would like to use them, leaving the remaining lemons in the jar (they’ll keep for up to 6 months).

Once you have used up all the lemons, the syrupy liquid left in the jar can be used as a delicious flavoring agent in soups, curries, tagines, etc.

Makes 1 pint preserved lemons.

Category: Meals

Share this Recipe: Share on Facebook Tweet This! Pin it on Pinterest

As I’ve mentioned before, I don’t really like to cook for men I am dating (or trying to date), at first, anyway. For most people, “let’s cook together” is code for “let me prove to you that I have mad care-taking, domestic skillz, and then let’s make out on my couch.” But I covered that part (the skillz part, anyway) when you asked me what I do for a living; you know I can cook—it says so on the business card I gave you when we met. And I totally do want to make out on your couch, but frankly, I have been cooking all day for work, and the last thing I want to do at night is attempt to keep my mascara from running while chopping onions and flirting with you. Let’s just go out instead.

That said, dating me (or any food professional) is not without benefits. Once you have proven that your interest in me extends beyond my kitchen abilities, I will gladly tie on an apron (I’ll wear a cute one, just for the occasion) and make you a meal that will blow your mind. No, I don’t need assistance—you just bring a bottle of wine and chat with me while I stir (also, I don’t want to blow my chances with you by revealing too early my teeny-tiny little tendency to totally micromanage the way you chop garlic—trust me, it’s better if you don’t help).

So here’s what’s going to happen. You’ll arrive at my house with the aforementioned bottle of wine. Upon entering, you will smell the most luxurious, intoxicatingly delicious fragrance ever. You are going to fall in love with me just a little bit before you even get halfway down the hallway leading to the kitchen because the scent is just going to be that good. You’ll come into the kitchen, where I will have some warm, crusty bread waiting (probably some Boucheron and a little fig jam as well), and farmers market-fresh veggies ready to saute in butter. I’ll have a couple of steaks grilling and on the stove, you’ll see the source of the heavenly aroma wafting throughout my apartment: a little saucepan of something magical. You will wonder what this aphrodisiac-in-a-pot is, and when we finally sit down for dinner and I spoon its contents over our perfectly-grilled steaks you’ll be blown away by my skills (skillz). You’ll want to go make out on the couch right away, but I’m classy and so I’ll at least insist we finish our dinner first.

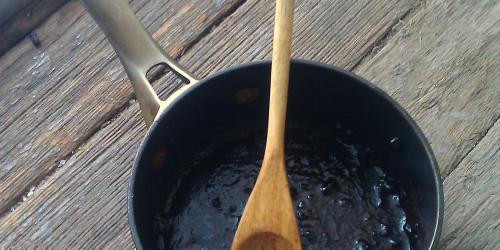
And here’s the thing about that good-smelling concoction: it’s just a bunch of stuff dumped into a pot and cooked until it has reduced down to a thick, buttery, savory-sweet liquid. Also, it only cost me about 4 bucks.

Because, yeah, not only am I a really good cook, I’m awesomely clever too.

  • ingredients
  • 3 tbsp unsalted butter $1 for a stick
  • 2 shallots, chopped finely $0.50
  • 1 bottle inexpensive red wine $2.50
  • 2 tbsp balsamic vinegar Pantry
  • salt and pepper to taste Pantry
Total Cost of Ingredients $4

Directions

Melt the butter in a small pot over medium-low heat and add the chopped shallots. Cook for 7-8 minutes, allowing them to caramelize.

Pour in the wine and and continue to cook for 25-28 minutes, until the contents of the pot are about 1/4 what they were when you began. Add the balsamic vinegar and cook for another 5-6 minutes. Season with salt and pepper to taste and use (over grilled beef, pork or chicken) immediately.

Serves 2-3.

Confession: I bought a bunch of beautiful, fragrant yellow tomatoes last weekend at the Noe Valley farmers market and promptly forgot about them. I should really be punished—seriously, it’s a crime against summer produce. They should have been eaten immediately, at room temperature, drizzled with extra virgin olive oil and a pinch of salt, or cut into fat slices and served with fresh basil and medallions of mozzarella di bufala. What they shouldn’t have done, is wilt in a basket on my kitchen table, only to eventually be transferred to my fridge where they would continue to wilt, though slightly more slowly, thanks to the cold.

Another day or two, and they would have begun to mold and would have had to be composted.

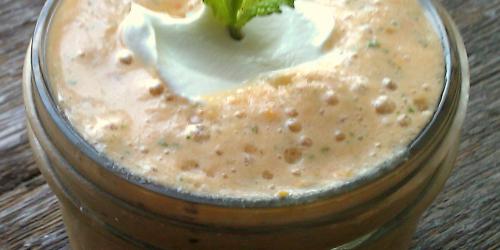
Fortunately, this afternoon, I thought of this soup, sort of a raw cream of tomato soup/gazpacho hybrid. If you don’t have fresh mint, fresh basil or cilantro could be substituted for different but equally good results.

  • ingredients
  • 3 cups cored, chopped, very ripe yellow (or any color) tomatoes (about 4 medium-sized yellow tomatoes) $3.50
  • 2 cloves garlic, minced Pantry
  • 1 tbsp extra virgin olive oil Pantry
  • 2 tbsp plain yogurt or sour cream, plus more for garnish $1.50 for 8 oz.
  • 1 handful fresh mint leaves, plus more to garnish $1 for a bunch
  • 1/4 tsp each salt and pepper Pantry
Total Cost of Ingredients $6

Directions

Combine all ingredients in a blender or food processor and pulse until smooth. Serve immediately or chill until ready to serve.

Serve soup in bowls or glasses, garnished with a dollop of yogurt or sour cream and a sprig of mint.

Serves 3-4.