BrokeAss Gourmet

BrokeAss Gourmet

Black Bean and Cheese-Stuffed Arepas

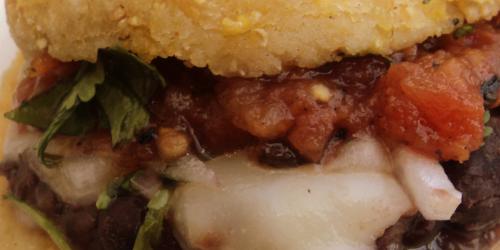
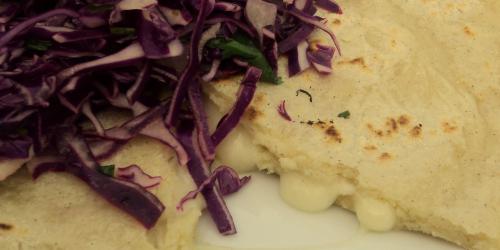
Arepas, little fried cornbread rounds stuffed with a plethora of different fillings, are popular fare in Venezuela and Colombia. My friend Diane has been asking me to make them for quite awhile and this lovely afternoon I finally got around to it.

Feel free to get creative with your fillings. Next time I might add chorizo, sour cream and/or sliced avocado.

Note: Arepa flour is precooked corn flour, not to be confused with masa harina. It is sometimes called masarepa, harina precocida, or masa al instante. Look for it at Latin American grocery stores or well-stocked grocery stores in the Latin foods section.

  • ingredients
  • 3 1/2 cups arepa flour (see intro) $2.50 for 4 lbs oz.
  • pinch of salt Pantry
  • 3 cups warm water
  • olive or vegetable oil Pantry
  • 2 cup canned black beans, drained and mashed with the back of a fork (or used refried black/pinto beans) $1.50 for 15 oz.
  • 1/2 cup shredded jack, cheddar or queso blanco cheese $3.50 for 8 oz.
  • 1/2 red onion, chopped $0.50 for a whole onion
  • 1 handful fresh cilantro leaves $1 for a bunch
  • your favorite hot sauce or salsa, optional
Total Cost of Ingredients $9

Directions

Mix together arepa flour, salt and water to form a very soft dough.

Spread a little arepa flour on a flat surface and knead the dough lightly for 4-5 minutes.

Wet your hands and form into about 8 3” disks, about 1” thick. Set on a clean plate.

Heat about 1/4” oil in a large frying pan (preferably nonstick) over medium-high heat and fry the arepas for 2-3 minutes on each side, until a crisp crust forms.

Preheat the broiler to high.

Split the arepas in half, as you would an english muffin (gently running a knife along the edges helps). Spread a few spoonfuls of beans on one half and top with a few pinches of cheese.

Place the split-open arepas halves (both the bean-and-cheese-topped ones and the plain ones) under the broiler and toast lightly until the cheese is bubbly and melted.

Top the bean/cheese halves with the chopped onions, cilantro and salsa or hot sauce if desired.

Serve immediately.

Makes 8 arepas (serves about 4).

Category: Meals

Tags: , , ,

Share this Recipe: Share on Facebook Tweet This! Pin it on Pinterest

Curried Chicken-Cheddar Turnovers

If it weren’t pouring here in San Francisco, I would pack cheesy, savory little treats, along with some fresh fruit and a 6-pack of PBR into a picnic basket and head to the park for a picnic. Since, however, the weather is refusing to cooperate, I will have to do so in the living room of my apartment.

The people-watching isn’t great, but you can’t beat the proximity to the bathroom.

  • ingredients
  • 1 medium sweet potato, peeled cubed, cooked and smashed (about 1 1/2 cups) $0.50
  • 1 large chicken breast, cooked, cooled and chopped $2.50
  • 1/4 cup frozen green peas $1.50 for 10 oz.
  • 1/2 cup shredded sharp cheddar cheese $3.50 for 8 oz.
  • 3 scallions, chopped $1 for a bunch
  • 2 1/2 tbsp curry powder $1.50 for 1 oz.
  • salt and pepper to taste Pantry
  • 1 1/2 cups all-purpose flour, plus more for pan and for rolling Pantry
  • 1 tsp salt Pantry
  • 1 stick (4 oz) very cold butter, cut into small pieces $1
Total Cost of Ingredients $11.50

Directions

Preheat oven to 375 degrees F. Lightly flour a baking sheet and set aside.

In a mixing bowl, combine mashed sweet potato, chicken, green peas, cheese, scallions, curry powder and salt and pepper to taste Set aside.

Combine flour and salt in a bowl or food processor. Cut in the butter, using 2 forks (or by pulsing the food processor), Stream 1/4 cup ice water (or more, as needed) just until the dough comes together. Refrigerate until ready to use, or immediately turn out onto a lightly floured surface.

Divide the dough into 4 balls and roll each one out on a lightly floured surface into an 6” circle.

Place 1/4 filling on one half of a dough circle and fold dough over, to make a half-moon. Pinch edges gently, to seal. Dip a fork in a bit of flour and gently press the back of it against the seal to create a scalloped edge. Transfer to prepared baking sheet. Repeat with remaining dough and filling.

Use a sharp knife to make a cross (or other design) on the top of each turnover. This will allow air to escape and keep turnovers from bursting in the oven.

Bake for 27-30 minutes, or until turnovers are golden brown and crisp.

Serve warm.

Makes 4 turnovers.

Mac-and-Cheese-Stuffed Acorn Squash

OK, I know I’ve done the squash-mac-and-cheese-thing before. Twice, actually.

But seriously, how freaking cute are these?

Green winter squashes, filled to the brim with creamy, brown-buttery, sage-y mac and cheese, all topped with more bubbly cheese and crisp bread crumbs? Serve these as a side dish and everyone will ignore everything else on their plate, so it’s probably best to just go ahead and call them the main event.

  • ingredients
  • 1 cup macaroni elbows $1.50 for 14 oz.
  • 2 medium-sized acorn squashes, cut in half, lengthwise $2.50
  • 2 tbsp unsalted butter $1 for a stick
  • 2 tbsp all-purpose flour Pantry
  • 1 cup milk $1.50 for a pint
  • 1 cup shredded cheddar cheese, plus a few extra pinches for garnish $3.50 for 8 oz.
  • 4 sage leaves, chopped finely, plus more for garnish $1 for a bunch
  • few dashes of nutmeg $1.50 for 1 oz
  • salt and pepper to taste Pantry
  • 1/8 cup bread crumbs $2 for 12 oz.
Total Cost of Ingredients $14.50

Directions

Preheat oven to 375 degrees F.

Cook the pasta in salted boiling water according to package directions. Drain and return to pot. Set aside.

While pasta cooks, use a metal spoon (or a serrated spoon, if you have one) and scoop most of the flesh and seeds out of the squash halves, leaving about 1/2” in the skin (this is a little tricky and takes a bit of time, but is an important step). Discard the seeds and transfer the pieces of squash a medium pot.

Cover squash with water and cover pot with a lid. Turn heat to medium-high heat and cook, covered for 8-10 minutes or until squash is very soft. Drain and mash with the back of a fork (or puree in a blender, food processor or with an immersion blender) until very smooth. Set aside.

Melt the butter in a medium pot over medium heat and cook just until lightly browned. Whisk in flour to form a sticky dough. Slowly whisk in the milk to form a very creamy sauce.

Stir in the butternut squash and the cheese until completely distributed. Add the sage, nutmeg and salt and pepper to taste. The sauce should be very thick and creamy at this point.

Scrape the sauce into the cooked pasta and stir well to ensure all the pasta is coated. Divide between the hollowed-out squashes and top each with a few pinches of cheese and a sprinkle of bread crumbs.

Place on a baking sheet and bake for 25-30 minutes, or until the tops are browned and bubbly.

Serve garnished with fresh sage leaves.

Serves 4.

Third Date Chicken

  • Prep Time 0:15
  • Cook Time 1:05
  • Estimated Cost $13.50
  • 12 Comments

I don’t love cooking for first, or even second dates. I know it seems like it should be my go-to activity (an opportunity to tantalize the taste buds of my potential paramour!), but it gets weird when you cook for a living. First of all, the pressure’s on to impress (as if it weren’t already anyway) and it requires me to try to look cute while chopping onions (just try it). Moreover, it feels akin to asking a dentist out and then asking him to take a quick peek at your molars.

That said, by date #3, I am usually comfortable enough to invite a man into my kitchen, and this is my trusty stand-by meal, assuming he eats poultry (this is San Francisco, so the possibility that he is a raw foodist gluten-free vegan is not out of the question). I get the chicken prepped and into the oven before he shows up (which has the side benefit of making my apartment smell amazing), roast some sweet potatoes or whip up some risotto and throw together a green salad.

Even if you aren’t planning a hot date any time soon, this chicken is great to make on a Sunday, and then eat throughout the week. I tuck pieces of it into sandwiches, wrap it in burritos or pack it cold on a picnic.

Ingredients

  • 1 whole (4-5 lb) roasting chicken, giblets removed $12
  • 1/2 cup extra virgin olive oil Pantry
  • 12 garlic cloves, chopped Pantry
  • leaves from 2 sprigs fresh rosemary $1 for a bunch
  • 1 lemon, zested and sliced thinly $0.50
  • 2 tsp each salt and pepper Pantry

Recipe Serves 4-6

Directions

  1. Preheat oven to 375 degrees F.
  2. Rinse the chicken under cool running water and pat dry, using paper towels. Place in a large (at least 9"x13") casserole pan.
  3. Whisk together the olive oil, garlic, rosemary, lemon zest, salt and pepper (you can also leave the garlic cloves whole and blend it all together in a food processor or blender).
  4. Pour a bit of the oil-garlic mixture into the cupped palm of your hand and rub it over the skin of the chicken on both sides. 
  5. Gently slide your hands between the skin and the flesh of the chicken and rub some of the oil mixture beneath the skin. Pour a bit more oil into your hands and rub the cavity of the chicken with it. Continue until the whole chicken is covered with the garlic-oil mixture.
  6. Place a few slices of lemon between the skin and the flesh. Stuff the rest of the slices into the cavity. Arrange chicken breast-side-up in the pan and use kitchen twine or a couple of toothpicks to attach the legs together. 
  7. Cover the pan tightly with aluminum foil.
  8. Bake, covered, for 30 minutes. 
  9. Remove the foil and bake, uncovered, for another 25-30 minutes, or until the skin is golden-brown and the juices run clear (stab a knife into the thigh to check this).
  10. Cut into pieces and serve hot.
  11. If you want to make a pan gravy, pour the pan juices (there should be plenty) into a small pot over high and bring to a light boil. Sprinkle in 1-2 tbsp of flour and whisk constantly (breaking up the lumps) until a thick, creamy gravy forms. Serve alongside the chicken.

Salvadoran Pupusas with Cheese

I have loved Salvadoran pupusas (stuffed corn tortillas) for a long time, and yet had yet to make them until recently. Upon tasting my first batch (and, um, there have been 3 since yesterday afternoon…) I couldn’t get over how scrumptious they were, especially considering how easy they were to make. The tortilla-forming takes a bit of practice, but have faith—you’ll get it quickly.

The first time I made them, I stuck with simple, classic cheese filling as shown here. The second and third time, however, I got more creative, filling them once with black beans and cheese and again with roasted vegetables. Feel free to experiment.

Note: to make the classic cabbage slaw shown here that pupusas are often served with, simply toss together 1/2 cabbage, sliced thinly, juice of 1 lime, 1 tbsp extra virgin olive oil, 1 handful fresh cilantro, chopped, salt and pepper to taste.

  • Ingredients
  • 4 cups masa harina $2 for 1 lb
  • pinch of salt Pantry
  • 2 cups water
  • 2 cups shredded Monterey jack or queso blanco $3.50 for 8 oz
Total cost of Ingredients $5.50

Directions

Mix masa harina, salt and water together in a bowl to make a sticky dough (add a touch more water if it’s too crumbly after stirring well). Divide the dough into 8 balls.

Place a ball between two pieces of wax paper and roll out, using hands or a rolling pin, into a 6” circle. Set on a plate coated lightly with masa harina. Repeat with remaining balls of dough.

To assemble a pupusa, place 1/4 cup shredded cheese on top of one dough round. Spread out evenly. Top with a second dough round and pinch edges gently to seal. Repeat with remaining dough and cheese.

To cook, heat an ungreased griddle or pan (preferably cast iron) over high heat. Cook the pupusas for 2-3 minutes on each side, or until lightly charred in places.

Serve hot, with cabbage slaw and salsa if desired.

Makes 4 pupusas.

Category: Meals

Tags: ,

Share this Recipe: Share on Facebook Tweet This! Pin it on Pinterest