BrokeAss Gourmet

BrokeAss Gourmet

White Pizza with Rainbow Chard and Egg

  • Prep Time 0:15
  • Cook Time 0:20
  • Estimated Cost $9
  • 16 Comments

I don’t really have time to be writing this post. I am sort of over-scheduled right now.

First of all, as you may know, I wrote a book. It wasn’t supposed to come out until May 8th, but the folks at Amazon decided to send it out a week early, so if you pre-ordered, you should already have it in your hands, which is equal parts thrilling and anxiety-producing for me, feedback junkie that I am.

As such, I’m throwing a party at Green Apple Books on Clement Street in San Francisco, getting ready for a big signing party up in Santa Rosa at my parents’ house, preparing for a demo at The Olive Press, and planning a trip to to Los Angeles and then Chicago, to speak at both cities’ Google locations and a variety of other fun spots, shortly thereafter.

Also, I am writing a second book, about pizza dough (go figure). My manuscript was due 2 days ago. It is not finished (I’m close though, I swear).

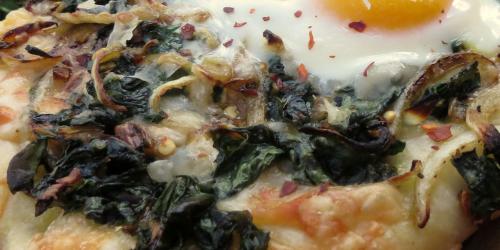
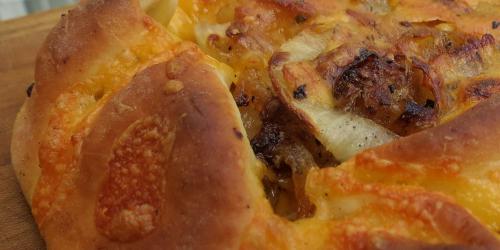
Funny as it may sound given what I do for a living, when I work for hours on end, I often forget to eat…even if I’m cooking. I’ll have coffee, then more coffee, then a glass of water, after realizing how dehydrated the coffee has made me, then suddenly it is 3 PM and I am starving. This pizza was this afternoon’s much-needed diversion/sustenance. And it was awesome.

Now excuse me, I have stuff to do!

Ingredients

  • flour for the pan and for rolling Pantry
  • 1/2 recipe pizza dough $1.50 for a whole recipe
  • extra virgin olive oil Pantry
  • 3 cups chopped Rainbow or Swiss chard (kale or spinach would also work) $2 for a bunch
  • 1 medium onion, sliced $0.50
  • 2 cloves garlic, chopped Pantry
  • salt and pepper to taste Pantry
  • 3/4 cup shredded mozzarella or provolone cheese $3.50 for 8 oz.
  • 1 or 2 eggs $1.50 for 6

Recipe Serves 2-3

Directions

  1. Preheat the oven to 475 degrees F. Lightly flour a baking sheet or pizza pan and set aside.
  2. Heat 2 tbsp oil in a large frying pan over medium-high heat. Add the chard and cook for 5-6 minutes, until it begins to wilt, then add the onion and garlic and cook, stirring occasionally, until the onions begin to brown (another 5-6 minutes). Season with salt and pepper to taste.
  3. On a lightly-floured surface, roll the dough out into a 10" circle (or an oblong shape, if you prefer), and place it on the prepared pan.
  4. Drizzle the dough lightly with olive oil, then top with the cheese. On top of the cheese, scatter the greens mixture. Crack an egg or two on top of the greens mixture.
  5. Bake the pizza for 10-12 minutes, until the crust is golden-brown and the egg white is just set (the yolk should be runny).
  6. Top with more salt and pepper, cut into wedges and serve.

Roasted Brussels Sprouts with Sambal Cheese Sauce

  • Prep Time 0:10
  • Cook Time 0:15
  • Estimated Cost $10
  • 11 Comments

There are two conversations which my parents (who have been married for 31 years and have one of the best relationships I know of) have with enough regularity that I can usually mouth along with them.

The first happens every Passover, while we are preparing for Seder at their house. My mother pulls out the Seder plate we've been using for the past million or so years and attempts to arrange the Passover symbols in their proper places. This involves reading Hebrew--something my mother doesn't know how to do.

So, she summons my dad, who does read Hebrew, to join her in the kitchen and help. He happily agrees and they set about trying to figure it out. The scene that follows is always the same and always hilarious to witness: inevitably, my father can't figure out one of the spots, and my mother insists she knows what it is, which, of course she does not (though, neither does he). "You don't read Hebrew!" my dad insists. "I've been doing this for 31 years!" my mother retorts. Eventually they figure out what needs to go where by process of elimination, while my brother and I snicker, because it isn't Passover until this happens.

The second scenario happens with a bit more frequency: the subject of vegetables comes up--either because we are eating them or because we are talking about food (which we are pretty much always doing). My father professes to like vegetables. Like clockwork, my mother laughs and says, "yeah, if they're covered with enough cheese sauce!" He denies this, she rolls her eyes. We all laugh.

I happen to love vegetables, even without cheese sauce. But I gotta tell you, this cheese sauce could convert even pickiest of supposed vegetable haters.

Ingredients

  • 1 lb Brussels sprouts, halved $1.50
  • 2 tbsp extra virgin olive oil Pantry
  • 1 tbsp butter $1 for a stick
  • 1 tbsp all-purpose flour Pantry
  • 1/2 cup whole milk or half-and-half $1.50 for a pint
  • 3/4 shredded white cheddar cheese $3.50 for 12 oz.
  • 1 1/2 tbsp (or more to taste) sambal or sriracha $2.50 for 10 oz.

Recipe Serves 4 generously

Directions

  1. Preheat the oven to 375 degrees F.
  2. Toss the Brussels sprouts with olive oil and spread out in an even layer on a baking sheet. Roast for 12-15 minutes, flipping halfway through cooking.
  3. While the sprouts roast, melt the butter in a medium pot over medium heat. Whisk in flour and cook, whisking throughout, for 1 minute.
  4. Gradually add the milk, whisking constantly, until a thick sauce forms (this should take 6-7 minutes).
  5. Melt in the cheese, whisking constantly, for 1-2 minutes. Stir in the sambal or sriracha.
  6. Let cool slightly while you arrange the cooked sprouts in a serving dish.
  7. Pour the cheese sauce over the roasted sprouts and serve immediately.

Passover Brisket

  • Prep Time 0:20
  • Cook Time 4:00
  • Estimated Cost $16.50
  • 11 Comments

Passover begins Friday, which means it is also time for brisket! This easy and irresistibly delicious version yields meltingly tender beef in a flavorful, slightly sweet sauce.

If you can’t find Kosher for Passover canned tomatoes, just use an equal amount of halved Roma tomatoes.

Ingredients

  • 1 tbsp olive oil Pantry
  • 1 3-lb beef brisket (leave the fat on--you'll take it off later) $13
  • salt and pepper Pantry
  • 2 onions, sliced $1
  • 4 cloves garlic, chopped Pantry
  • 1 24-oz. can whole, peeled tomatoes $2.50
  • 1/2 cup brown sugar Pantry

Recipe Serves 6

Directions

  1. Preheat the oven to 325 degrees F.
  2. Heat the oil in a large oven-proof dutch oven or pot over high heat.
  3. Salt and pepper the brisket generously on bot sides.
  4. Place the brisket in the pan and brown well on both sides. Transfer to a plate.
  5. Reduce the heat to medium and to the hot pan, add the onions and garlic and cook for 3-4 minutes, stirring occasionally. Add the tomatoes and stir well. Let cook for 2 minutes.
  6. Nestle the brisket into the tomato mixture and into the pan, pour enough water (you may also use broth) to cover. Stir well to distribute the seasonings evenly.
  7. Cover pot with the lid and bring the liquid to a boil. Once it boils, remove from the stove and place in the oven.
  8. Simmer in the oven for 3-3 1/2 hours, or until very tender.
  9. Once the brisket has cooked, carefully remove it from the sauce, and place on a carving board. Let rest.
  10. Place the remaining sauce over high heat and add the brown sugar. Let boil for about 10 minutes, until it thickens. Season with more salt if necessary.
  11. Cut away any remaining ribbons of fat on the brisket and slice the meat, against the grain. Serve immediately, with the sauce spooned over it.

Smoked Tuna Salad

Evan told me about can-smoked tuna yesterday as we were discussing cool ways to apply fire to food. His friend David Ruderman, an Orthodox rabbi, showed him how to do it once, when he was visiting from Israel. David picked it up during his time in the military, where this trick originated. I have to admit, at first I was skeptical; the process involved packing a can of oil-packed tuna with a wad of toilet paper and setting it on fire. It sounded dangerous and kind of gross.

Still, I was intrigued. And now, having just done it, I can confirm that it’s actually quite easy, tasty and really, really fun to make. Though the fire actually stays quite small and is surprisingly non-smelly, there’s something just awesome and rustic-feeling about setting up a “smoker” on your back deck.

And the results are just incredible. The smoking process gets rid of that fishy, tinny flavor, replacing it with a complex, smoky one, making it perfect for this smoked-whitefish-style salad preparation.

I happened to have some fresh bialys, which I toasted and served it on top of. It’d be good plain too, or heaped on top of some dressed greens.

Note: I highly recommend using very basic toilet paper or tissue. Don’t use anything with fragrance or lotions in it.

  • ingredients
  • 1 can olive-oil-packed tuna $2
  • unscented toilet paper or tissue, preferably organic
  • 2 tbsp finely-minced onion $0.50 for a whole onion
  • 1 tbsp finely-chopped flat-leaf parsley $1 for a bunch
  • juice of half a lemon $0.50 for a whole lemon
  • 1 hard-boiled egg, cooled and chopped $1.50 for 6 eggs
  • 2 tbsp mayonnaise Pantry
  • salt and pepper to taste Pantry
Total Cost of Ingredients: $5.50

Directions

Carefully open up the can of tuna without removing any of the oil. Discard the lid.

Place the tuna can in a large pot and bring it, with some toilet paper or tissue outside. Keep a pitcher of water nearby, just in case.

Take about 4 squares of toilet paper (or the equivalent amount of tissue) and fold it up into a little stack. Press it into the tuna, allowing the edges to hang off the sides. The paper should soak up quite a bit of oil.

Carefully light a dry edge of the paper and watch it while it burns. The whole thing will catch on fire and continue burning (using the oil as fuel). Stay nearby, and keep an eye on it. It should keep burning for 10-15 minutes.

Eventually, the flame will go out, which means that the fish has finished smoking. Let the can sit for 5 minutes to cool down.

Use a fork to carefully remove the ashy paper (it should just peel off). Discard it and transfer the fish into a mixing bowl. Refrigerate for 5-10 minutes, to cool it down.

Stir the cooled fish together with onion, parsley, lemon juice, egg, mayonnaise, salt and pepper.

Serve immediately or chill for up to 24 hours.

Serves 2.

Category: Meals

Tags: , , , , ,

Share this Recipe: Share on Facebook Tweet This! Pin it on Pinterest

Apple-Onion Tartlets with Cheddar

  • Prep Time 0:15
  • Cook Time 0:45
  • Estimated Cost $8
  • 18 Comments

Ooh, these are so good.

Sweetness from the caramelized onions and apples is contrasted delightfully with salty cheddar and spicy black pepper. Make them for brunch, or a light supper, served with a green salad.

Ingredients

flour for baking and rolling Pantry
2 tbsp extra virgin olive oil Pantry
2 medium onions, sliced thinly $1
1/2 tsp each salt and black pepper Pantry
1 recipe pizza dough $1.50
2 Granny Smith apples, cored and sliced thinly $2
1/2 cup shredded sharp cheddar cheese $3.50 for 8 oz.

Recipe Serves 4

Directions

  1. Preheat the oven to 400 degrees F. Lightly flour a baking sheet and set aside.
  2. Heat the oil in a large frying pan over medium-low heat. Add the onions and stir a few times, to distribute the oil evenly. Add the salt and pepper and stir again. Cook for 18-20 minutes, allowing to caramelize, stirring once or twice throughout cooking.
  3. While the onions caramelize, divide the dough into 4 even balls on a lightly floured surface. Use your hands or a rolling pin to roll each ball out into a 6" circle. Set the circles on the prepared baking sheet (it's OK if they touch--they won't when you're done assembling the tartlets).
  4. Arrange about half-an-apple's worth of slices on a circle (as if you were making apple pie) in the center of one of the dough circles. Make sure to leave about 1 1/2 inches of dough at the border.
  5. Top the circle of apples with about 1/4 of the caramelized onions.
  6. Fold the border of dough in, to form a tartlet (it's supposed to look rustic, so don't worry about making it look perfect). Sprinkle the whole thing (crust included) with about 1/8 cup cheddar cheese.
  7. Repeat the tartlet-making process with the remaining ingredients.
  8. Bake for 18-22 minutes, or until the crust is golden-brown and the cheese is bubbly.
  9. Serve whole or cut into wedges.