BrokeAss Gourmet

BrokeAss Gourmet

Mac-and-Cheese-Stuffed Acorn Squash

OK, I know I’ve done the squash-mac-and-cheese-thing before. Twice, actually.

But seriously, how freaking cute are these?

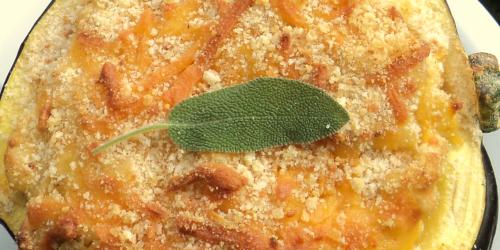
Green winter squashes, filled to the brim with creamy, brown-buttery, sage-y mac and cheese, all topped with more bubbly cheese and crisp bread crumbs? Serve these as a side dish and everyone will ignore everything else on their plate, so it’s probably best to just go ahead and call them the main event.

  • ingredients
  • 1 cup macaroni elbows $1.50 for 14 oz.
  • 2 medium-sized acorn squashes, cut in half, lengthwise $2.50
  • 2 tbsp unsalted butter $1 for a stick
  • 2 tbsp all-purpose flour Pantry
  • 1 cup milk $1.50 for a pint
  • 1 cup shredded cheddar cheese, plus a few extra pinches for garnish $3.50 for 8 oz.
  • 4 sage leaves, chopped finely, plus more for garnish $1 for a bunch
  • few dashes of nutmeg $1.50 for 1 oz
  • salt and pepper to taste Pantry
  • 1/8 cup bread crumbs $2 for 12 oz.
Total Cost of Ingredients $14.50

Directions

Preheat oven to 375 degrees F.

Cook the pasta in salted boiling water according to package directions. Drain and return to pot. Set aside.

While pasta cooks, use a metal spoon (or a serrated spoon, if you have one) and scoop most of the flesh and seeds out of the squash halves, leaving about 1/2” in the skin (this is a little tricky and takes a bit of time, but is an important step). Discard the seeds and transfer the pieces of squash a medium pot.

Cover squash with water and cover pot with a lid. Turn heat to medium-high heat and cook, covered for 8-10 minutes or until squash is very soft. Drain and mash with the back of a fork (or puree in a blender, food processor or with an immersion blender) until very smooth. Set aside.

Melt the butter in a medium pot over medium heat and cook just until lightly browned. Whisk in flour to form a sticky dough. Slowly whisk in the milk to form a very creamy sauce.

Stir in the butternut squash and the cheese until completely distributed. Add the sage, nutmeg and salt and pepper to taste. The sauce should be very thick and creamy at this point.

Scrape the sauce into the cooked pasta and stir well to ensure all the pasta is coated. Divide between the hollowed-out squashes and top each with a few pinches of cheese and a sprinkle of bread crumbs.

Place on a baking sheet and bake for 25-30 minutes, or until the tops are browned and bubbly.

Serve garnished with fresh sage leaves.

Serves 4.

Third Date Chicken

  • Prep Time 0:15
  • Cook Time 1:05
  • Estimated Cost $13.50
  • 12 Comments

I don’t love cooking for first, or even second dates. I know it seems like it should be my go-to activity (an opportunity to tantalize the taste buds of my potential paramour!), but it gets weird when you cook for a living. First of all, the pressure’s on to impress (as if it weren’t already anyway) and it requires me to try to look cute while chopping onions (just try it). Moreover, it feels akin to asking a dentist out and then asking him to take a quick peek at your molars.

That said, by date #3, I am usually comfortable enough to invite a man into my kitchen, and this is my trusty stand-by meal, assuming he eats poultry (this is San Francisco, so the possibility that he is a raw foodist gluten-free vegan is not out of the question). I get the chicken prepped and into the oven before he shows up (which has the side benefit of making my apartment smell amazing), roast some sweet potatoes or whip up some risotto and throw together a green salad.

Even if you aren’t planning a hot date any time soon, this chicken is great to make on a Sunday, and then eat throughout the week. I tuck pieces of it into sandwiches, wrap it in burritos or pack it cold on a picnic.

Ingredients

  • 1 whole (4-5 lb) roasting chicken, giblets removed $12
  • 1/2 cup extra virgin olive oil Pantry
  • 12 garlic cloves, chopped Pantry
  • leaves from 2 sprigs fresh rosemary $1 for a bunch
  • 1 lemon, zested and sliced thinly $0.50
  • 2 tsp each salt and pepper Pantry

Recipe Serves 4-6

Directions

  1. Preheat oven to 375 degrees F.
  2. Rinse the chicken under cool running water and pat dry, using paper towels. Place in a large (at least 9"x13") casserole pan.
  3. Whisk together the olive oil, garlic, rosemary, lemon zest, salt and pepper (you can also leave the garlic cloves whole and blend it all together in a food processor or blender).
  4. Pour a bit of the oil-garlic mixture into the cupped palm of your hand and rub it over the skin of the chicken on both sides. 
  5. Gently slide your hands between the skin and the flesh of the chicken and rub some of the oil mixture beneath the skin. Pour a bit more oil into your hands and rub the cavity of the chicken with it. Continue until the whole chicken is covered with the garlic-oil mixture.
  6. Place a few slices of lemon between the skin and the flesh. Stuff the rest of the slices into the cavity. Arrange chicken breast-side-up in the pan and use kitchen twine or a couple of toothpicks to attach the legs together. 
  7. Cover the pan tightly with aluminum foil.
  8. Bake, covered, for 30 minutes. 
  9. Remove the foil and bake, uncovered, for another 25-30 minutes, or until the skin is golden-brown and the juices run clear (stab a knife into the thigh to check this).
  10. Cut into pieces and serve hot.
  11. If you want to make a pan gravy, pour the pan juices (there should be plenty) into a small pot over high and bring to a light boil. Sprinkle in 1-2 tbsp of flour and whisk constantly (breaking up the lumps) until a thick, creamy gravy forms. Serve alongside the chicken.

Salvadoran Pupusas with Cheese

I have loved Salvadoran pupusas (stuffed corn tortillas) for a long time, and yet had yet to make them until recently. Upon tasting my first batch (and, um, there have been 3 since yesterday afternoon…) I couldn’t get over how scrumptious they were, especially considering how easy they were to make. The tortilla-forming takes a bit of practice, but have faith—you’ll get it quickly.

The first time I made them, I stuck with simple, classic cheese filling as shown here. The second and third time, however, I got more creative, filling them once with black beans and cheese and again with roasted vegetables. Feel free to experiment.

Note: to make the classic cabbage slaw shown here that pupusas are often served with, simply toss together 1/2 cabbage, sliced thinly, juice of 1 lime, 1 tbsp extra virgin olive oil, 1 handful fresh cilantro, chopped, salt and pepper to taste.

  • Ingredients
  • 4 cups masa harina $2 for 1 lb
  • pinch of salt Pantry
  • 2 cups water
  • 2 cups shredded Monterey jack or queso blanco $3.50 for 8 oz
Total cost of Ingredients $5.50

Directions

Mix masa harina, salt and water together in a bowl to make a sticky dough (add a touch more water if it’s too crumbly after stirring well). Divide the dough into 8 balls.

Place a ball between two pieces of wax paper and roll out, using hands or a rolling pin, into a 6” circle. Set on a plate coated lightly with masa harina. Repeat with remaining balls of dough.

To assemble a pupusa, place 1/4 cup shredded cheese on top of one dough round. Spread out evenly. Top with a second dough round and pinch edges gently to seal. Repeat with remaining dough and cheese.

To cook, heat an ungreased griddle or pan (preferably cast iron) over high heat. Cook the pupusas for 2-3 minutes on each side, or until lightly charred in places.

Serve hot, with cabbage slaw and salsa if desired.

Makes 4 pupusas.

Category: Meals

Tags: ,

Share this Recipe: Share on Facebook Tweet This! Pin it on Pinterest

Homemade Strawberry Pop-Tarts

If you know my mother, it won’t come as a shock to you that, growing up, Jeremy and I were not allowed to eat Pop-Tarts for breakfast. Pop-Tarts, like Lucky Charms, Pops and Cap’n Crunch were relegated to a category that my brother and I referred to as “vacation food.” Therefore, I associate Pop-Tarts with Lake Tahoe, Hawaii, New Hampshire, Maine and doing Mad Libs in the back seat of a Volvo Stationwagon.

And, of course, college. Because everyone ate Pop-Tarts in college, right?

But these are better than the packaged, cardboard-ish vacation/college Pop-Tarts you’re familiar with. These are light, flaky and very fresh-tasting. Serve with milk, coffee or tea as an afternoon treat (I can’t seem to get behind the idea of eating what is essentially pie for breakfast, but if you can, more power to you).

  • ingredients
  • 1 1/4 cups all-purpose flour, plus more for pan and for rolling Pantry
  • 1 tbsp sugar Pantry
  • 1 tsp salt Pantry
  • 1 stick (4 oz) very cold butter, cut into small pieces $1 for a stick
  • 2 eggs, beaten, divided 1.50 for 12
  • 1 tbsp cream or half-and-half $1.50 for a pint
  • 1/2 cup strawberry (or any kind, really) preserves $3 for 15 oz.
  • 2 tsp cornstarch $1.50 for 12 oz.
Total Cost of Ingredients $7.50

Directions

Preheat oven to 350 degrees F. Lightly flour a baking sheet and set aside.

Combine flour, sugar and salt in a bowl or food processor. Cut in the butter, using 2 forks (or by pulsing the food processor), Stream in one of the eggs and the cream or half-and-half, just until the dough comes together. Refrigerate until ready to use, or immediately turn out onto a lightly floured surface.

Use a rolling pin to roll the dough out into a 10“x12” rectagle (about 1/8” thick). Cut into rectangles of desired size (I did this free-form, though most were about 3“x4”.

Mix the jam together with the cornstarch and 1 tbsp water. Stir well.

Place 1-2 tbsp in the center of half of the rectangles and cover with a second pastry. Press the edges gently to seal, then press again using the back of a lightly-floured fork to create a scalloped border. Arrange tarts on the prepared baking sheet.

Use the fork to gently poke a few holes in the tops of the tarts (this will allow air to escape, keeping the tarts form bursting during baking).

Whisk the remaining egg together with 1/8 cup water to make an egg wash. Brush the tops of the tarts with the egg wash and bake for 18-20 minutes, or until golden brown.

Let cool for at least 5 minutes.

Makes about 6 pop tarts.

I recently found out that I was nominated by a reader for Babble (an amazing website for parents)‘s Top 100 Food Mom Blogs.

I know what you’re thinking.

If you’re a friend who knows me well, you’re thinking: “What a strange thing for Gabi Moskowitz to be nominated for! She doesn’t have kids! “ You’re right. I don’t.

If you’re someone I went to high school or college with and haven’t seen in a decade or so, you are perhaps wondering, “Hmm. Maybe she got pregnant?” Um, no. At least not that I’m aware of.

If you’re an old boyfriend of mine, you are likely pondering who the father is, not to mention why you made the colossal mistake of letting me get away, and so, to you, I’ll confirm that yes, I have several beautiful, happy, super-genius children. Yes, James Van Der Beek is the father and yes, we’re very, very happy.

But, otherwise, no, I am not a mom. I was, however, nominated for this super-cool mom food blogger list. While I have no children of my own, I do spend a lot of time with some really great ones. Moreover, I write recipes that are quick, fresh and inexpensive to make. AKA, totally family-friendly.

So, if you have a second, would mind shooting me a vote by clicking here and “liking” BrokeAss Gourmet?

Thanks!

P.S. Yes, that’s a picture of me cooking in my Fischer Price toy kitchen circa 1984.

Category:

Tags:

Share this Recipe: Share on Facebook Tweet This! Pin it on Pinterest