BrokeAss Gourmet

BrokeAss Gourmet

Today's Reuse Roundup post comes from Devrah Lawver, of San Ramon, CA.

I hope her tip inspires you to send me your best kitchen tip(s) for waste minimizing--you could win a Google Nexus 7 tablet and signed copies of both of my cookbooks. Only 2 days left to enter the contest (it ends March 7th)!!

Email tips to gabi@brokeassgourmet.com. 

Devrah says:

My tip to reduce kitchen waste is to meal plan! So basic! Meal planning allows you to only shop for what you need, not just what looks good, plus, it also usually ensures that you eat a little healthier and don't do that "I have nothing to eat"- fridge stare down.

I don't use a paper chart or app, having this big white board on the wall works for me. I take a photo of it before I go to the grocery store (and I use scratch paper to make a shopping list). I know there are cute notebooks (maydesigns.com has super adorable meal planning notebooks that are personalizable), but I have enough notebooks and charts to keep track of in my life. I like it simple.

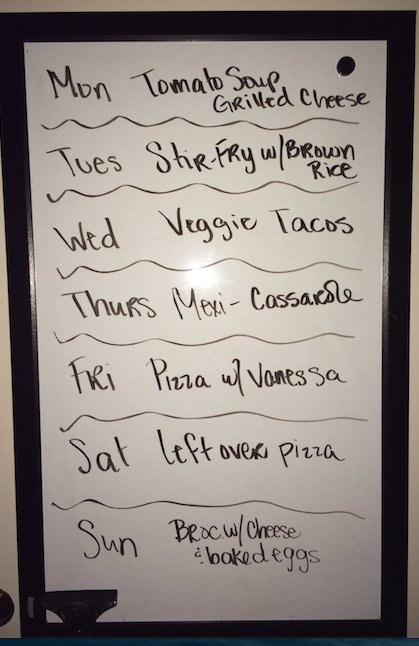
What I like about meal planning, is that I also account for leftovers. Oftentimes leftovers are for lunch the next day. You can see that this week I am having veggie tacos one night, but then I use the leftover ingredients in a mexican cassarole. Now that I am living alone, meal planning keeps me from over-buying. I can't go to the store and just pick stuff out or else I end up with too much that ends up going bad and wasted. I am also in grad school two nights a week, so I don't have time to run to the store just to pick up something for dinner, I do all of my shopping on the weekends, making two or three stops depending on my list (sprouts, trader joes and target... I don't bother with Costco or Safeway unless I need something specific).


Today's Reuse Roundup post comes from Ian and Tanya Grant of Seattle, WA. Their tip involves their kale, smoothies, a bunny, and a dog.

Hopefully they will inspire you to send me your best kitchen tip(s) for waste minimizing--you could win a Google Nexus 7 tablet and signed copies of both of my cookbooks. But get on it because the competition closes this Friday, March 7th! 

Email tips to gabi@brokeassgourmet.com. 

Ian says: 

Ok, so here's what we do to reduce waste. We make smoothies! If our fruit/kale collection for the week is going to hell, it gets thrown into our Ninja blender and gets annihilated into a giant explosion of vitamin nourishing amazingness.

I hate vegetables, so as long as I'm not tasting it or can look it in the eye, we're good.

My wife Tanya is anti-throwing away, so she'll even take the things that would be gross and feeds them to Bunny (our bunny) and Riley the dog. They'll eat anything.

Here's what Tanya says because she says I'm not being helpful:

"When it comes to produce I hate throwing things away - it feels like such a waste. When bananas get overripe I tend to throw them in smoothies, or peel and freeze them for future smoothies. Any fruits or veggies can be frozen and added to a "green" smoothie in place of ice. When it comes to the parts of fruits and veggies that people don't normally eat, it helps to have some pet garbage disposal on hand. Our rabbit and dog love to eat kale ribs, apple and bell pepper cores, and carrot tops. They're all filled with vitamins, so even the pets get a healthy boost."

Cheers!

Today's Reuse Roundup post comes from Maria Lipkina of Santa Cruz, CA. Maria is a pastry chef and baker, but her culinary prowess clearly doesn't end with with bread and muffins. Read on for this truly kitchen-savvy reader's tips (that's right, plural tips--she had a lot of 'em!). Hopefully they will inspire you to send me your best kitchen tip(s) for waste minimizing--you could win a Google Nexus 7 tablet and signed copies of both of my cookbooks! Email tips to gabi@brokeassgourmet.com.

Maria says:

I saw your call for waste-reducing tips and tricks on Facebook, and thought I'd just use it as an opportunity to brag shamelessly about my waste-reduction projects. Yes, that would be plural. I can't pick just one! This is your official warning that this list is long. So hey, bear with me, and I hope you like some of these. :)

First off, here's my "umbrella" waste-reduction philosophy: If there's an ingredient sitting around in my house with no designated purpose, I'll think of a recipe that centers on that ingredient.

Here's a photo of some apricot thumbprint cookies I made because the apricot jam had spent a few too many weeks on the fridge door.

And here's a blueberry cheesecake, because what was the intended purpose of those frozen blueberries again?

I pretty much try to save whatever I can. I had a brunch party a few months ago, and we made a HUGE batch of bacon in the oven. It seemed like a big waste to throw away all the bacon grease, so I saved it in a little bowl. Now I use it to cook eggs or add richness to other dishes!

My passion for eliminating food waste even extends beyond my own kitchen. I currently work in a bakery as a bread and pastry baker, and I try to do everything I can to save the scraps that are sometimes left at the end of the day.

One way that this manifests is with croissant dough. As we put the sheets of dough through our roller, bits and scraps sometimes need to be cut off to make the sheets of dough more even. As the day goes on, I collect all the scraps in a pile and take them home. I use it to make super-easy cinnamon rolls with cream cheese frosting at home!

I try to take home whatever would be otherwise tossed at the busy bakeshop, and invent whatever I can feed to my friends, as long as the dough's not going in the trash!

Here are some broccoli/garlic/cheese hand pies that I made at home out of rescued galette dough scraps.

Alright, I think that's the end of my tirade! In general, I just hate seeing food go in the trash, and do whatever I can think of to make sure it goes into people's mouths instead. My grandmother, who grew up in the Soviet Union and can't STAND waste, is my inspiration for that. Here's one last photo-- my babushka's matzah balls!

Our first Reuse Roundup tip comes from Stefani Hutchinson of Conway, South Carolina! Rather than throw out the ends of celery, Stefani has found a way to actually re-grow them. How awesome is that!? Read on for her tip, and be sure to send me your best kitchen tip for waste minimizing--you could win a Google Nexus 7 tablet and signed copies of both of my cookbooks! Email tips to gabi@brokeassgourmet.com. 

Says Stefani:

You can grow your own celery from the ends leftover from the stalks you buy at the store. Cut the bottom off and place the piece in water. Change the water each day to keep it clean and before you know it there will be roots and new stalks. Plant the new celery plant in a nice pot or in your garden and there you are! Fresh, home grown celery from the remains of the one you bought at the store! Here you can see a new baby root just starting at the bottom of the stalk.

Category: Articles

Tags: ,

Share this Recipe: Share on Facebook Tweet This! Pin it on Pinterest

DIY Kronuts

  • Prep Time 10 minutes
  • Cook Time 12 minutes
  • Estimated Cost $5.50
  • 12 Comments

The world has gone crazy for Cronuts™.

If you happen to live under a rock, and don't know what a Cronut is, it's a hybrid croissant-doughnut, invented by the good people at the Dominique Ansel Bakery. It has led the people of New York (and every other city where other bakeries' takes on the cronut have begun popping up) going nuts with anticipation, waiting in line for hours (or paying this dude to wait for them), just to get that deep-fried, flaky, buttery, layered confection. Oh, and, they're being sold on the black market at a 700% mark-up.

Yes, these are pastries we're talking about.

I was inspired, when my friend Aimee told me last weekend that, in protest of the ridiculousness of the line-waiting and pastry-scalping, she tried to make Cronut herself at home. Sadly, her efforts to make croissant dough yielded something, in her words, "brick-like," not the light, flaky Cronuts of her dreams. 

As she told me of her trials, it occurred to me that pre-made crescent dough (the kind sold in the tubes, made famous by a certain giggling, tiny man made of dough) might be a viable hack. Sure enough, it worked out beautifully.  

I make these a little bit smaller than conventional Cronuts™ (slightly less guilt that way), and top them with a simple powdered sugar glaze, so you can really taste all the buttery goodness. Feel free to get creative with icings or other flavorings (melted dark chocolate Cronuts, anyone?).

Skip the line, save money and impress your friends: make Kronuts (with a K!) at home! 

**Note: When I originally posted this, I called my creations Cronuts, however, the folks from Dominique Ansel have requested I call them something else, so as not to cause confusion. So, I'm going with Kronuts.** 


Ingredients

  • 1 8-ounce tube of ready-to-bake crescent roll dough $2.50
  • vegetable or canola oil, for frying Pantry
  • 1/2 cup powdered sugar $1.50 for 16 ounces
  • 1/8 cup milk or half-and-half $1.50 for a pint

Recipe Serves 3-6

Directions

  1. Take the crescent roll dough out of its tube and place it on a lightly-floured surface.    
  2. Gently unroll the dough, and gently pinch the perforated lines to seal, so you have one big sheet of dough.                                                                                       
  3. Fold the dough rectangle into thirds.                                                                
  4. Very gently roll with a rolling pin, just to smooth the dough.                                  
  5. Use a 3-inch mason jar, glass or biscuit cutter to cut out 3 circles. 
  6. Use a 1-inch shotglass to cut the middles and any remaining dough scraps into Kronut holes.                                                                                                      
  7. Heat about 4 inches of oil in a large, heavy-bottomed pot over medium-high heat, until it reached 350 degrees F.
  8. Working in batches, fry the dough rounds and holes until golden-brown and puffy, about 2 minutes on each side.                                                                        
  9. Remove the fried Kronuts from the oil and drain on paper towels.
  10. In a bowl, whisk together the powdered sugar and the milk or half-and-half, until you have a thick glaze.                                                                                       
  11. Gently drizzle the glaze over the warm Kronuts.