BrokeAss Gourmet

BrokeAss Gourmet

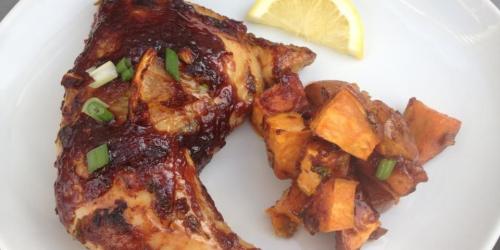
Garlicky BBQ Chicken and Sweet Potatoes for 2

  • Prep Time 0:15
  • Cook Time 0:34
  • Estimated Cost $11.50
  • 29 Comments

When I don't need the whole thing, there is no better chicken part for my money than whole legs.

This is one of those glorious one-pan meals. I usually add a green salad or a cooked vegetable, but it's not necessary. Served with a cold beer or a glass of Chardonnay, this is one of my favorite ways to end the day--and it's just enough for 2 (or 2 nights worth of dinner for 1).

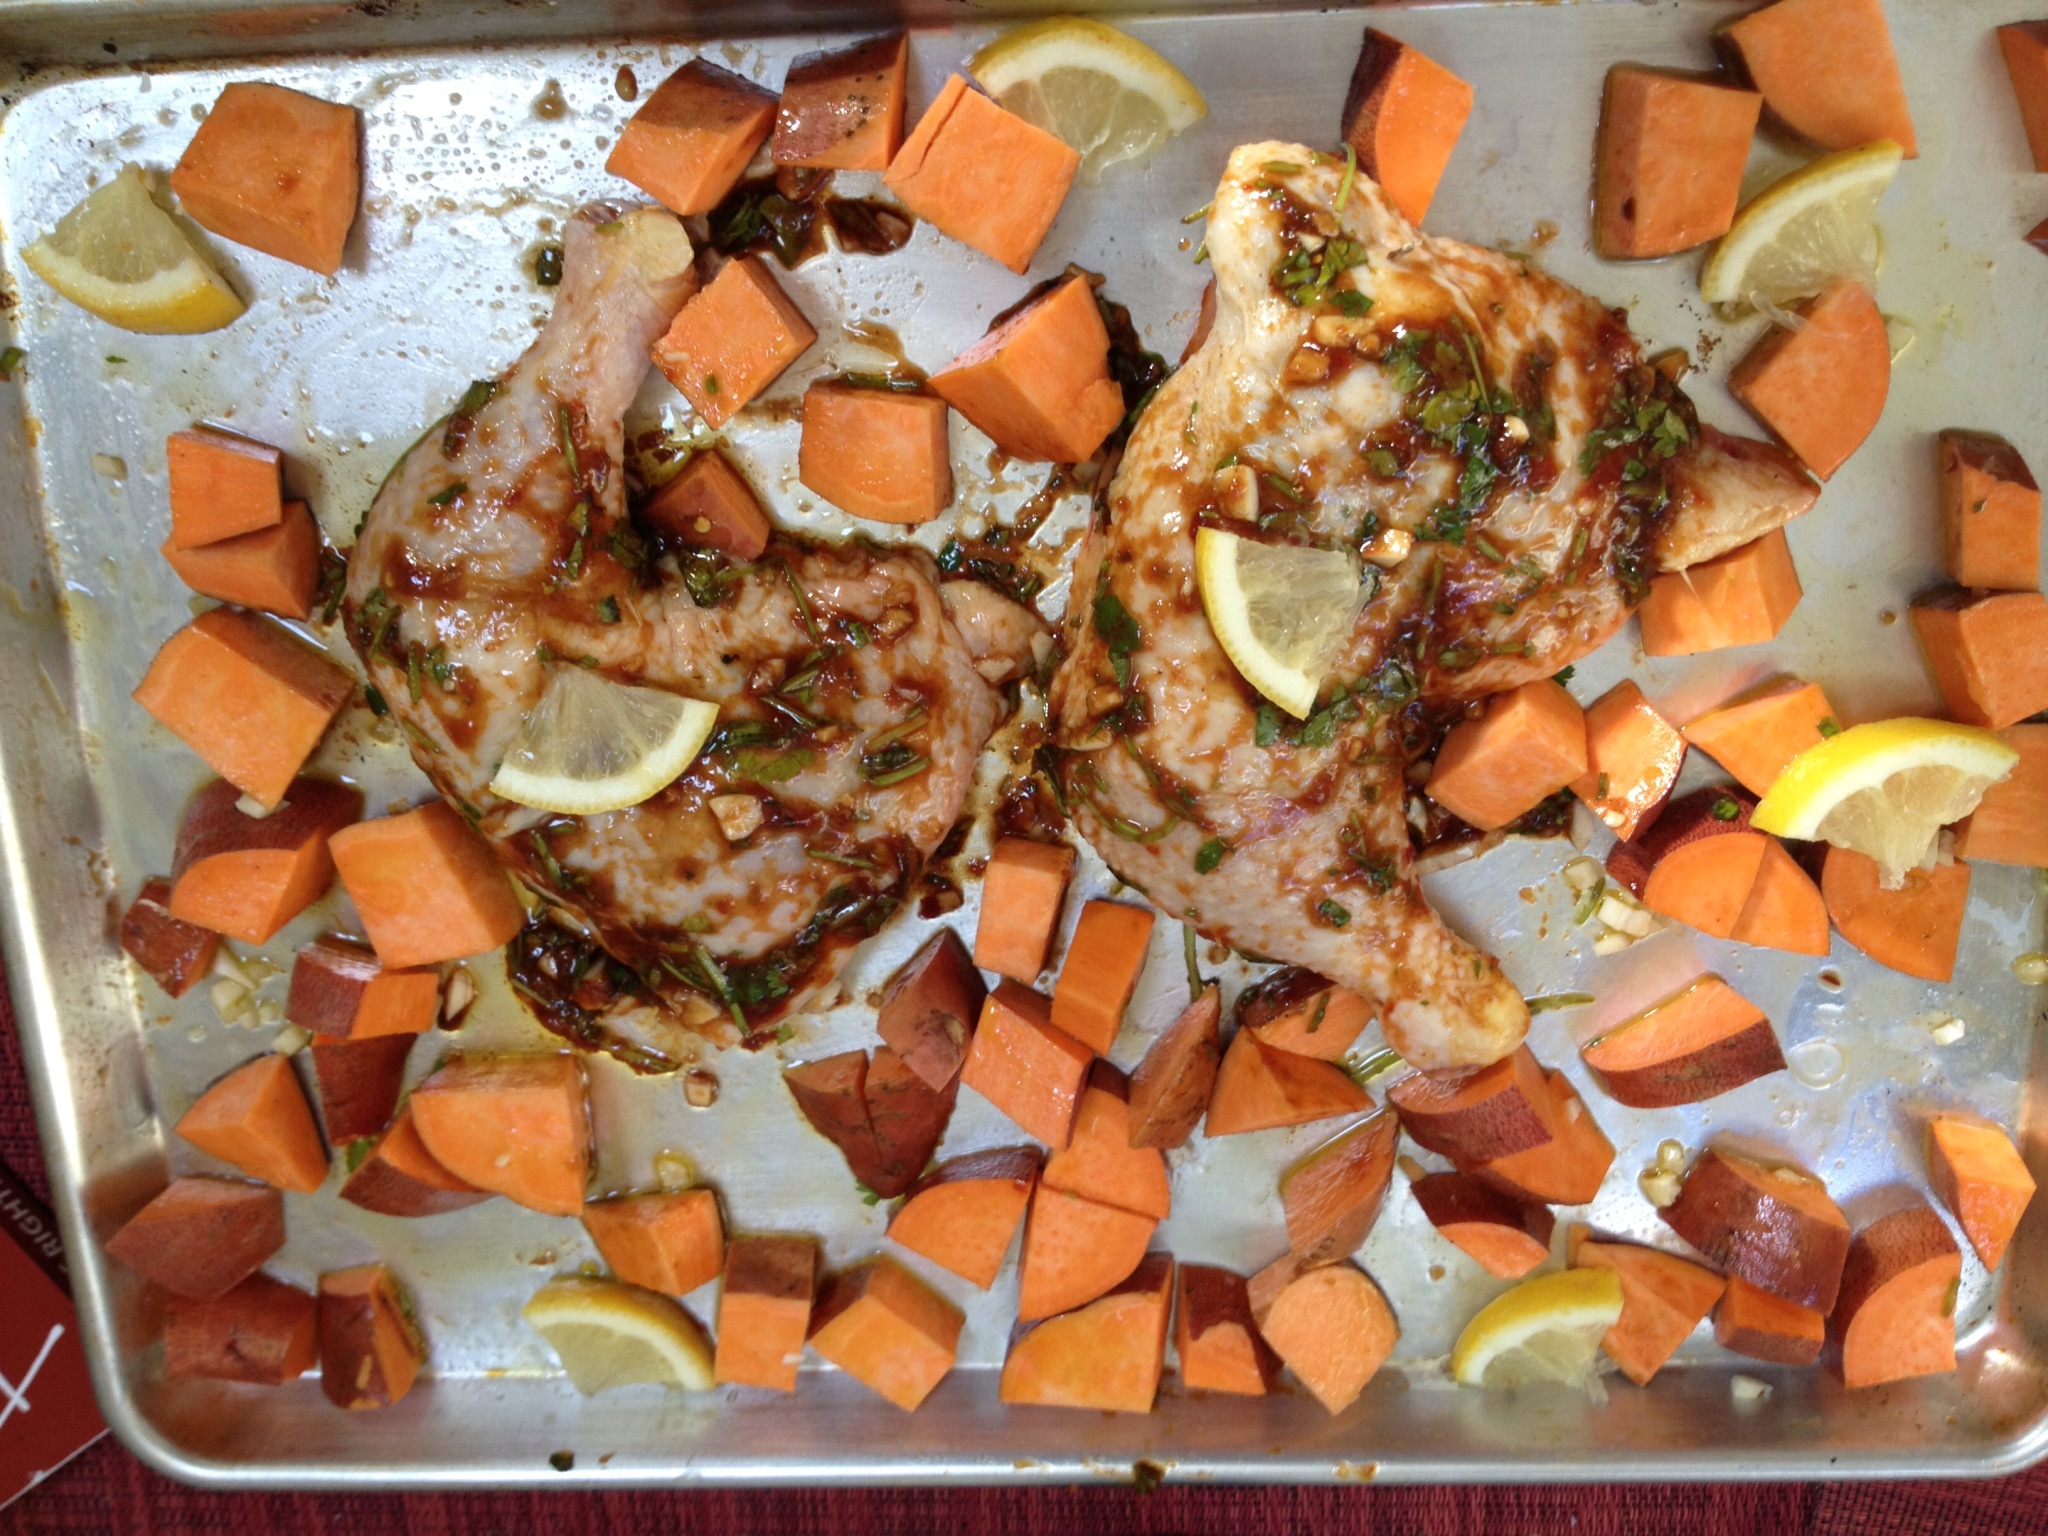
When I don't need the whole thing, there is no better chicken part for my money than whole legs. Comprised of both the thigh and the drumstick, these tender, deeply flavorful chicken pieces work well in nearly every way--on the grill, cooked in mole, or roasted. They also feature a slightly higher fat content than chicken breasts, and therefore are ideal for cooking along with a root vegetable, as I've done here, since the extra bit of fat coats and flavors the dense veggies. I've used garnet yams here, but regular potatoes, peeled, cubed butternut squash, beets, turnips, or a combination would work nicely as well.

bbq chicken on pan

And the best part: one pan means fewer dishes!

Note: This isn't a requirement, but it's one of my favorite tricks: as soon as I open the package of chicken, the first thing I do is trim the excess fat. I saute it along with onions, garlic, ginger, Chinese Five Spice, fish sauce, a dash of soy sauce, water and whatever vegetable scraps I have laying around to make broth for pho. Even if I'm not planning on eating the pho the same day, it's a great, flavorful broth to have on hand, and it takes only a couple of minutes to get started. I let it simmer for a couple of hours, usually while I prepare and serve the chicken, and then simply strain, cool and refrigerate or freeze in an airtight container until I'm ready to use it.

Ingredients

  • 2 whole chicken legs (thigh and drumstick, attached, skin on) $5
  • 1/4 cup prepared BBQ sauce (I like TJ's Bold and Spicy Kansas City Style) $3.50 for 18 oz. 
  • 6 cloves garlic, chopped, divided Pantry
  • 1 large handful fresh cilantro or flat-leaf parsley, finely chopped $1 for a bunch
  • 1 lemon (half juiced, half sliced thinly) $0.50
  • dash of salt, plus more to taste Pantry
  • 1/2 tsp freshly ground black pepper, plus more to taste Pantry
  • Asian chili sauce to taste Optional
  • 2 large garnet yams (orange sweet potatoes), scrubbed and cut int 1" pieces (I like to leave the skin on) $1.50
  • 2 tbsp extra virgin olive oil Pantry

Recipe Serves 2

Directions

  1. Preheat the oven to 375 degrees F.
  2. Rinse the chicken in the sink and pat dry with paper towels. Set aside.
  3. In a bowl combine the BBQ sauce, 4 cloves of the chopped garlic, the cilantro, lemon juice, salt, pepper, and chili sauce, if using. Mix well with a spoon.
  4. Place the mixture and the chicken legs in a zip-top bag until chicken is completely covered with the sauce.
  5. Seal tightly, making sure there is no air in the bag, and place in the refrigerator for 20 minutes (or up to 4 hours).
  6. While the chicken marinates, toss the sweet potatoes in a bowl with the remaining garlic, the olive oil, and salt and pepper to taste until well-coated.
  7. Once the chicken has marinated, place it skin-side-up on an ungreased, rimmed baking sheet (cover the baking sheet with foil if you prefer).  
  8. Surround with the sweet potato mixture, making sure it is nicely spread out.
  9. Roast for 28-34 minutes, until sweet potatoes are tender, skin is sticky-crisp and meat is juicy but cooked-through. 
  10. Let rest for 5 minutes, then serve hot.

Roasted Garlic Spinach-Artichoke Dip

  • Prep Time 0:25
  • Cook Time 0:55
  • Estimated Cost $11
  • 30 Comments

This classic spinach-artichoke dip gets an upgrade from sweet, slowly roasted garlic. 

Look, I'm not going to lie to you; I am not interested in football.

I cannot tell you how many times when, as a kid, my dad would call me into the living room where he was watching an instant replay of some "amazing" play in some supposedly "epic" game. He'd take a brief break from screaming at the television (because he, like many sportsfans, believes the players can hear him). He'd wave me over to the couch, point at the TV and we'd have the following conversation.

Dad: Watch this, Gab! This is beautiful.

Gabi: Um. I have a lot of homework to do.

Dad: Just for a minute.

Gabi: OK.

(I watch a guy on TV catch a ball.)

Dad: Wasn't that INCREDIBLE!? 

Gabi: Sure.

And that's how pretty much every conversation I have ever had about football goes. I don't begrudge football fans their fun--I just can't seem to get into it.

But this year, the Niners, of San Francisco, MY beautiful, amazing city, are going to the Superbowl. And, while I couldn't care less about the specifics of the actual game, I am stoked that SF is representing. As such, I figured I better do my part and make a kick-ass dip.

This classic spinach-artichoke dip gets an upgrade from sweet, slowly roasted garlic. Roasted garlic is great on its own--just try it spread over some grilled bread...yum--but when used in place of the usual minced cloves, it adds a subtle-but-definitely-there hint of deep, garlicky flavor. A whole head of garlic might seem like a lot, but when it's roasted, it mellows out quite a bit.

I like to serve this with tortilla chips. pita chips and sliced red bell peppers.

GO NINERS! (And spinach-artichoke dip!)

Ingredients

  • 1 head garlic Pantry
  • 2 tbsp extra virgin olive oil, divided Pantry
  • 1 medium onion, diced finely $0.50 
  • 1 lb chopped frozen spinach (thawed) $2
  • 11/2 cups thawed, chopped frozen artichoke hearts $2
  •  6 ounces cream cheese (the bar kind not the whipped kind) $1.50
  • 1/4 cup sour cream or Greek yogurt $1.50 for 10 oz.
  • 1/4 cup mayonnaise Pantry
  • 1/3 cup grated monterey jack cheese, plus more for the top $3.50 for 12 oz.
  • dash nutmeg Optional
  • 1/4 teaspoon salt Pantry
  • freshly ground pepper to taste Pantry
  • Chips, crackers, baguette slices or vegetables, for serving

Directions

  1. Preheat the oven to 350 degrees F.
  2. Use a knife to slice the bottom off of the head of garlic, so you have a flat bottom. 
  3. Place the garlic head on a piece of foil large enough to wrap it up, and drizzle the garlic with 1 tbsp of the olive oil.
  4. Wrap the foil up tightly so the garlic is completely covered. 
  5. Roast the garlic in the oven for about 30 minutes, or until very soft and sweet.
  6. While the garlic roasts, heat the remaining olive oil in a large frying pan over medium heat. 
  7. Add the onion and cook just until translucent, about 3 minutes.
  8. Add the spinach and artichokes, and cook with the onion, about 5 minutes, until the mixture is soft and very fragrant. Turn off the heat and set aside.
  9. When the garlic has finished roasting, pull it out of the oven and let cool for 10 minutes, or until the foil is cool enough to handle.
  10. Genly unwrap the foil and squeeze the soft garlic cloves out of their paper and into a large mixing bowl.
  11. To the mixing bowl, add the cream cheese, sour cream or yogurt, mayonnaise, jack cheese, nutmeg, salt and pepper. Stir well.
  12. Gently fold in the spinach-artichoke-onion mixture.
  13. Scrape the dip into an 8" pie pan or 8" square pan and sprinkle with more cheese, and red chili flakes, if desired (for spiciness and color).
  14. Bake for 22-25 minutes, or until golden and bubbly.
  15. Serve hot.

Chinese Pork Dumplings

  • Prep Time 0:45
  • Cook Time 0:10
  • Estimated Cost $14.50
  • 30 Comments

Some people meditate with river rocks or yoga or gongs. Some people throw Tarot cards or the I Ching. Some people chant. Good for them.

I, however, make dumplings.

I find it endlessly soothing--the mixing of the meat, the flouring of the rolling board, the folding of the tiny ruffles that seal my dumplings together, creating a perfect vacuum for cooking the tender pork mixture.

It may not qualify as Zen, but it's my own personal Nirvana. And it's not as hard as you might think.

mixtogether

First, you mix pork (or another ground meat) with flavorings...

mixed dumpling meat

...so it looks like this.

wrappers

Next, get your wrappers ready on a floured surface, with a little bowl of water.

place a little bit

Put a little bit of filling in the center of a dumpling wrapper.

foldinhalf

After dabbing water on the edges, fold it in half, like a taco.

pleats

Carefully fold little pleats on one side of the dumpling, sealing as you go.

finished

The finished product should look like this.

makeaplate

Make a whole plate of 'em.

Then fry them in vegetable oil, so the bottoms get brown and crispy.

Pour in a little water and steam away.

The finished product is crispy on the bottom and juicy inside. I like them with chili paste for an extra kick.

Ingredients

  • 3/4 lb ground pork (you can also use beef or chicken, but add 1 egg yolk to make sure it stays moist enough) $2
  • 6 napa cabbage leaves, minced $1 for a head
  • 8 garlic chives (available at Asian grocery stores. If you can't find them, subsititute 4 minced green onions), minced $1.50 for a bunch
  • 1 handful fresh cilantro, minced optional
  • 1/4 medium onion (or 1 shallot), minced $0.50 for a whole onion
  • 3 tbsp minced ginger $0.50 for a medium-sized piece of ginger
  • 3 cloves garlic, minced Pantry
  • 3 tbsp soy sauce, Pantry
  • 1 tbsp sesame oil, $3 for 12 oz.
  • 2 tbsp corn starch $2 for 14 oz.
  • 1 tbsp rice vinegar $2.50 for 14 oz.
  • 1 tbsp Asian chili paste optional
  • flour for dusting Pantry
  • 40 round dumpling or potsticker wrappers, allowed to come to room temperature $1.50 
  • 2 tbsp vegetable oil for frying Pantry

Recipe Serves 6

Directions

  1. In a large mixing bowl, combine the pork (or beef/chicken plus an egg yolk), minced cabbage, garlic chives (or green onions), cilantro (if using), onion (or shallot), ginger, garlic, soy sauce, sesame oil, corn starch (if using), rice vinegar and chili paste (if using). Mix well, using clean hands, to combine.
  2. Place your dumpling wrappers on a lightly floured surface, along with the filling and a small bowl of water.
  3. To assemble the dumplings, use a clean finger to brush the edges of a dumpling skin lightly with water. 
  4. Place about 2 tsps of the pork mixture in the center of the wrapper, making it into a neat little mound, leaving a large border of empty wrapper.
  5. Fold the wrapper in half, like a little taco, but do not seal it.
  6. Make 5-6 small pleats on one side,as you seal the wrapper together, pinching gently to ensure total closure. The dumpling should resemble a little crescent moon.
  7. Repeat with the remaining filling and wrappers, until all the potstickers are made are made.
  8. To cook the dumplings, heat the oil in a large frying pan (make sure it has a fitted lid and set it near the stove), over medium heat. 
  9. Working in batches, arrange the dumplings close to one another (but not touching) in the pan) and let cook for 2-3 minutes, until a golden crust begins to develop on the bottom. 
  10. Carefully pour about 1/4 cup water over the gyoza, then cover the pan quickly and let steam for about 3 minutes.
  11. Remove the lid and let the dumplings aerate until the excess water is cooked away and the bottoms become crisp again.
  12. Transfer the cooked dumplings to a serving platter, repeat with the remaining uncooked dumplings, then serve immediately, with a half-and-half mixture of soy sauce and rice vinegar for dipping.

Category: Meals

Tags: , ,

Share this Recipe: Share on Facebook Tweet This! Pin it on Pinterest

Olive Oil Challah

  • Prep Time 2 hours (including rising time)
  • Cook Time 35 minutes
  • Estimated Cost $3
  • 40 Comments

The richness of the eggs combined with the fragrance of good, grassy olive oil makes my mouth water every time.

For several months now, I have been baking challah every friday afternoon. This is, of course, in part because I have spent the better part of the last year falling in love with someone who observes Shabbat every Friday, but that's not the only reason.

Making fresh challah is both sensuous (the richness of the eggs combined with the fragrance of good, grassy olive oil makes my mouth water every time), and familiar (I've made it so many times now that I have the ingredient ratios memorized and can do it by feel). Kneading the soft dough (almost a hybrid of pastry and pizza dough) relieves tension and fills me with promise of the weekend ahead. 

The toppings and variations are infinite. Once, I topped my braided dough with finely-minced onions, poppy seeds and sea salt: 

 onion challah

And another time, I pressed fresh, halved figs into the soft dough before baking:

fig challah

Feel free to get creative, and don't forget to make enough to have throughout the weekend--there is no french toast like challah french toast!

Ingredients

  • 1 packet active dry yeast $1.50 for 3
  • large pinch plus 1/4 cup sugar Pantry
  • 1/3 cup extra virgin olive oil (use something you enjoy the taste of), plus more for the bowl Pantry
  • 3 eggs, divided (2 for the bread, one for the egg wash) $1.50 for 6
  • 1 1/2 tsp salt Pantry
  • 4 cups all-purpose flour, plus more for kneading Pantry
  • sesame and/or poppy seeds optional

Recipe Serves 8-10

Directions

  1. Preheat the oven to 350 degrees. Turn it off after it reaches temperature, so that when it's time for the dough to rise, the oven will be warm, but not hot.
  2. Lightly flour (or line with parchment paper) a baking sheet and set it aside.
  3. In a large mixing bowl, whisk the yeast and the pinch of sugar into 2/3 cup warm water, and let sit to activate, 3-4 minutes (it will become foamy). 
  4. Whisk in the remaining sugar, the olive oil, 2 of the eggs, and the salt. Continue whisking until completely incorporated.
  5. Slowly add the flour, stirring as you go. Eventually, you should have a soft, rich dough.
  6. Flour a smooth, clean surface (like a countertop or large cutting board) and turn the dough out onto it. 
  7. Knead the dough for 8-10 minutes, until smooth and elastic. Form it into a large ball.
  8. Clean the dough debris the bowl you mixed it in, and pour about 2 tbsp olive oil into it. 
  9. Place the dough in the oiled ball and roll it around to make sure it is completely covered with oil.
  10. Cover the bowl with a clean dish towel and place in the warm (but not hot) oven.
  11. Let rise for 1 hour, or until roughly doubled in size.
  12. Now it's time to weave the challah. There are a few ways to go about this, all of them gorgeous and awesome: You can do it the Deb (of SmittenKitchen) way, the Tori of The Shiksa in the Kitchen way, or you can do it the Gabi Moskowitz, 1989 Graduate of Beth Ami Hebrew School Sunday Challah-Making Class way, which is to sort of braid it like you would hair, and then tuck the messy bits under so no one can see them (which, for the record, I also do with my hair). 
  13. Transfer the braided challah to the prepared baking sheet.
  14. In a small bowl, whisk the remaining egg with 3 tbsp water.
  15. Use a pastry brush to brush the dough with a bit of the egg wash, then return the braided challah to the warm oven. Let rise for another 45 minutes (save the egg wash, you'll need it again shortly).
  16. Once it has risen, paint the challah with more of the egg wash, then sprinkle with seeds, if using. Set aside (out of the oven) briefly.
  17. Preheat the oven to 375.
  18. Bake the challah for 30-35 minutes, or until golden-brown, and hollow-sounding when rapped gently on its bottom.
  19. Let cool slightly, then serve.


Category: Meals

Tags: , , , ,

Share this Recipe: Share on Facebook Tweet This! Pin it on Pinterest

Vegetarian Green Chile Enchiladas

  • Prep Time 0:30
  • Cook Time 0:40
  • Estimated Cost $13
  • 36 Comments

I returned from the trip longing for all the accoutrements of my vacation: toasty kiva fireplaces, fresh sopapillas with Taos honey and green chilies on everything. 

After spending Chrismukkah with my family in Sonoma County, and New Years with his in Milwaukee, Evan and I hopped a scarily small plane from MKE to Santa Fe for a romantic mini-vacation. We spent 2 days in Santa Fe and 2 in Taos. We soaked in a private hot tub overlooking snow-capped mountains at Ten Thousand Waves, hiked near the Rio Grande Gorge Bridge in Taos and ate our weight in chilies and mole sauce.

Aren't we cute? 

Aren't we cute?

As tends to happen, I returned from the trip longing for all the accoutrements of my vacation: toasty kiva fireplaces, fresh sopapillas with Taos honey and green chilies on everything. 

Since I don't have a fireplace in my San Francisco apartment (Do you? I'm coming over.), and regular consumption of deep-fried bread, though delicious, doesn't really support my chances of fitting into my favorite jeans, I figured green chilies were the way to go.

We bought some roasted green Hatch Santa Fe chilies on our trip, but I'm saving those for later. Regular old jalapeños and poblanos worked perfectly here. I roasted the chilies with tomatillos, onions and garlic, and pureed them into a perky but mellow sauce, which I poured over corn tortillas filled with vegetables and cheese.

New Mexican cooking truly is a hybrid of Mexican, Native American and Tex-Mex food. Real, whole chilies get combined with regular American cheddar or jack cheese, as opposed to a more traditional Mexican cheese--still, these would be delicious with queso blanco or queso quesadilla, if you're so inclined. 

I served mine topped witih greek yogurt in lieu of sour cream and a few slices of avocado. I sat down, took a bite, and let the sweet memories come flowing back.

Delicious, in so many ways.

Ingredients

  • 4 cloves garlic, peeled, ends removed Pantry
  • 1 medium onion, peeled and cut into large chunks $0.50
  • 2 green peppers, seeds and veins removed, cut into large chunks $0.50
  • 2 poblano peppers, seeds and veins removed, cut into large chunks $1
  • 6 small (or 3 large) tomatillos, husks removed, quartered $2
  • extra virgin olive oil Pantry
  • salt and pepper to taste Pantry
  • 2 medium Russet potatoes, scrubbed and diced $1
  • 1 large or 2 medium sweet potatoes, scrubbed and diced $1
  • 1 large bunch kale or Swiss chard (stems discarded), chopped thinly $1.50 
  • 1 handful fresh cilantro leaves, chopped $1 for a bunch
  • 12 corn tortillas $1.50
  • 2 cups shredded jack or cheddar cheese $3 for an 8-oz. block

Recipe Serves 4-6

Directions

  1. Preheat the oven to 375 degrees F.
  2. Place the garlic, onion, jalapeños, poblanos and tomatillos on a baking sheet.
  3. Drizzle olive oil liberally over the mixture and toss together well.
  4. Spread the oiled mixture over the baking sheet in an even layer.
  5. Roast for 25-30 minutes, or until the peppers are very soft.
  6. While the pepper mixture roasts, place the potatoes, sweet potatoes and kale in a large pot with 3 cups of water.
  7. Cover with a fitted lid, and bring to a boil.
  8. Once it boils, reduce heat to medium-low and simmer until both kinds of potatoes are cooked through. Remove from heat, season with salt and pepper to taste, and set aside.
  9. Once the pepper-onion mixture has finished roasting in the oven, puree it with the cilantro and 1 cup of water. (Leave the oven on.)
  10. Transfer the pureed mixture to a pot (or transfer it to a pot and use an immersion blender right in the pot).
  11. Cook the green pepper sauce over medium-low heat, until it reaches the level of spiciness you like (the more you cook it, the milder it'll be come--and remember, you'll be cooking it more when you bake your enchiladas). Once it's mild enough, remove from heat and let cool until warm to the touch--but not hot.
  12. To assemble the enchiladas, grease a 9"x13" baking dish with olive oil.
  13. Microwave the tortillas for 30 seconds or so, to soften them.
  14. Dip a tortilla into the sauce, and pull it out, shaking off excess.
  15. Place 2-3 tbsp filling, plus a generous sprinkle of cheese into the tortilla and roll it up.
  16. Place the rolled-up tortilla, seam-side-down, into the prepared pan, and repeat with the remaining tortillas, sauce, vegetables and cheese (make sure to reserve about 1/2 cup cheese for the top).
  17. Pour whatever sauce is left over all the rolled tortillas in the pan. Top with the reserved cheese.
  18. Cover the pan tightly with foil and bake at 375 for 15 minutes. 
  19. Remove the foil and bake for another 10-15 minutes, or until the cheese is bubbly and browned.
  20. Let cool slightly, then serve.