BrokeAss Gourmet

BrokeAss Gourmet

30-minute bagels

  • Prep Time 15 minutes
  • Cook Time 17-20 minutes
  • Estimated Cost $4
  • 43 Comments

About five years ago, I ran into an old boyfriend at a restaurant in my hometown. I was finishing lunch with my mother and then eleven-month-old daughter Anna, when I glimpsed him, sitting across from a man I didn't recognize, eating a salad. It was simultaneously jarring--we hadn't spoken in years, and I had no idea he was living in town--but it was also nice, because he was someone I had always genuinely liked, which neither distance nor the passage of time could diminish. 

I blurted his name out, and he turned to face me, seemingly as stunned as I was. He and I chatted awkwardly for a few minutes, I introduced him to my daughter, and then we were on our way, leaving him and his friend to their meal. We went on with our day, but it was hard to stop thinking of the strange, seemingly-out-of-nowhere brush with the past. We were teenagers when we were together, long before I was anywhere close to fully-formed or actualized, if that's even a thing one can ever be. My not particularly self-compassionate memory of my teenage self is as an overdramatic, self-absorbed bottomless well of need for attention. There was no way that, in the three minutes I fumbled through niceties while my daughter gnawed on the leftover crusts of her grilled cheese and my mother and his friend stood by, that I had succeeded in demonstrating how far I had come since the days I used to cry on the phone on a semiweekly basis. 

As I nursed my daughter before putting her to bed that night, replaying the lunchtime run-in over and over again in my mind, I realized that, in the years that had passed, I had come to think of him as the sort of keeper of everything I hated about myself when I was younger, not necessarily because they were all I ever was when we were together, but because we had largely cut off contact with one another by the time we were twenty, and so, to my mind, everything I evenutally outgrew, and the ways I eventually grew up didn't factor in to his understanding of me. I had this image of him walking around with memories of me exclusively as a depressed, dramatic, attention-craving seventeen-year-old, and it made me feel crazy. I was different now! Didn't he know that? I was actually pretty successful in life! I had written four books, produced a five-season TV comedy based on my life and writing, not to mention gotten married to a great guy and had a kid? You might be asking yourself, "Gabi, why did it matter what someone you weren't even in touch with thought about you--if he ever thought about you at all?" Don't worry, I'm getting there.

I obsessed about it for maybe a month, and then I did something that was either the best or worst possible next move, depending on your perspective: I dug up his email address and wrote to him to see if he wanted to get together for coffee to catch up sometime. Perhaps with an hour of his attention and a couple of lattes, I reasoned to myself, I could convince him of how much I had grown in the past two decades, and he'd update the Gabi Moskowitz file he surely keeps in his mind, and finally, I would be redeemed.

Reader, he did not respond, and instead of reminding myself that I was a thirty-seven-year-old married woman with a baby, and not a dejected high school senior, my feelings were hurt. I had, quite literally, reached out to my past, and my past couldn't even be bothered to make up a face-saving lie about how "things are super busy right now, but I'll let you know when I have time." Maybe all my worst fears about my high school self were true after all, and he hadn't forgotten. Maybe he'd seen my name pop up in his inbox, and thought to himself, "no, thank you," and promptly clicked delete. 

I've been thinking a lot about this encounter lately as I've been pondering what my return to blogging might look like after spending the past five-plus years mostly focusing on parenting, podcasting, and revising the manuscript of my first novel, but publishing almost nothing. A lot has changed since I first started blogging, when I was a twenty-seven-year-old, perpetually single city dweller, hell-bent on becoming a professional writer. Now, almost thirteen years later, I've somehow become a forty-one-year-old married suburban mother of two, struggling to reconnect to the part of me that started this journey, back when I had all day to myself to shop, cook, photograph, and write. Back when drinking four glasses of wine at a press event didn't absolutely destroy me for the next three days, and I didn't have preschool tuition, or pediatrician appointments, or the needs of literally anyone else to worry about.

I keep reaching for her, every time I sit down to write, trying to conjure her confidence and willingness to throw anything at the sauce-splattered kitchen wall and see what sticks to it, but time after time, she leaves me on read. Is she still somewhere inside me, buried beneath all the mental labor and mom anxiety overtaking my brain, or did she leave me for somewhere cooler, maybe where Cocomelon and Raffi don't start blaring every third song when the music on my phone is set to shuffle? Is she ever coming back? 

I managed to get over the ghosted ex-boyfriend email pretty quickly. All it took was a little self-reflection and a smidgen of therapy to conclude that I was, as was, admittedly, sometimes my tradition, being a little bit overdramatic. He was not, in fact, the keeper of everything bad about me, because a) that's not a thing, and b) even if it were, who cares? He's not the owner of a company I'm trying to work for or The New York Times' book editor. His opinion has no bearing on my actual life, but furthermore, whatever reason he had for not responding to my email was none of my business. 

I keep wondering if the same logic applies to the other person not taking my calls: the writer I was before I went barrelling toward middle age. She doesn't appear to be coming back any time soon, but maybe that's okay. Maybe she doesn't even exist anymore, at least not in the form she used to occupy. Certainly this is true of the way I cook now. I still cook for my own tastes, yes, but the needs of the husband and tiny snack monsters I've acquired in the past decade factor in too, and some of them--and I am not naming names--are still not completely sold on vegetables. Maybe instead of trying to cajole my twenty-something writer self into reemerging, I should just let her go and work on getting to know my forty-something writer self. Who knows? Maybe she has some good ideas.

Here's what I know:

I still like to write longmeandering headnotes often more about feelings than the food. If you're one of those people who likes to Tweet about how food bloggers should just get to the recipe without yammering so much, first of all, stop making that joke, it's tired and disrespectful. Second, listen to this song. Third, if you're still not convinced recipes go well with long stories, then I'm probably not the blogger for you.

I still love developing and photographing recipes, even if my photos aren't the aesthetic ideal when you think food blog (there are so many bloggers who do that bit better than I do and I love that for them).

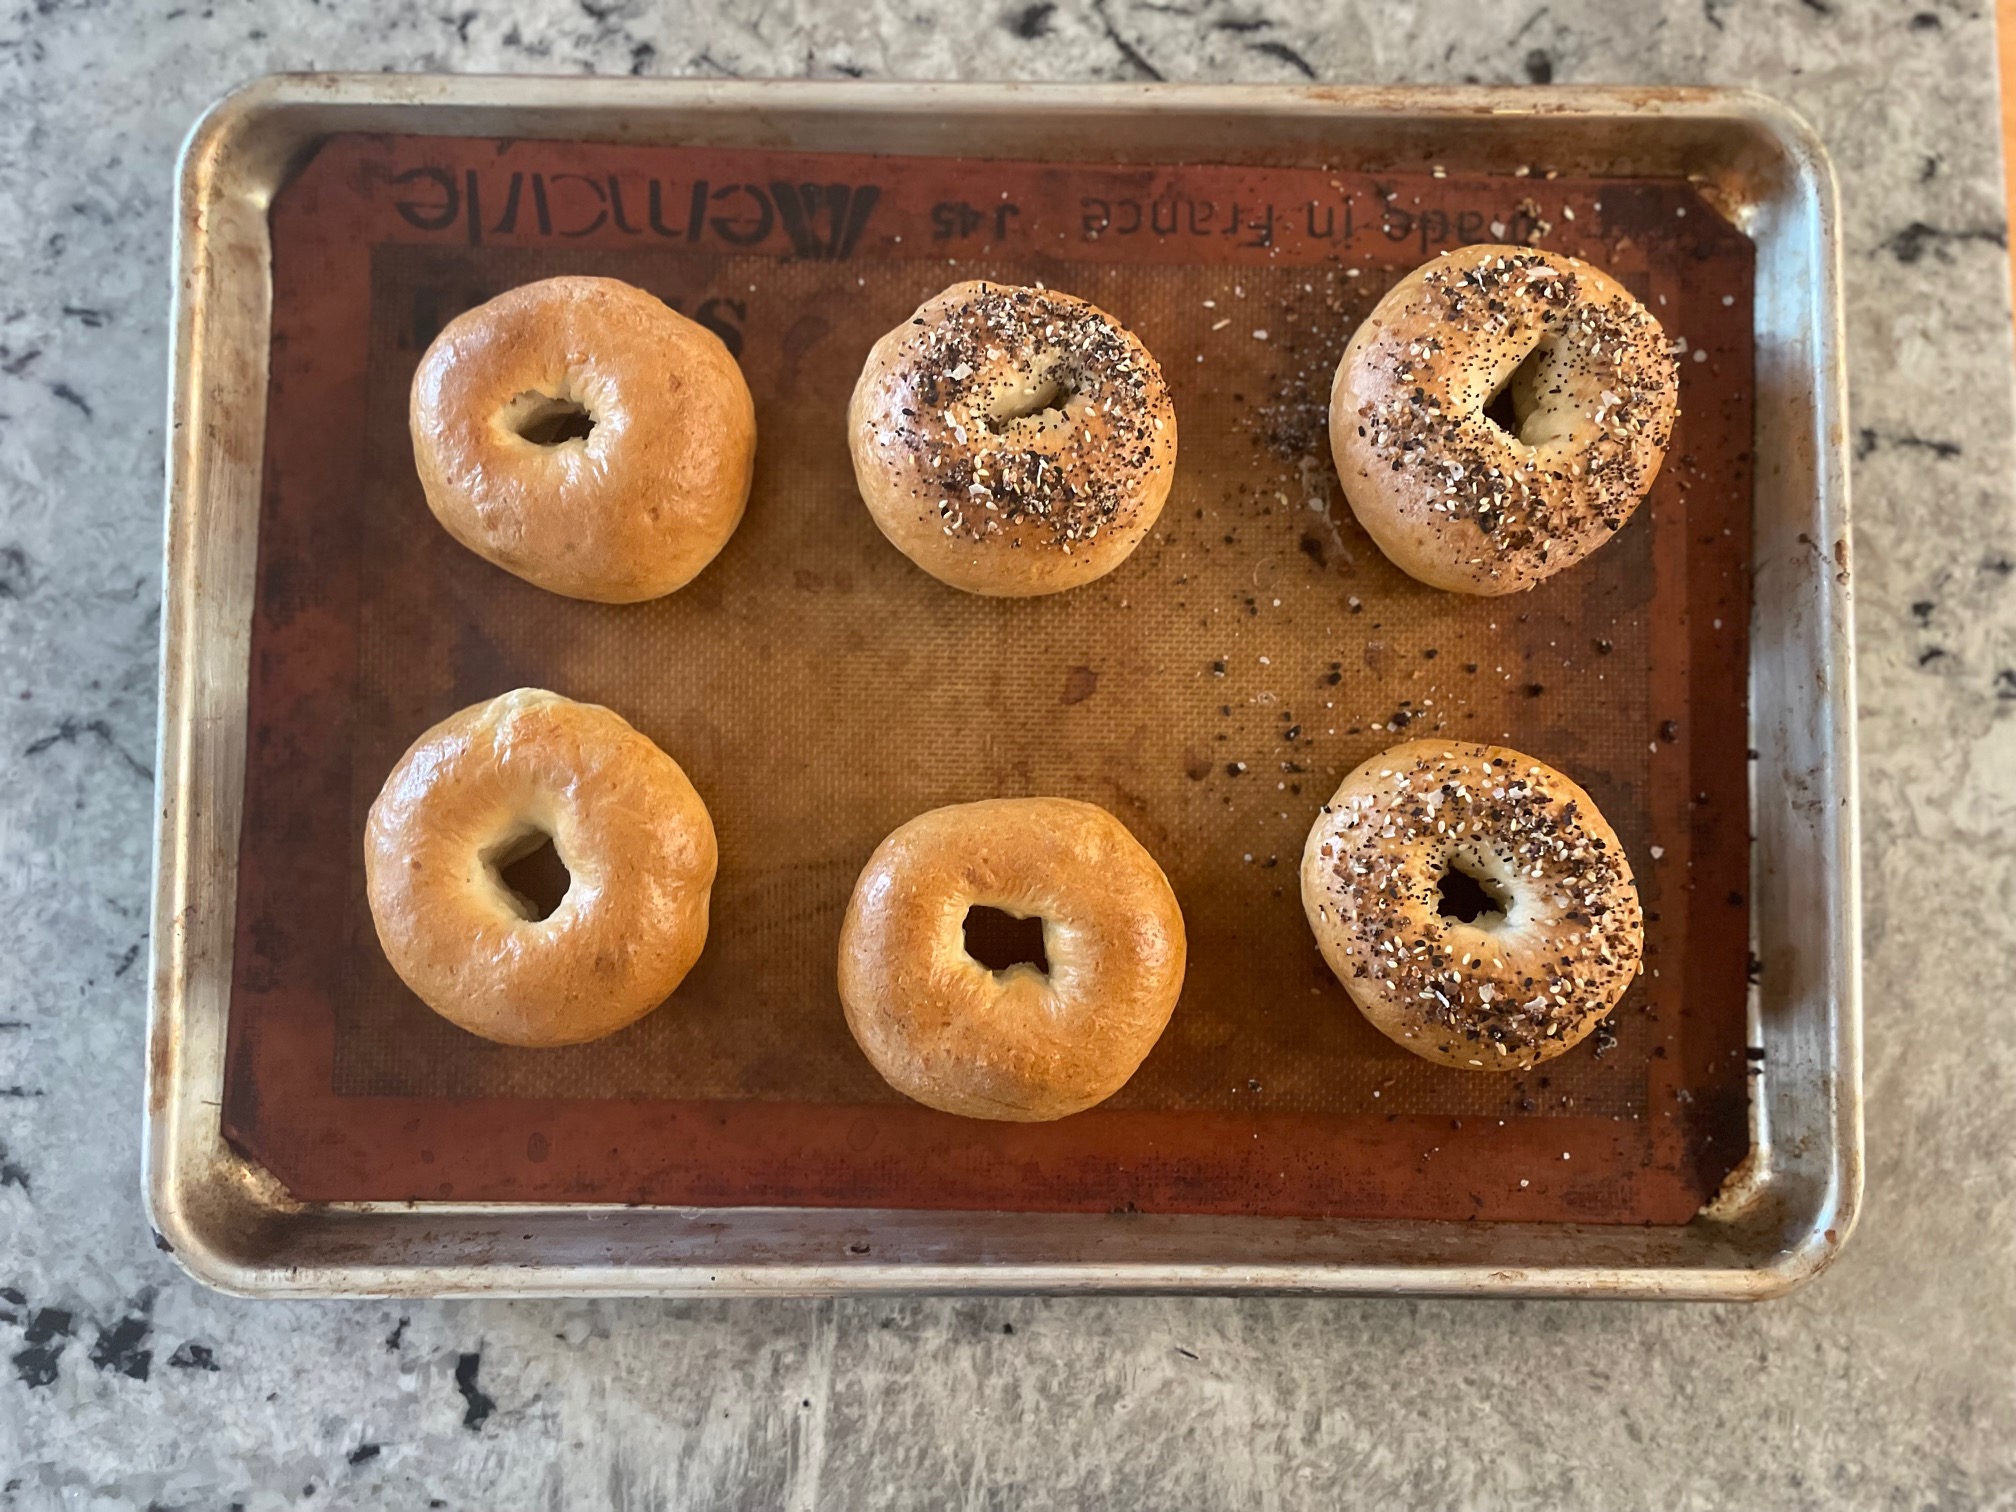
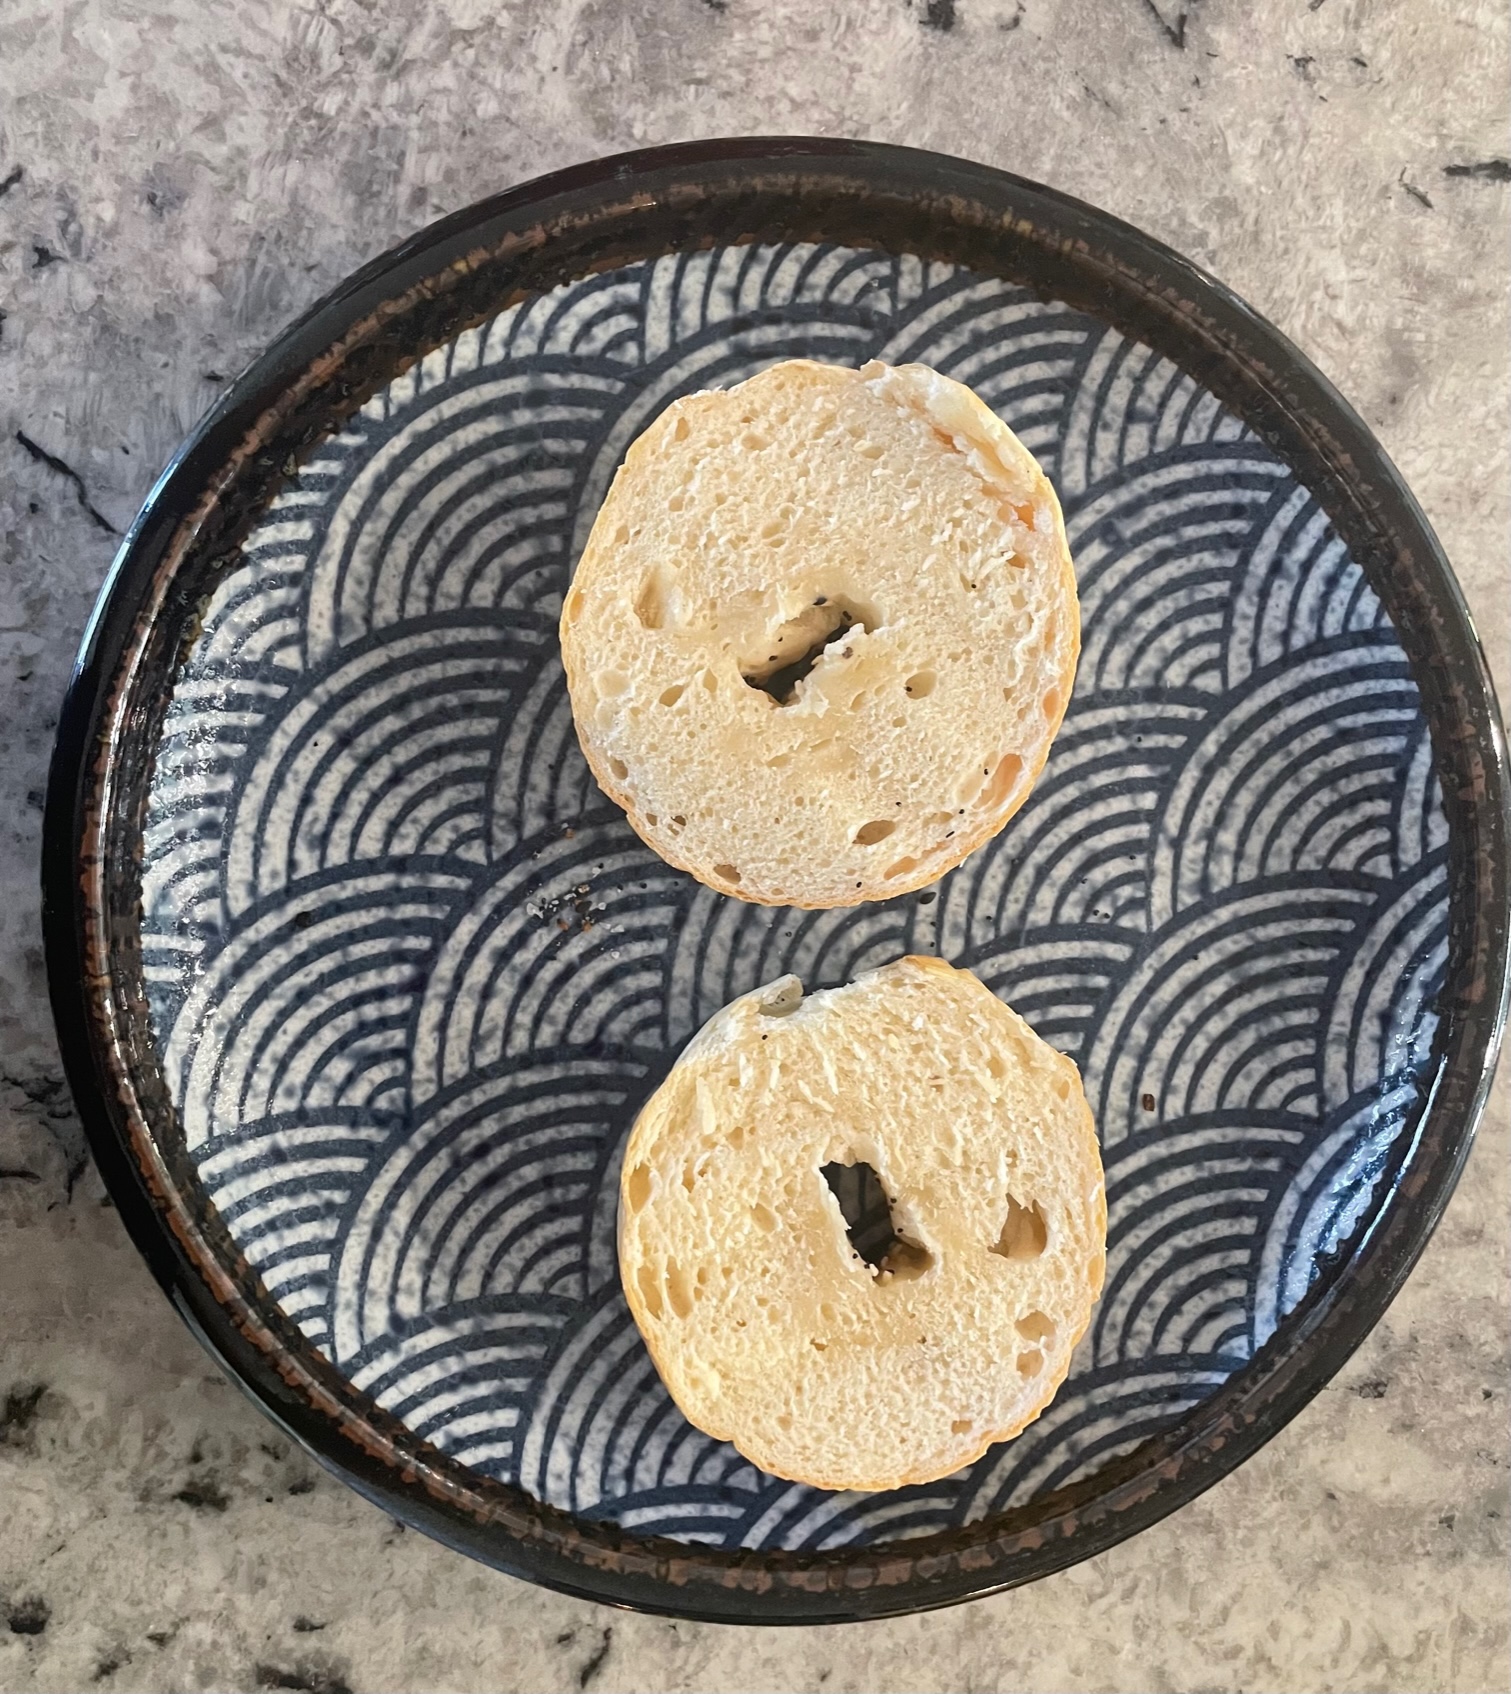
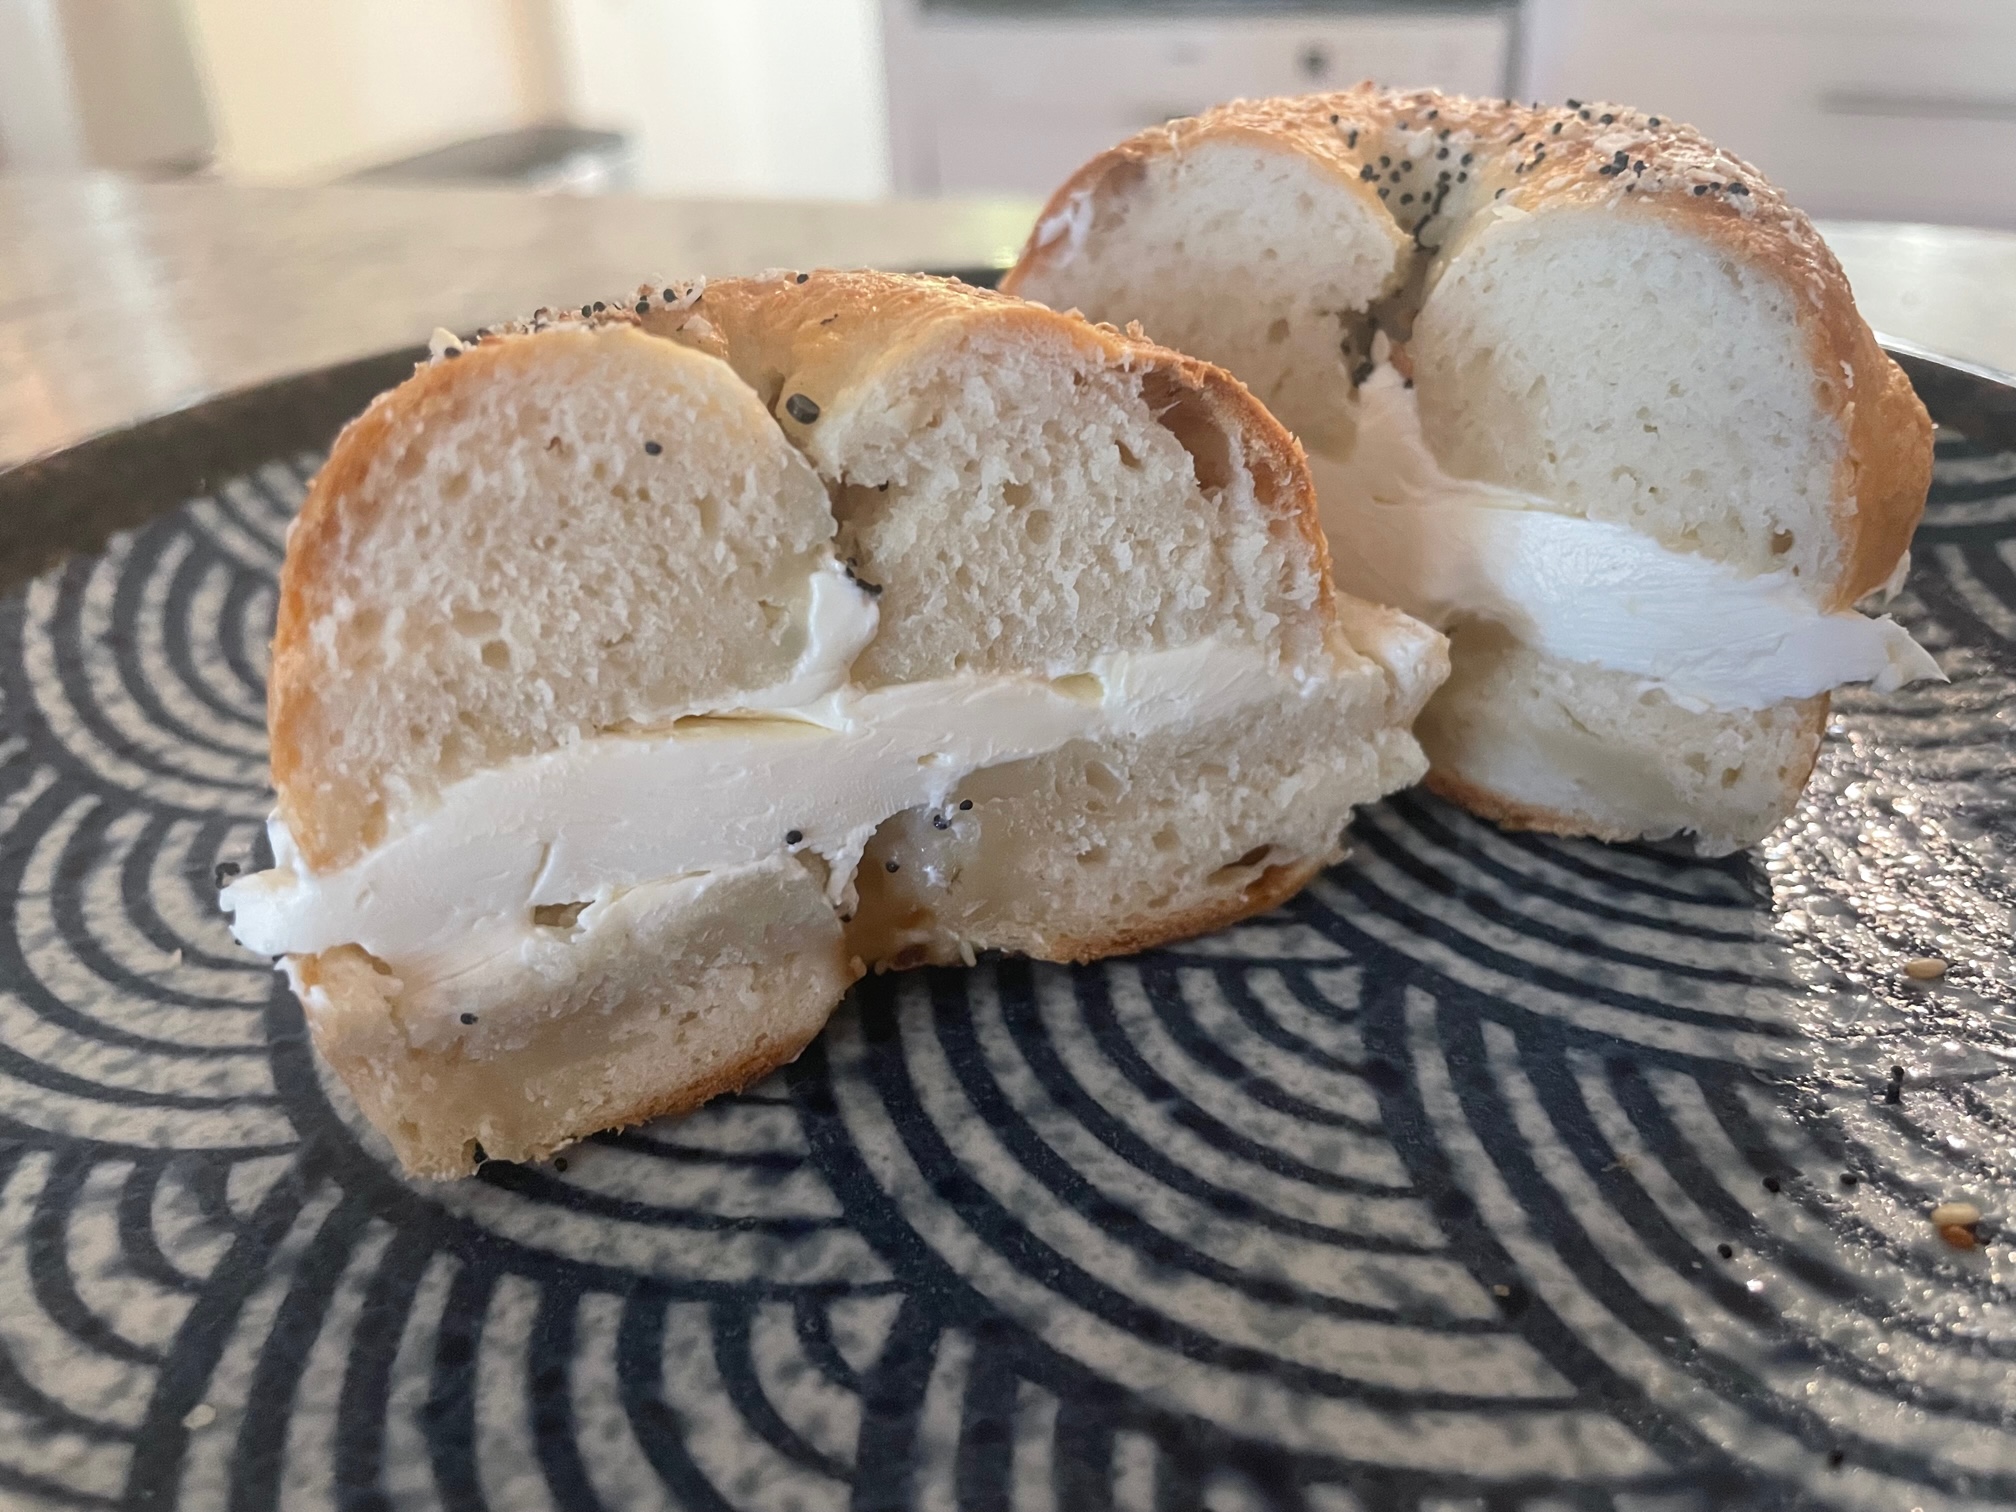
These bagels (Aha! There's IS a recipe in this post! I told you my headnotes are meandering.), which contain no yeast and require zero rising time--just four ingredients which you very likely already have on hand--and can be on your plate, spread thickly with cream cheese, ready to be devoured within 30 minutes of realizing you're hungry, are one of the best things I've made in a long time. Not only are they delicious, they're so easy, wildly cheap, and a favorite of every person I live with (no easy task). 

I don't say this lightly: in the time it would take you to put on shoes, drive to a bagel shop, wait in line, and order, you could be eating these hot out of the oven, and they will genuinely be better. Here's how to do it.

Combine flour (either bread flour or AP flour -- bread flour will yield a chewier bagel, but AP is good too), baking powder, salt and nonfat Greek yogurt (make sure to use nonfat, not for diet reasons, but because even though this is a super nontraditional bagel recipe, bagel dough is typically fatless, and using nonfat yogurt will help them rise nicely) in a large bowl or stand mixer.

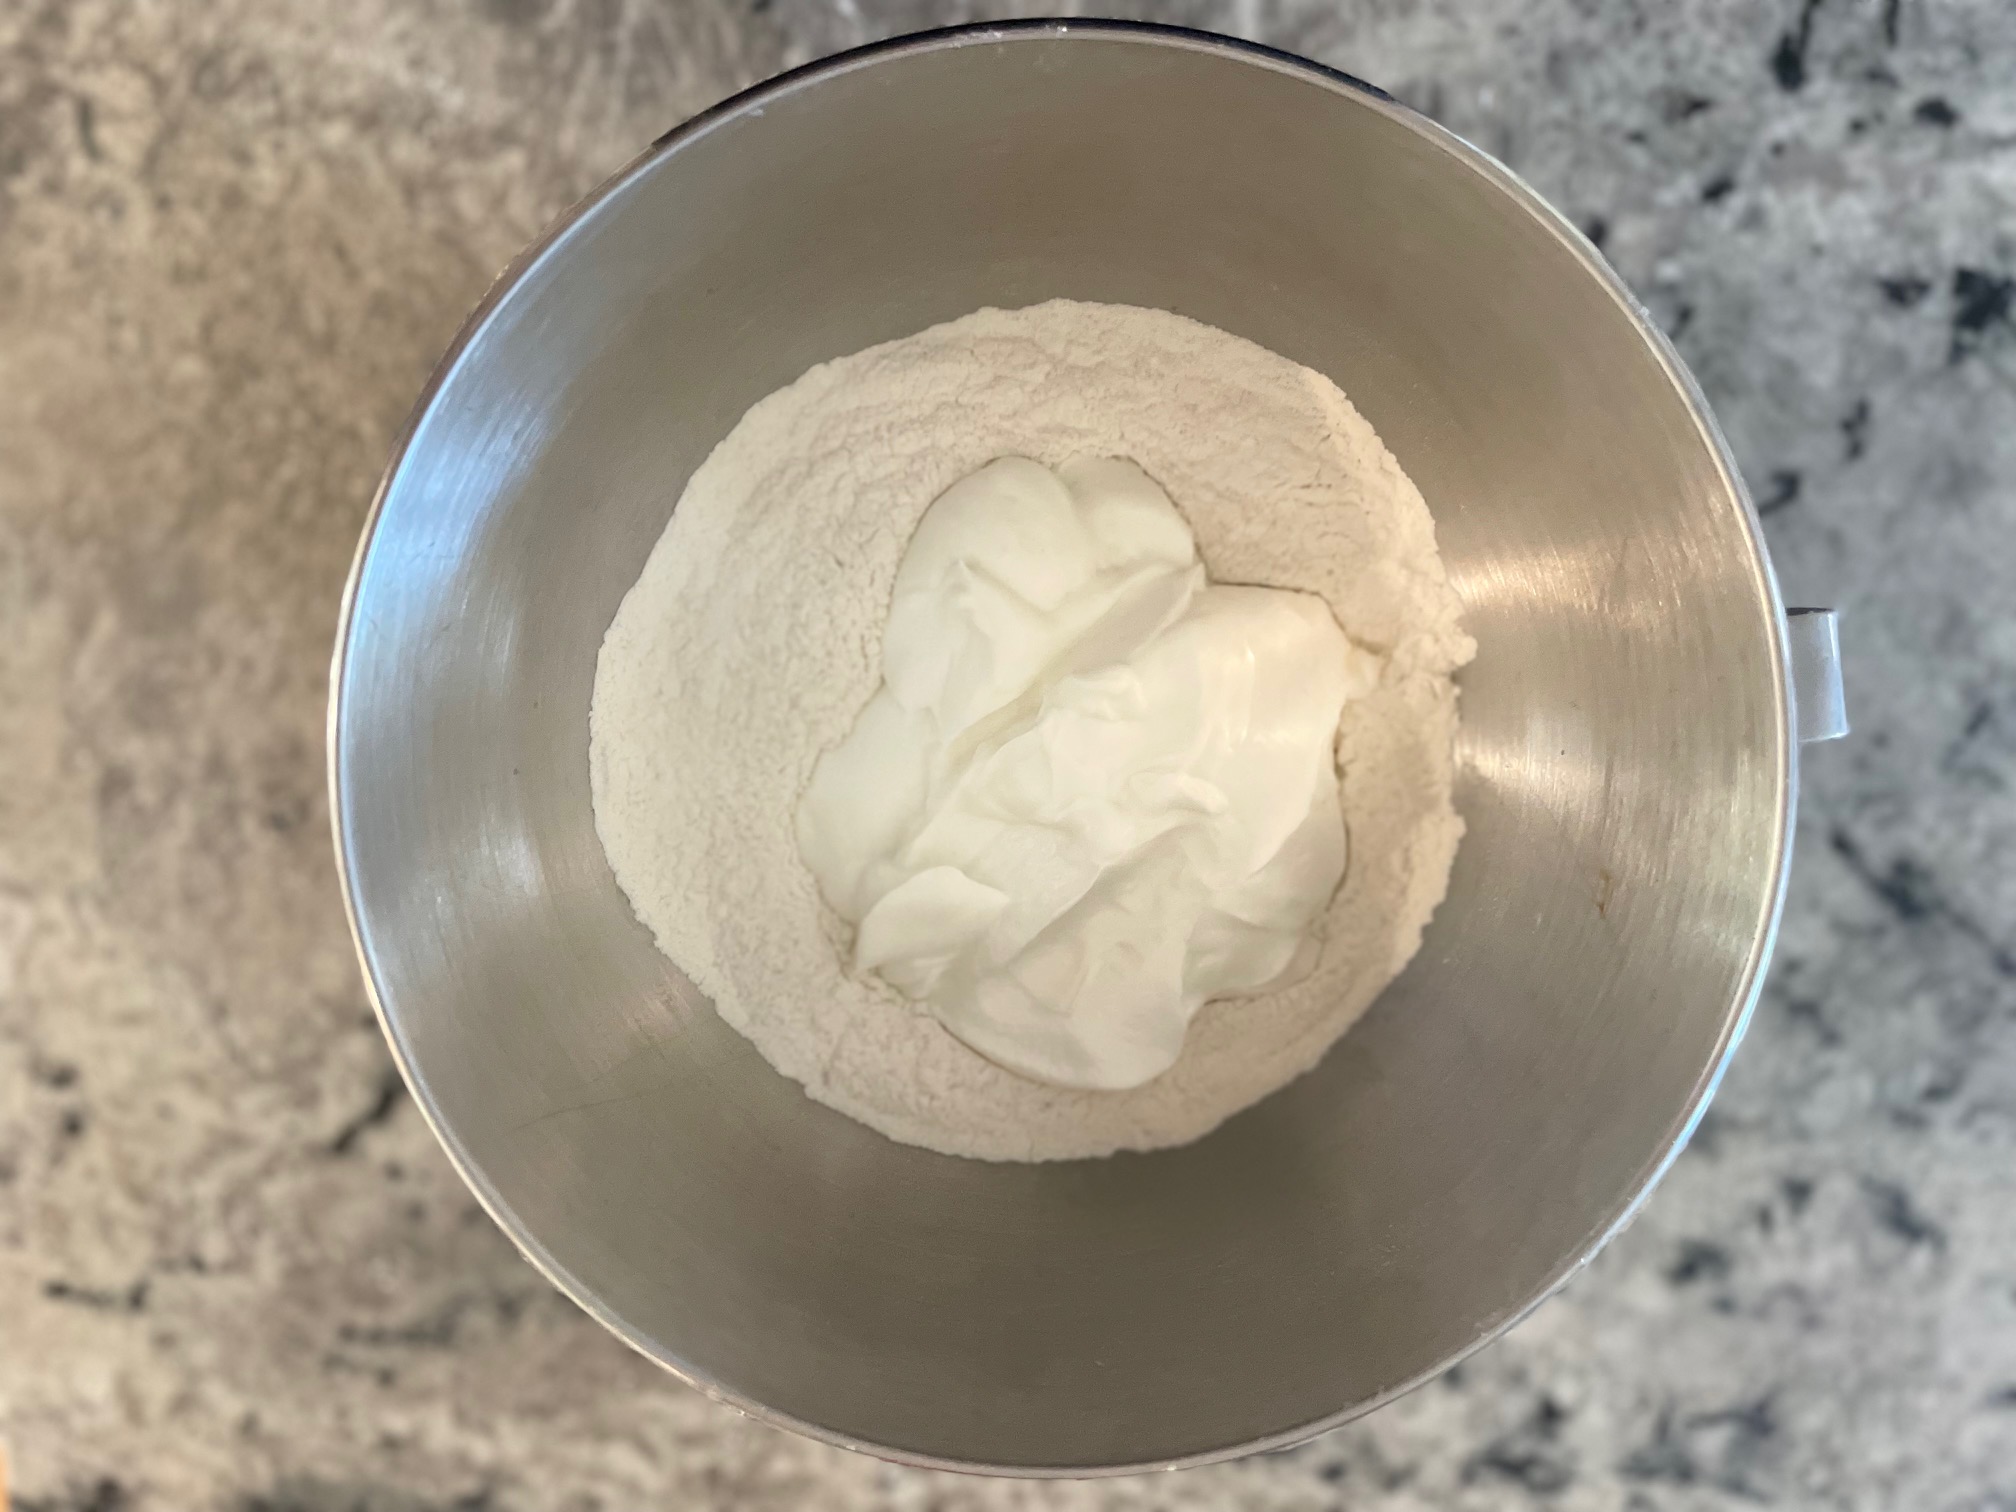
Mix it (I like to do this by hand, even if I'm using a mixer). It will be very shaggy, almost like biscuit or pie dough, but keep going. It'll come together eventually.

Once you have a cohesive ball of dough, knead it for 8-10 minutes, until very smooth and elastic.

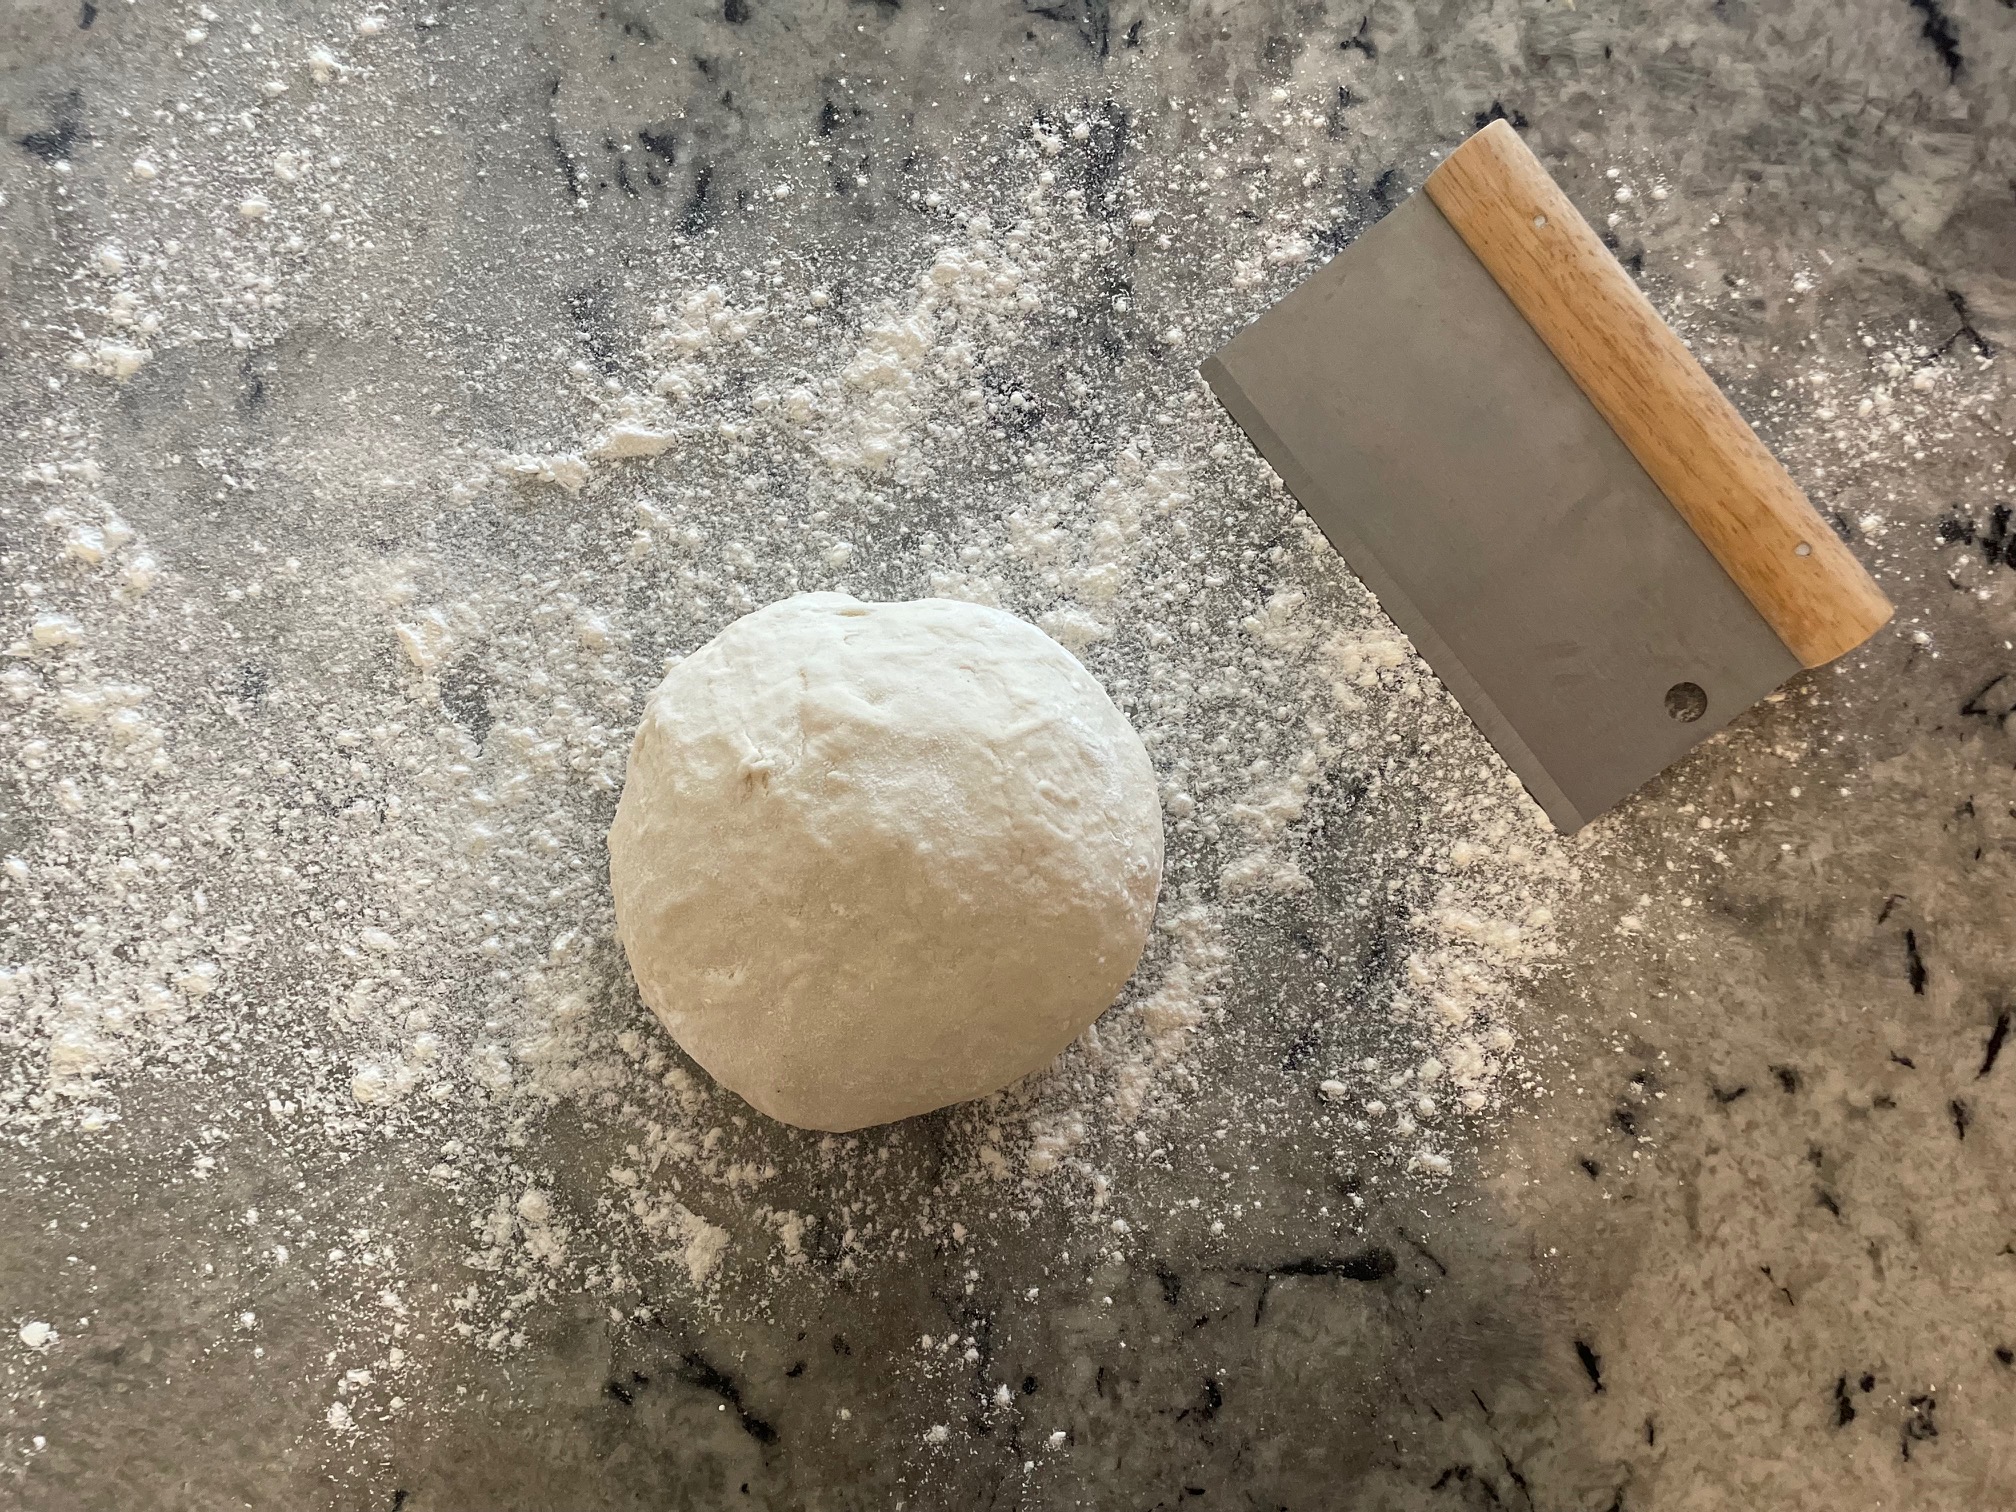
Cut the dough into 6 equal pieces (or 8-10 for smaller bagels).

Shape the pieces into balls, then poke a hole in the center and stretch into bagels. 

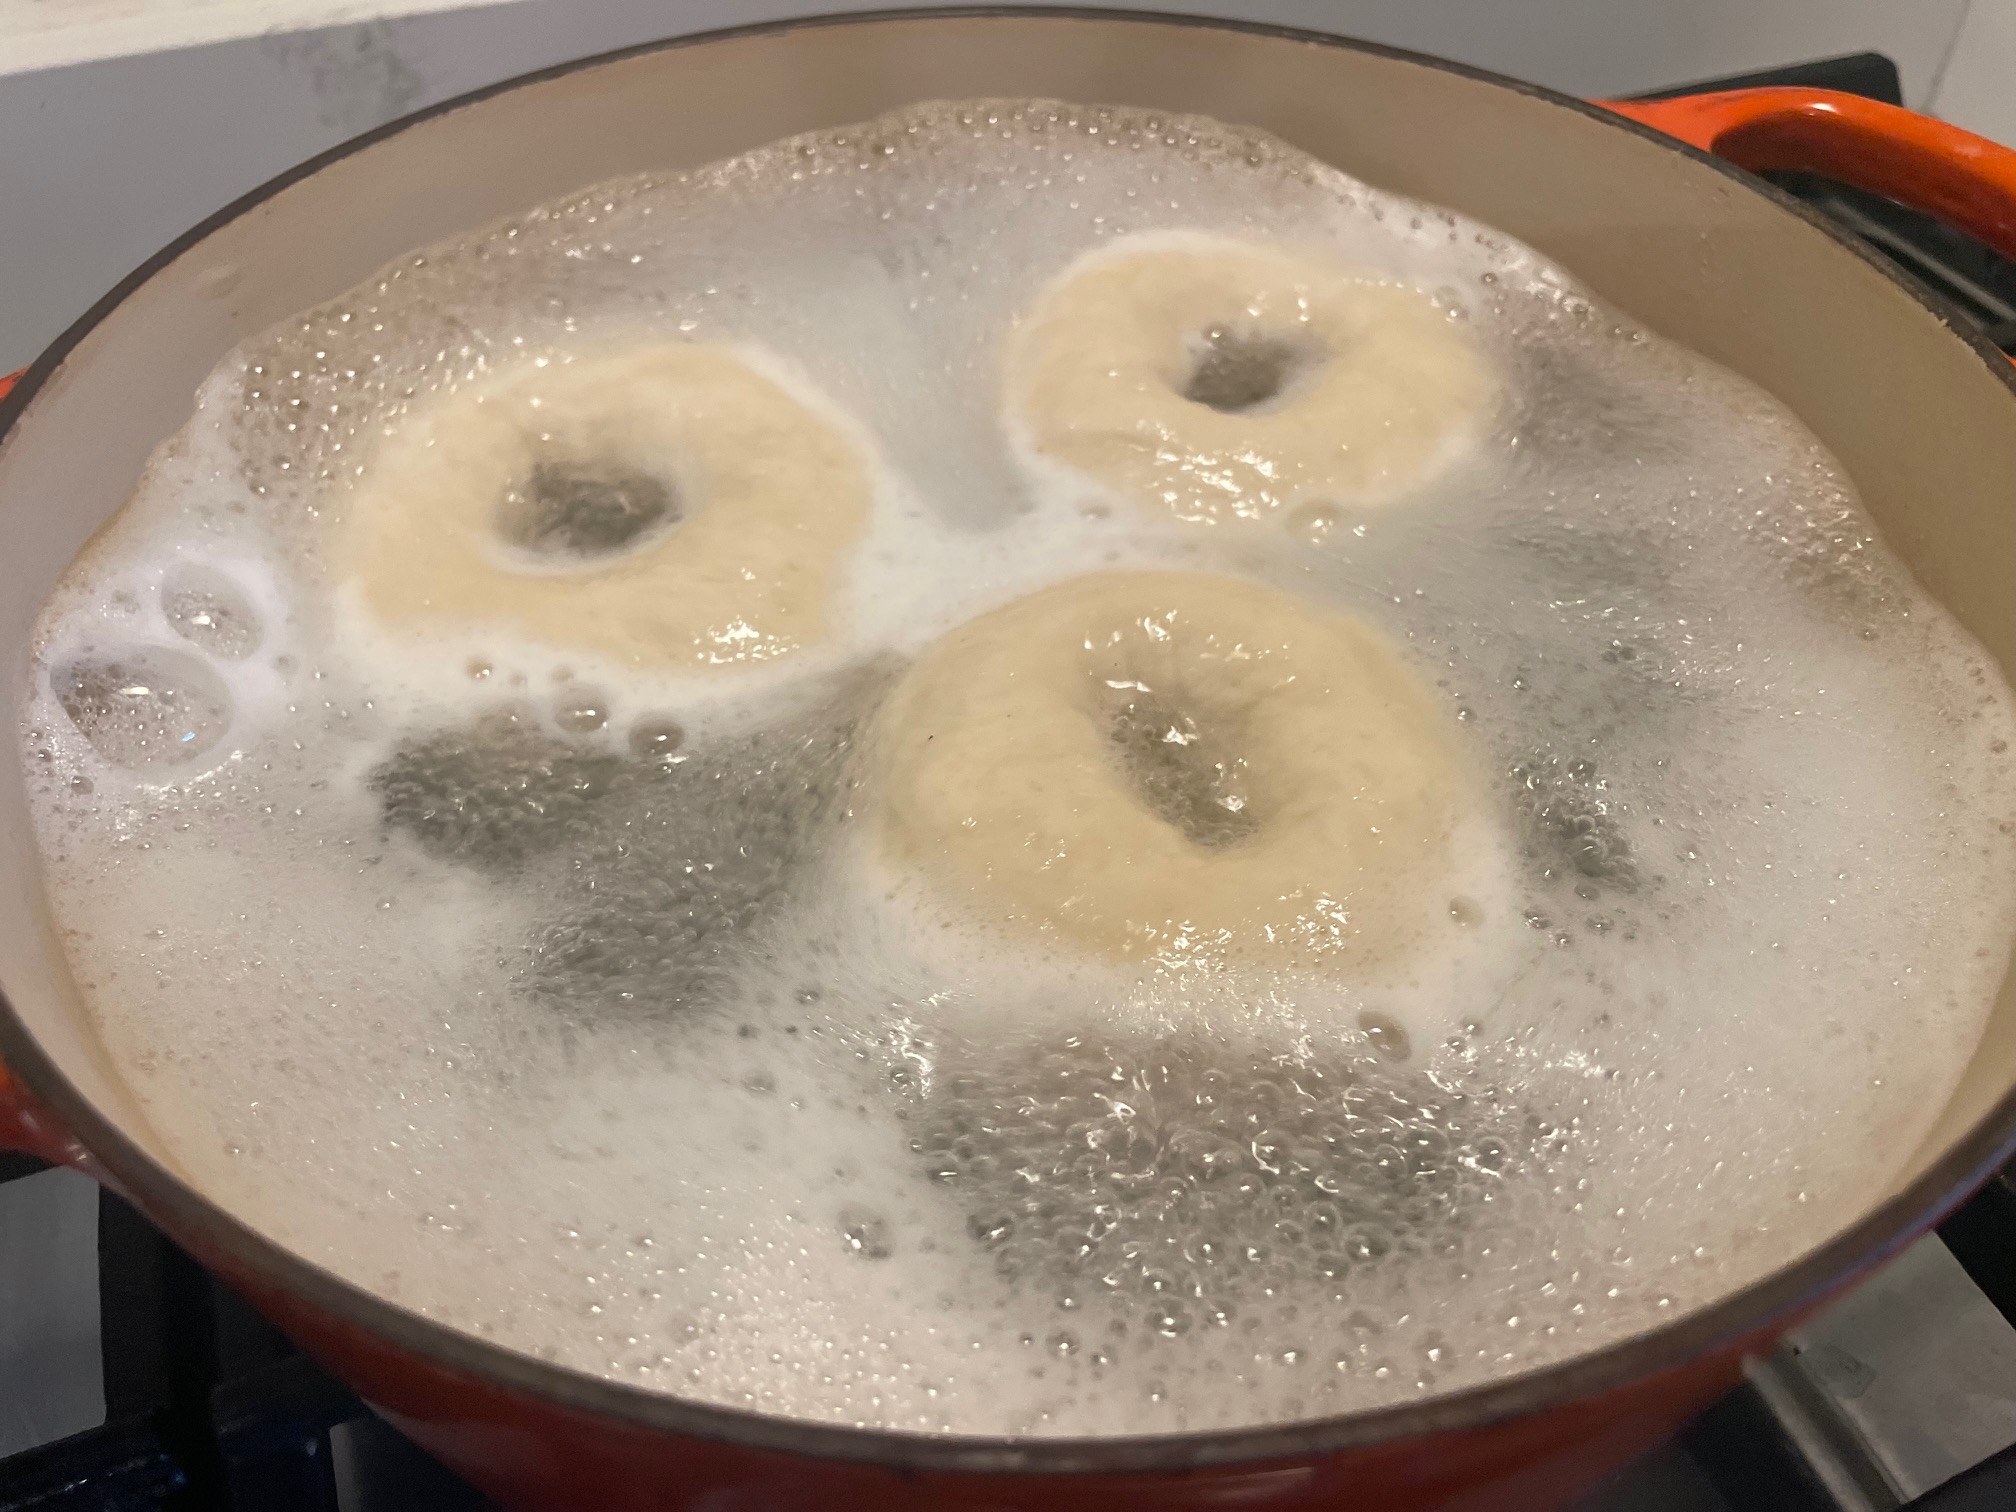
Boil the bagels for 1 1/2 minutes on each side.

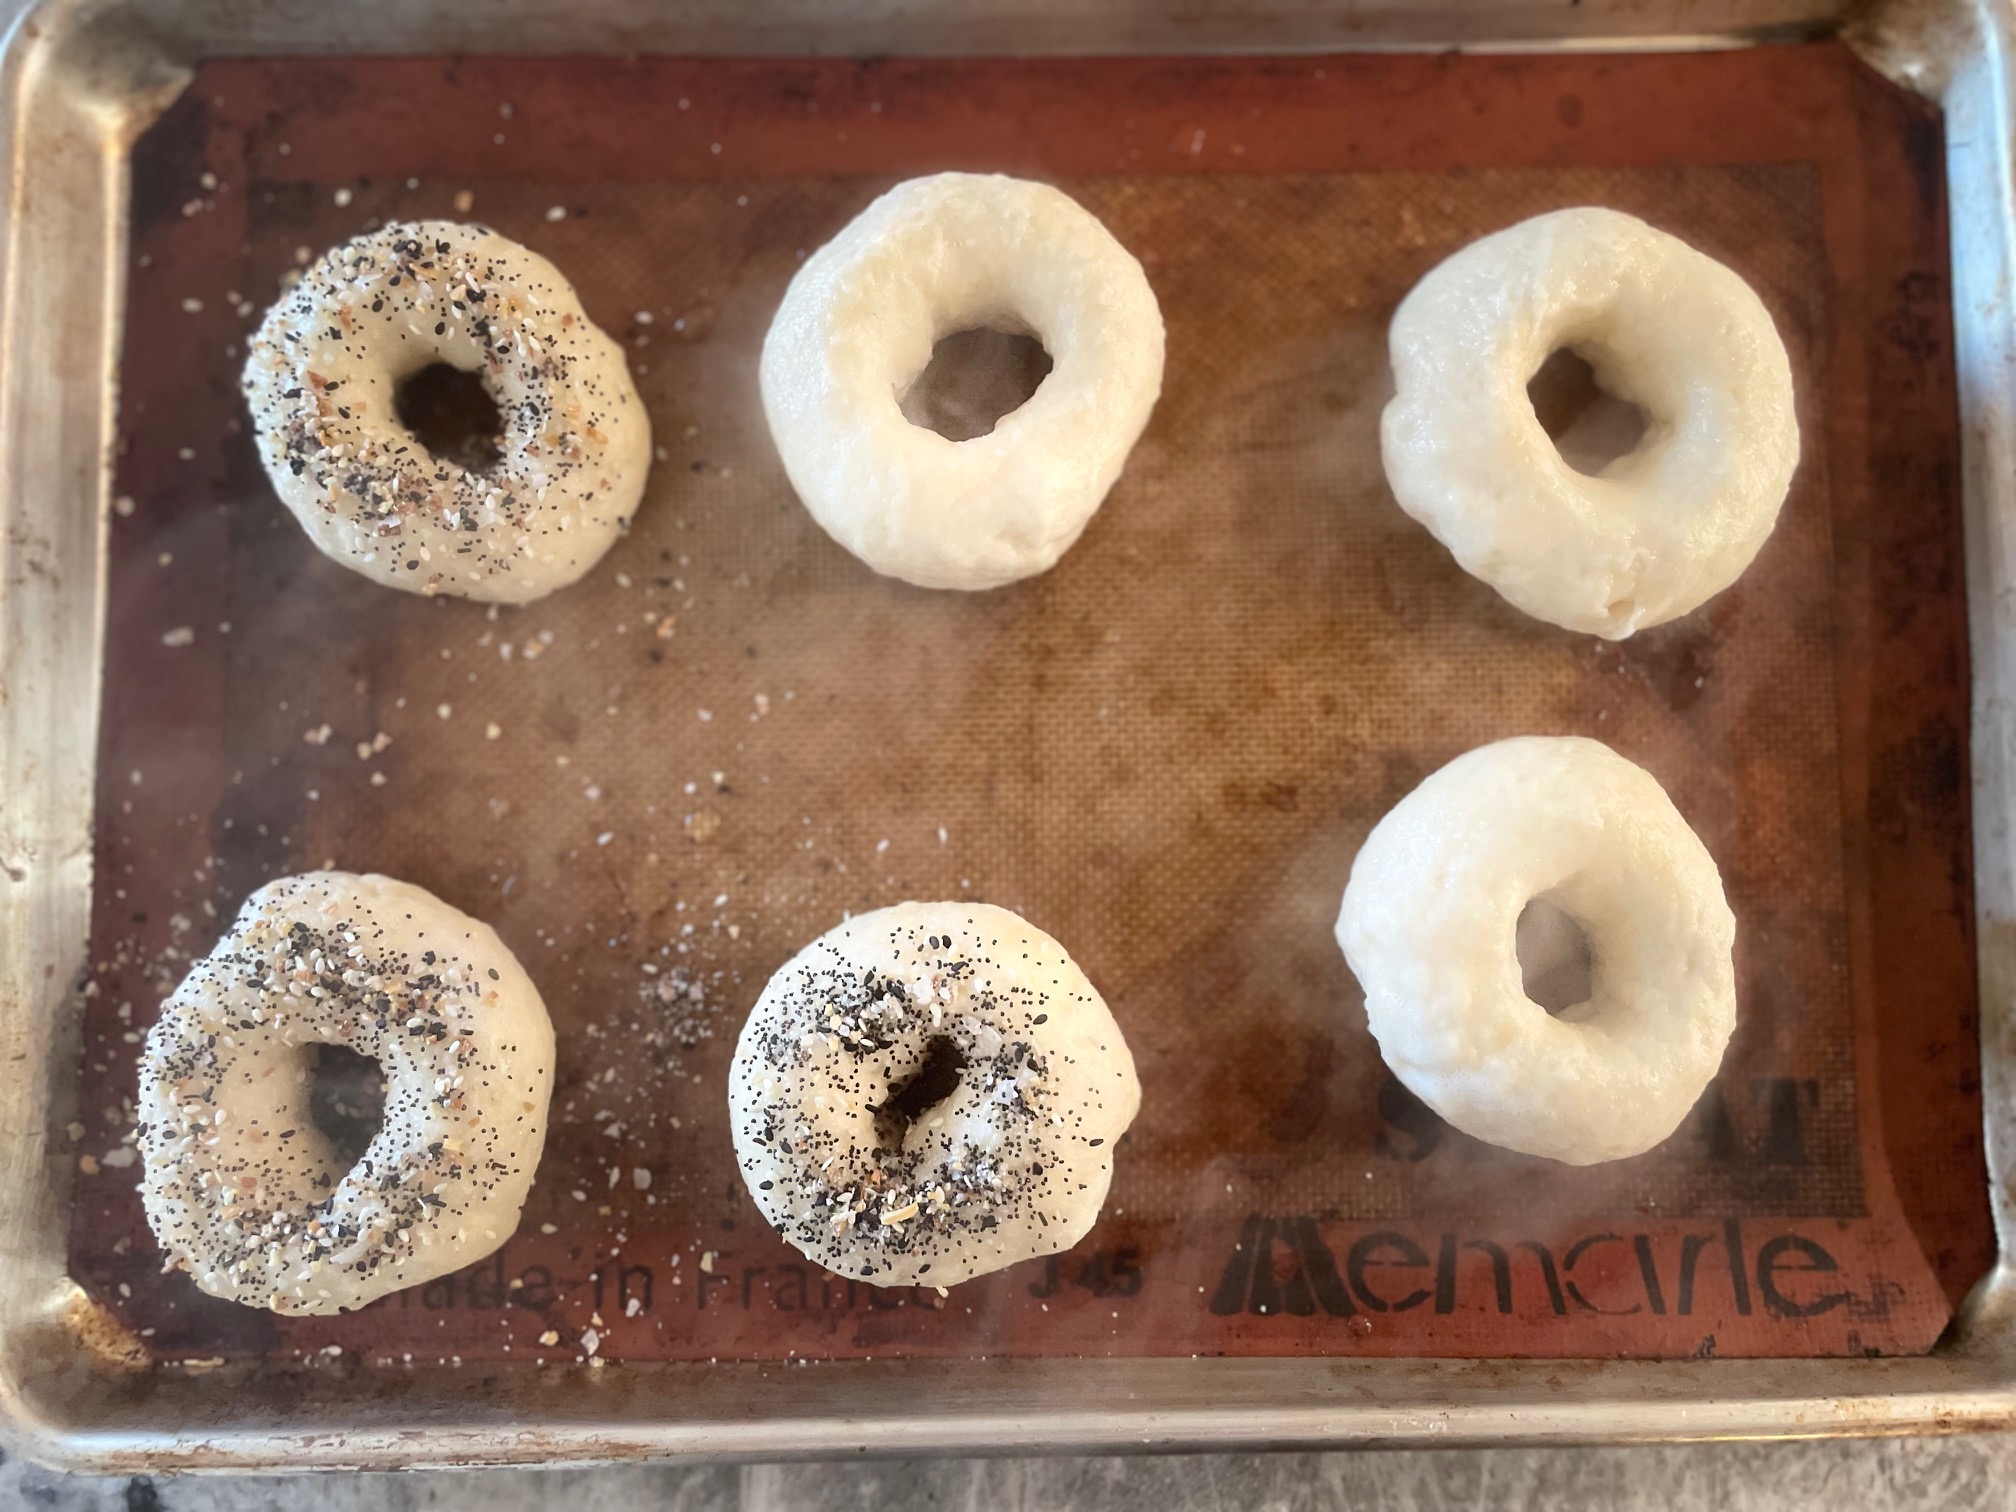
Arrange the boiled bagels on a lined rimmed baking sheet. Top if desired (no need for egg wash).

Bake at 475 for 17-20 minutes, then do your best to let them cool for 10 minutes before diving in.

\

They may not be the same as traditional bagels, but they're pretty damn close. Think of them as a twist on an old classic: that familiar taste you know and love, just...updated.

Ingredients

  • 3 cups (400 grams) bread flour or 3 cups (360 grams) all-purpose flour Pantry
  • 2 tablespoons baking powder Pantry
  • 1/3 teaspoon kosher salt Pantry
  • 1 1/2 cups nonfat Greek yogurt $4 for 16 ounces

Recipe Serves 6

Directions

  1. Preheat oven to 475 degrees F.
  2. Line a rimmed baking sheet with parchment, a silpat, or grease lightly with cooking spray or olive oil.
  3. Fill a large, wide pot (like a dutch oven) with water and bring it to a boil.
  4. While the water boils, whisk the dry ingredeints together in a large bowl or the bowl of a stand mixer.
  5. Add the yogurt and mix. At first, the dough will be very shaggy, but as you continue to mix, the yogurt will hydrate the flour. 
  6. Knead for ten minutes, either by hand or in a stand mixer, until the dough is smooth and elastic. This step is necessary to achieve bagels with that classic chewy texture.
  7. Optionally, allow the dough to rest at room temperature for up to an hour. This helps relax the gluten in the dough, making it easier to roll out, but is not required.
  8. Cut the dough into 8 equal portions (6 for large bagels, 10 for smaller ones).
  9. Roll each piece into a ball and gently poke your finger through the center, stretching each piece until it resembles a bagel.
  10. Bring the pot down to a simmer, then, working in batches, drop a few dough rings into the simmering water.
  11. Simmer for one minute on each side, then transfer to the prepared baking sheet. If you want to add toppings, now is the time (no egg was is necessary, just top the wet bagels with your preferred ingredients).
  12. Repeat until all the bagels have been boiled, and bake for 17-20 mintutes, until bagels are nicely browned with a thick crust, and sound hollowed when tapped gently on the bottom.
  13. Let cool on the baking sheet for 10 minutes, then slice and serve. 
  14. Store leftovers in an airtight container in the fridge for up to a week. 

Category: Articles

Share this Recipe: Share on Facebook Tweet This! Pin it on Pinterest

I love grocery shopping.


I love making a list, plotting everything I’m going to cook with it later in the week. I love checking my pantry just before I go to see if there’s anything I’m running low on, and adding it to the list in addition to my weekly usuals. I love visiting multiple stores (usually Trader Joe’s, Whole Foods, my local favorite, Nugget, and maybe once a month, Costco) because I like different things from different stores (there is, for example, no dried pineapple like the Dried Baby Pineapple from Trader Joe’s, no peanut butter as good as the organic unsweetened Whole Foods creamy peanut butter spread, and no ricotta that compares to the Bellwether Farms Whole Milk Basket Ricotta they sell at Nugget. What can I say? I like to have my stuff.


Food shopping is different right now, obviously. Stores are running out of staples like flour, beans, pasta, rice and toilet paper (side note: we have a cheap, easy-to-install bidet and we love it), and people are shopping less frequently in an effort to minimize COVID-19 exposure, which means longer stretches of time between trips. This is fine for all your shelf-stable items, like the aforementioned flour, beans, rice, and pasta, but what about fresh fruits and vegetables? A friend texted me a few days ago asking for tips to keep the veggies in her fridge from wilting quickly so as to support her social distancing efforts, and it struck me that other people might be wondering the same thing. Read on for my best produce-life-extending tips.


Store onions, garlic, potatoes, yams, and winter squash in a cool, dark place to prevent sprouting (in the case of the root vegetables) and to keep them fresher longer.


Keep apples in the fridge, as well as berries and any stone fruit you know you’ll eat soon that has reached ideal ripeness. If something is ripening faster than you can eat it. freeze it on a rimmed baking sheet, then transfer to a zip-top bag or other freezer-safe container and use for smoothies and cooking/baking (like this banana bread).


Store fresh leafy herbs in jars or glasses with a little bit of water, either in the fridge or on the counter, if you use it a lot. Change the water every couple of days.


Use produce bags, ziplock bags, or air-tight containers for anything tender like leafy greens. Wrap greens in a couple of damp (wrung-out) paper towels) and store in the bags. This helps to prevent wilting. Keep anything you’ve cut into (like onions or lemons) wrapped tightly. These fruit and veggie savers are a cute, sustainable way to keep opened produce fresh.


When purchasing avocados, buy one ripe one for immediate use and one (or more) hard ones and keep them on your counter. As soon as they ripen, refrigerate them until you’re ready to use them.


Don’t overlook frozen veggies. They are frozen at the peak of freshness, so they can be a great product, especially in the case of greens. You get a lot more for your money, since freezing breaks down the greens a bit, so a 16-ounce bag of organic frozen kale or spinach is actually several bunches of the fresh stuff! I use frozen organic kale and spinach in my smoothies every day, and I greatly prefer it to the fresh kind since you can get so much more in there. I’ve been trying to think of smoothies as the way I’m getting some good veggie nutrition during this time, since frozen fruits and vegetables keep for a long time, I can play around with flavors, and I know that a big green smoothie will be the equivalent of the amount of salad I would normally eat with a meal. Frozen greens are also great sauteed with garlic and lemon in olive oil or butter and tossed with pasta or rice, or served with an egg. Other great frozen items are cauliflower, broccoli, carrots, and peas. This pea soup, made with frozen peas, is very spring-y, delicious and so cheap.


The main thing I keep thinking about every time I head to the kitchen to make a meal for my family (it feels like I’m constantly doing this, honestly), is whether I can do a little more with a little less.


I ask myself if there’s a simpler way to make what I want to serve, and I scour the backs of my cupboards and fridge to see if there’s some forgotten item that needs to be used up before I turn to what’s right in front of me. I ask myself what we really need for the meal to be nutritious and for us to all feel satisfied, and more often than not, I find that we don’t really require as much as I might normally put on the table. It’s a lesson I plan to take with me when all of this is over. We’re so accustomed to having access to everything we like all the time, but with a little careful planning, some basic techniques, and creativity, it’s often possible to find all you need within what you already have.

Category:

Share this Recipe: Share on Facebook Tweet This! Pin it on Pinterest

Quarantine Banana Bread

  • Prep Time 10 minutes
  • Cook Time 50 minutes
  • Estimated Cost $8
  • 159 Comments

It’s a weird time.


Terrifying, really. We don’t know what’s going to happen, but we know that it’s bad. And we know that if we’re going to make it less bad, we have to spend a lot of time away from other people, for an amount of time that may be a matter of weeks, but also may be many months. We don’t know, we’re going to have to see.


So Evan, Anna, and I are hunkered down here at home. I can’t get over how fortunate I feel. I’ve never been so conscious of the amount of privilege we have to be able to stay home, in a warm, comfortable space, with everything we need. We miss our friends and family and we’re sad that we can’t go out and socialize, but we know that being able to work from home is not an option everyone is afforded. I’m incredibly anxious about all the things we can’t control. I’m worried about the spread of COVID-19, of course. I’m worried about my parents and in-laws, all of whom are over 60. I’m worried about the impact this veritable shutdown of much of society for who knows how long is going to have on the world.


For as long as I can remember, the way I have tempered anxiety about the scary outside world is by making my inside world as warm and nice and pleasant to be in as possible—primarily through cooking. Since the literal inside world is fast becoming our primary world, I am doubling down cleaning (disinfecting. so much disinfecting), reorganizing, trying to make everything as pretty and cozy as possible. We’re well-stocked food-wise (though not overly stocked—I have faith in the food supply chain and am so grateful to those who continue to run it even during this crisis), and I’m cooking a lot, even more than usual. We eat all three meals together every day, and lately we’ve been making popcorn around 4 PM to munch on while we show Anna an important movie from Evan’s and my respective chlldhoods (so far we’ve seen about 1/6 of The Wizard of Oz, and the entirety of Mary Poppins 47 times #letsgoflyakite #spoonfulofsugar). Current popcorn preparation is melted butter and Trader Joe’s Elote spice mix which I think tastes a little like Cool Ranch Dorito dust.


Dinners have been very comfort-forward: a lot of pastas and savory bakes, like green chili enchiladas and pumpkin lasagna.


Some roasted roasted chicken legs with garlic, potatoes, and rosemary.


And I have been baking. The usual weekly challah, yes, but also cookies, a couple of loaves of this excellent bread from the NYT, and over the weeknd, a riff on the banana bread from my last book, Hot Mess Kitchen. As is usually the impetus for banana bread, we had a few bananas languishing in my fruit bowl on the counter, which is whatever most of the time, but in times of limited groceries and extra attention paid to ever morsel of food we consume, not okay. There was no throwing them in the freezer and popping them in a smoothie whenever I felt the whim—there is no space in the freezer. Plus, we really needed a loaf of banana bread.


Anna “helped”, by which I mean she stood in her tower and kept trying to dip her finger into the baking soda. 


I debated whether or not to add chocolate, but the answer was obvious.


Parchment handles make loaf-retrieval simple and clean.


Case in point:


The resulting loaf had a crisp, browned exterior and a soft, pleasantly squishy interior, almost reminiscent of bread pudding. We ate it in our backyard with salted butter while FaceTiming Evan’s parents.


Don’t second-guess the butter. Yes, it’s overkill. Yes, it’s ridiculously indulgent. Totally. I mean, banana bread is essentially cake, right? Well, if ever a time in history called for butter on cake, I’d say this is it.


Ingredients

  • 3 very ripe bananas, peeled $1.50
  • 1/3 cup melted butter or coconut, canola, or vegetable oil Pantry
  • ⅔ cup brown sugar Pantry
  • 1 egg, beaten $3.50 for 12
  • 1 teaspoon vanilla extract Pantry
  • 1 teaspoon baking soda Pantry
  • 1/2 teaspoon ground cinnamon Pantry
  • Pinch of salt Pantry
  • 1 cup of all-purpose flour Pantry
  • 3.5 ounces dark (64-74% cacao) chocolate, chopped roughly $3

Recipe Serves 6-8

Directions

  1. Preheat the oven to 350°F and grease a 4x8-inch loaf pan. Line with parchment paper as pictured.
  2. In a mixing bowl, mash the ripe bananas with a fork until smooth. Stir the melted butter or oil into the mashed bananas.
  3. Mix in the baking soda and salt. Stir in the sugar, beaten egg, and vanilla extract. Mix in the flour.
  4. Gently stir in the chocolate chips and nuts, if using.
  5. Pour the batter into your prepared loaf pan.
  6. Bake for 50-55 minutes or until a toothpick inserted into the center comes out clean.
  7. Remove from oven and let cool completely.
  8. Gently remove the banana bread from the pan.
  9. Slice and serve, preferably warm with butter.

Bourbon-Eggnog Pudding

  • Prep Time 5 minutes plus 1 hour in the fridge
  • Cook Time 10 minutes
  • Estimated Cost $8.50
  • 107 Comments

Just a quick dispatch from my parents' house, where I'm with my family, celebrating our annual secular Christmas (we're Jewish, so there's Chinese food involved, but also cookies and the Phil Spector Christmas album). 

Tonight, we're going out for Chinese food like all the other MOTs in town, and when we come home, my mom will hand out everyone's Christmas Eve pajamas (don't tell her, but I got her some super-cute ones too), and we'll have a nightcap.

To go with the nightcap, I just whipped up the most incredible dessert, and I wanted to share it with you in case you're in panic-mode, trying to throw together a crazy-easy dessert using stuff you probably already have on hand.

I present to you, bourbon-eggnog pudding!

Imagine butterscotch pudding made with eggnog and bourbon instead of milk and vanilla. And it takes about 10 minutes to put together (and at least an hour to chill). Top it with whipped cream and lots of nutmeg! Or maybe put it in a baked pie shell? The possibilities are endless.

Happy/Merry ChrismukkahKwanzaSolsticeWhateverYoureCelebrating, and here's to peace on Earth. <3 

Ingredients

  • 1 cup dark brown sugar Pantry
  • 1/4 cup cornstarch Pantry
  • 1/2 teaspoon salt Pantry
  • 1/8 teaspoon nutmeg, plus more for garnishing Pantry
  • 2 cups eggnog $3
  • 1 cup whole milk or half-and-half $1.50
  • 4 egg yolks $3 for 6 eggs
  • 3 tablespoons bourbon (or other whiskey, or rum) optional but recommended
  • 2 tablespoons unsalted butter $1 for a stick

Recipe Serves 4

Directions

  1. Combine the brown sugar, cornstarch, salt and nutmeg in a heavy-bottomed saucepan (don't turn on the heat yet).
  2. In a separate bowl, whisk together the eggnog, milk, egg yolks, and bourbon.
  3. Whisk the eggnog mixture into the dry ingredients and turn the heat to medium. 
  4. Continue whisking over the heat until a thick pudding forms (this may take up to 10 minutes).
  5. Stir in the butter and mix until fully incorporated.
  6. Push through a sieve or fine mesh strainer, just to ensure there are no lumps (skip this step if you are in a rush/don't mind lumps).
  7. Remove from heat, scrape into a glass bowl and let cool. 
  8. Cover the pudding with a piece of plastic wrap pressed right onto the pudding, not just over the glass (this prevents a skin from forming). 
  9. Refrigerate for at least 1 hour, or until very cold.
  10. Serve plain or topped with whipped cream and more nutmeg.

Carrot-Feta Tacos

  • Prep Time 20 minutes
  • Cook Time 35-40 minutes
  • Estimated Cost $12.75
  • 77 Comments

I have always felt like there is not nearly enough focus on the art of cleaning as you cook in recipes (though, ahem, there is a whole section on how to do it in Hot Mess Kitchen). Once it becomes second nature to compost your vegetable scraps as soon as you finish prepping your veg, to wash your bowls and whisks and cutting boards as soon as you're done with them, and perhaps, most importantly, to wipe down your work area after every little splatter, cooking becomes more joyful than you knew possible. This is extra-important in small kitchens (like mine), where you have very little surface area on which to spread your mess, but it'll make any kitchen experience more pleasurable.

And, there's another way to think about minimizing mess and post-cooking clean-up time, and it's become a new priority for me, now that Evan and I have finally convinced our baby that it's cool to go to sleep at 6:30 PM (and stay asleep until the next morning!!!!!! usually!!!!!!): cooking delicious meals with minimal clean-up so we can get to the business of enjoying our precious few hours of baby-free relaxation at night as quickly as possible. Basically, the math goes: the fewer pans I use, the less time we Evan spends washing up = the faster we are laying in bed, watching The Great British Baking Show (we're still working our way through the early seasons -- Mary Berry's gentle criticism + nice English people fretting over "biscuits" and "sponge" relaxes me better than a double martini).

And so, thanks to some beautiful organic carrots that showed up in our Imperfect Produce box last week, this minimal-cleanup vegetarian taco recipe (which I fully admit is not remotely authentic) has become a regular rotation in the 8-ish days since I first made it. After cooking it, you'll only have a baking sheet, a cutting board, a knife and a little bowl to wash, plus it's a great example of how to do right by vegetables by making them the star of a dish rather than forcing them to play backup singer to of a hunk of meat. 

The transformation of flavor that happens when you roast root vegetables in olive oil with nothing more than salt and pepper provides the basis of the whole dish's flavor profile. These near-charred bits of carrot and onion are a little smoky (you could totally amp the smoke factor up and add smoked paprika or use salt instead of regular, if you wanted).

Once the carrots and onion are roasted, the whole thing comes together quickly and easily. I toss the veggies with a simple lime-oil dressing to amp up their flavor, and also to provide moisture. Then I top hot tortillas (try the soft, flexible corn-wheat blend ones from La Tortilla Factory or Trader Joe's, otherwise regular corn or even small wheat tortillas will work) with the dressed, roasted veg, plus crumbled, creamy feta (goat cheese would be good too, or even avocado, for a vegan version, but I like the way feta's tang plays with the sweet carrots), a shower of fresh herbs and scallions, a few chilies and some crunchy pepitas, if you have some. The tacos are pretty light, so some pinto beans or a big crunchy salad both work well as serve-alongs. Or, just eat three or four tacos and call one of them your side dish.

OH! And if you don't have carrots,, but you DO have a butternut squash, you can not only sub diced butternut squash for the carrots, you can also roast the butternut squash seeds (here's how to do it)! Commercial pumpkin seeds are good, but I'd argue that homemade butternut squash seeds are THE BEST SEEDS EVER. They have a buttery, subtle flavor and a light crunch. I happened to have a bowl of them from a squash I used to make Naptime Soup earlier in the week, so that's what I used on this particular batch of tacos.

I like to assemble the tacos in advance, and bring them out to the table fully topped for people to grab and eat, but if you want to serve the tortillas, filling, and toppings buffet-style, that works too (even if everything cools down--the tacos are surprisingly good at room temperature, or even cold, if you are lucky enough to have leftovers) (you won't).

Ingredients

  • 6 large carrots, ends trimmed, peeled, and cut into 1-inch chunks $2
  • 1 medium yellow onion, diced $0.50
  • 4 tablespoons extra virgin olive oil, divided Pantry
  • salt and pepper Pantry
  • 6 corn tortillas (I love the soft corn-wheat blend ones from La Tortilla Fatory or Trader Joe's) $3
  • juice of 1 lime $0.50
  • 1 clove garlic, minced Pantry
  • 4 ounces feta, crumbled $3.50
  • 1 large handful mint, chopped $1 for a bunch
  • 1 large handful cilantro, chopped $1 for a bunch
  • 2 scallions (green and white parts), chopped $1 for a bunch
  • a few thin slices of jalapeño $0.25 for a whole pepper
  • handful of toasted pepitas (pumpkin seeds) optional

Recipe Serves 2-3

Directions

  1. Preheat the oven to 375 degrees F.
  2. Toss the carrots and onions with 2 tablespoons of the oil and salt and pepper to taste, and spread on a rimmed baking sheet.
  3. Roast for 35-40 minutes, stirring about half-way through.
  4. While the vegetables roast, wrap the tortillas in a sheet of foil. When the vegetables have about 20 minutes of cooking time left, put the tortillas on a separate rack in the oven.
  5. Whisk together the remaining olive oil, lime juice, garlic, and salt and pepper to taste. Set aside.
  6. Take the vegetables and the tortillas out of the oven.
  7. Drizzle the vegetables with the lime-oil mixture right on the baking sheet and toss well.
  8. To assemble the tacos, arrange the tortillas on a platter (be careful opening the foil packet--it'll be hot), and top each one with 1/6 of the carrots, feta, herbs, scallions, and chilies. 
  9. Serve immediately.