BrokeAss Gourmet

BrokeAss Gourmet

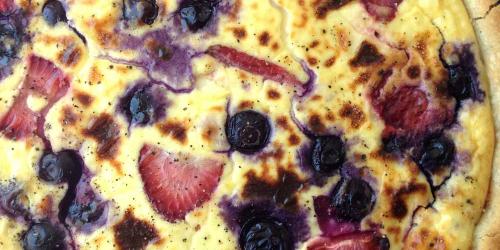
Goat Cheese Tart With Berries And A Black Pepper Crust

  • Prep Time 0:45
  • Cook Time 1:05
  • Estimated Cost $13
  • 18 Comments

It’s been a challenge for me to get excited about the 4th of July. Not so much for political reasons (though, there are a few of those), but rather because the person I’d most like to spend the holiday with is currently traipsing around Berlin. Plus, I hate cheesy 4th of July desserts (think blue-and-red Jell-O molds and flag cakes).

But, he’s been away for a few weeks now, and he’s not coming back for another few, so I have decided to focus on what’s going on in the here and now. And I tell ya, what’s going on here in San Francisco is pretty freaking incredible. Creamy local goat cheese is going on. Fresh, sweet strawberries are going on. Ripe, juicy blueberries are going on. A buttery black pepper crust is (say it with me)going ON.

They all bake together in a custardy tart, sweet bites of fruit intermingling with tart bites of goat cheese and spicy black pepper. Oh, and it also happens to be a classy, dignified nod to this country’s flag. Betsy Ross would totally have approved.

Serve this as part of a BBQ spread, or with a big green salad alongside.

Ingredients

  • 1 very cold stick butter, cut into pieces (reserve the wrapper to grease the pan) $1
  • 1 cup flour, plus more for rolling Pantry
  • salt Pantry
  • freshly ground black pepper Pantry
  • 1/8 cup ice water
  • 1 8-oz log creamy goat cheese at room temperature $3.50
  • 3/4 cup half-and-half $1.50 for a pint
  • 2 eggs $1.50 for 6
  • 1/2 cup fresh strawberries, hulled and sliced $3 for a pint
  • 1/2 cup fresh blueberries $2.50 for a half-pint
  • honey for garnish Pantry

Recipe Serves 6-8

Directions

  1. Preheat oven to 350 degrees F. Use the butter wrapper to lightly grease an 8” pie pan and set aside.
  2. Combine flour, butter a pinch of salt and a few generous pinches of black pepper in a food processor. Pulse until mixture resembles small peas. Slowly stream 1/8 cup ice water with machine running, just until dough comes together (you may need slightly more or less—just pay attention to the dough). Remove dough from machine, gather together into a ball, and wrap in parchment or plastic wrap. Refrigerate immediately for 30 minutes. (It’s also possible to make this by hand—just use two forks to cut the butter into the flour, salt and pepper, then slowly stream in the water until it comes together. Then proceed as directed.)
  3. Once the dough has chilled, roll it out on a floured surface (or between 2 pieces of parchment), into a circle just slightly larger than the circumference of the pie pan. Carefully drape it over the pie pan, then press gently to create the shape of a pie crust, trimming away any excess. Prick all over with a fork, then bake the crust for 25 minutes.
  4. While the crust bakes, beat together the softened goat cheese, half-and-half, eggs and one generous pinch each of salt and pepper, until creamy and smooth. Set aside.
  5. Arrange half of the berries in the pre-baked shell, then pour the goat cheese mixture over them. Scatter the remainder of the berries on top of the mixture and press gently to sink them into the custard. Top with a grind of black pepper.
  6. Bake for 35-40 minutes, until the custard sets and is brown in spots on top.
  7. Let cool for at least 15 minutes, then drizzle lightly with honey, slice into wedges and serve.

Sriracha Tomato Jam

  • Prep Time 0:15
  • Cook Time 1:05
  • Estimated Cost $6.50
  • 28 Comments

Never was there a food that captured this feeling like the tomato.

There’s this feeling I’ve been having a lot lately. During that perfect moment when the sun is setting behind me, the air is warm and the light is beautiful. I get it when I’m wrapped up in tight embrace with someone I really like, whom I know I’m not going to see for a while. And I get it when James jumps onto my lap for hugs and kisses; it’s a simultaneous realization that wonderful things are happening, yet time is not slowing down for them. It’s a strong desire to hold onto the specialness of each moment for just a little bit longer, before it slips away.

Never was there a food that captured this feeling like the tomato. Though, in this modern world, we have access to imported ones all year round, the local ones only really ripen to the full extent of their deliciousness in the summertime. We drizzle them with olive oil, tuck them into sandwiches with buffalo mozzarella and fresh basil, or just pop the tiny ones, whole, into our hungry mouths.

And then summer ends and they go away, and we are left with flavorless supermarket imports until the following year. So, in an effort hold on to the gloriousness of ripe summer tomatoes for just a little while longer this year, I am making this spicy jam. Jam is called “preserves,” after all—the idea being that it preserves fruit, long after its season.

Try this on grilled cheese (OMG), with french or sweet potato fries, dabbed on crostini with a thick smear of goat cheese, or drizzled over grilled meats. Do as I’m doing and make a big batch to eat year-round, and a little touch of summer magic will be right there in your refrigerator until next June.

Ingredients

  • 2 lbs ripe tomatoes $3.50
  • 1/2 medium onion, finely chopped $0.50
  • 2/3 cup honey Pantry
  • 1 tbsp balsamic Pantry
  • 3 tsp (or more to taste) Sriracha or other chili sauce $2.50 for 16 oz.
  • 1/2 tsp salt Pantry
  • several grinds fresh black pepper Pantry

Directions

  1. Fill a large pot with boiling water and bring it to a boil. Drop the tomatoes into boiling water for 12-14 seconds, then remove with a slotted spoon. Rinse under cool water, then slip their skins off (they should come right off). Let cool, then core and chop.
  2. Dump the water out of the pot and return it to the stove. Add the chopped tomatoes, onion, honey, balsamic, Sriracha, salt and pepper. Turn the heat up and bring to a gentle boil, then reduce the heat and let simmer for 55-65 minutes.

BrokeAss Beauty: Homemade Shampoo

Have you heard about this no 'poo business? Evidently, it's the latest underground beauty craze. People everywhere have stopped washing their hair and are "claiming it's the best thing ever.

I have to say, I'm inspired. Throngs of former shampoo-slaves are tossing their bottles and reporting shinier, healthier, more manageable locks. I'm seriously considering giving it a try...

...but not just yet. I have some important work things next week, and I need to look presentable (no 'poo-ers say the first few weeks of giving up shampoo leave you looking like a bit of a greaseball as your scalp adjusts its oil production). But I was psyched to discover this post from the hip homesteading blog, Crunchy Betty. It seemed like a good compromise--a homemade shampoo made from simple, inexpensive ingredients--just pure castille soap and coconut milk. Evidently, coconut milk contains very mild natural surfacants, which, in combination with the castille, create a luxurious lather. Oh, and it's 100% biodegradable. Now, sitting here, freshly showered, I can tell you: this stuff works. My hair smells amazing (kind of island-breezy, from the coconut) and feels soft and smooth, but not heavy. Even better, my scalp, which can sometimes get a little tight and dry after I wash my hair, feels great. Next time I make a batch, I might even experiment with adding a few drops of essential oil.

Call me a hippie--I don't care. My hair looks awesome.

Ingredients

  • 6 oz. pure castille soap (buy in the bulk section of a health food store and take only what you need) $3
  • 2 oz. coconut milk (don't use light) $1.50 for a 15-oz. can

Recipe Serves About 20 shampoos

Directions

  1. Combine the ingredients in a jar or bottle (make sure the lid/cap fits tightly). Shake gently and use about a tablespoon of the mixture to shampoo (that was enough for my just-past-the-shoulder-length hair.
  2. Store the leftover shampoo in the fridge.
  3. Makes enough for about 20 shampoos.

Grilled Corn Salad With Feta

  • Prep Time 0:15
  • Cook Time 0:05
  • Estimated Cost $8.50
  • 18 Comments

I have just returned from the most glorious weekend. Evan and I went to Fernando’s Bed and Breakfast, in Bodega, CA. We slept in every morning, sipped cappuccinos on the sunny deck attached to our room, and spent our days walking along the beach and poking around Bodega Bay and Sebastopol. Each afternoon, Fernando and his wife Marivone served wine on the patio, where we sipped and teetered on the porch swing.

All of this left me deliciously happy…and very full.

And, OMG, did we eat. Fernando cooked us a glorious breakfast each day, using fresh eggs from his very own chickens. We spread baguette slice after baguette slice with butter and homemade jam (strawberry! quince! mango! fig!). We went out for long, luxurious lunches and dinners, and left no bottle of wine or locally-brewed beer untasted. All of this left me deliciously happy…and very full.

And so, this light but satisfying corn salad is my lunch, and will also probably grace the side of some simply prepared fish for dinner tonight. It’s simple, fresh and healthy, and gets its smoky, roasted flavor from a quick charring. If you can’t find good corn, or if you just don’t feel like bothering with the shucking and slicing, use thawed fire-roasted corn from Trader Joe’s.

Ingredients

  • 4 cobs fresh, sweet corn, husked, rinsed and patted dry $1.50
  • 1 red bell pepper, diced $1.50
  • 1/2 red onion, diced finely $0.50 for a whole onion
  • 2 cloves garlic, minced Pantry
  • 1 large handful fresh flat-leaf parsley, chopped finely $1 for a bunch
  • 2 tbsp extra virgin olive oil Pantry
  • juice of one lime $0.50
  • 4 oz. feta cheese, crumbled $3.50 for 6 oz.
  • salt and pepper to taste Pantry

Recipe Serves 4

Directions

  1. Preheat a grill over high heat. Quickly sear the corn on as many sides as possible (you want to char it, not cook it). This may also be done over the direct flame of a gas stove.
  2. Once all the corn has been charred, let it cool for about 5 minutes. While it cools, place the bell pepper, onion, garlic and parsley into a large bowl and set aside.
  3. Use a sharp knife to carefully cut the charred kernels off of the cob. Transfer the kernels to the bowl with the other vegetables.
  4. Toss the whole thing together several times to mix well, then drizzle with the olive oil and lime juice. Toss again.
  5. Add the feta, toss gently and taste for salt (feta is quite salty), before adding the salt and pepper to taste.
  6. Serve immediately or chill until ready to use (up to 4 hours).

Category: Meals

Tags: , , , ,

Share this Recipe: Share on Facebook Tweet This! Pin it on Pinterest

Green Garlic and Almond Pesto

I slathered it over chicken thighs before roasting them and serving hot

This bright green pesto flavored an entire weekend of good eating. On Friday night, I slathered it over chicken thighs before roasting them and serving hot, smothered with caramelized onions with massaged kale salad and fresh challah. On Saturday morning, I stirred it into creamy scrambled eggs, which we ate on top of toasted, buttered leftover challah. On the same day in the late afternoon, we smeared crisp, olive oil-drizzled crostini with creamy goat cheese and topped each one with a spoonful of pesto and a whisper of fresh black pepper.

If you can’t find green garlic (young, greenish garlic with long stem-like scapes attached to the bulb) at your grocery store, look for it at your local farmer’s market. It has undertones of mature garlic, but it’s much sweeter and more herbaceous—perfect for Spring cooking.

Ingredients

  • 1 large handful fresh flat-leaf parsley, roughly chopped $1 for a bunch
  • 2 bulbs green garlic, plus the scapes (the long chives attached to the bulb), ends removed, chopped $1.50 for a bunch
  • 1/4 cup raw almonds $3.50 (buy in the bulk section)
  • 1/4 cup extra virgin olive oil Pantry
  • juice of 1 lemon $0.50
  • salt and pepper to taste Pantry

Recipe Serves 2/3 cups of pesto

Directions

  1. In a blender or food processor, pulse the parsley, green garlic and almonds until finely chopped. Stream in the olive oil and lemon juice until a thick paste forms. Season with salt and pepper to taste. Use immediately or store in an airtight container for up to a week.