BrokeAss Gourmet

BrokeAss Gourmet

Gingered Tuna Salad with Avocado and Sriracha

Everyone talks about gaining weight during the holiday season, but I have a hard time believing that a little over-indulgence on Thanksgiving, the winter holidays and New Years results in a national average of 7-10 pounds of extra weight. Rather, I think the issue is that people start indulging on Thanksgiving and then don’t stop until January 2nd. And yeah, a full month of eating like crap will pack on the pounds.

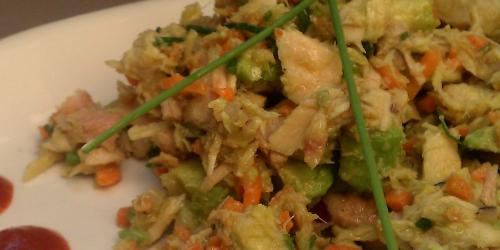
So this year, I say let’s try to get a jump-start on our New Years resolutions and eat as healthfully as possible for the month of December (save for a buttery Christmas goose here and some golden latkes there). This tuna salad is full of healthy fats, devoid of empty carbs and chock-full of flavor. I ate it in endive cups, but you could also wrap it in a whole grain tortilla, mound it over greens or just eat it straight out of the bowl.

Ingredients

  • 1 5-oz can tuna packed in olive oil $2
  • 1 tbsp finely chopped red onion (about 1/8 medium red onion) $0.50 for a whole onion
  • 1 clove garlic, finely minced Pantry
  • 1/2 medium carrot, shredded (about 2 tbsp--if you use bagged shredded carrot, run a knife over it a few times before using) $0.25 for a whole carrot
  • 1/2 ripe avocado, diced small $1.50 for a whole avocado
  • 1/2 tsp grated fresh ginger $0.50 for a small piece of ginger
  • 1 tsp (plus more to taste) Sriracha $2.50 for a 17-oz bottle
  • juice of 1/2 lime $0.50 for a whole lime
  • salt and pepper to taste Pantry
  • chopped fresh chives, parsley or cilantro for garnish optional

Recipe Serves 2

Directions

  1. Lightly toss together all ingredients and serve immediately or refrigerate for up to an hour before serving.


Chili-Roasted Acorn Squash and Seeds

  • Prep Time 0:10
  • Cook Time 0:30
  • Estimated Cost $3
  • 19 Comments

As a child, one of my favorite parts of Halloween was roasting the seeds from my family’s jack-o’lantern (go figure—I was way less excited about dressing up and collecting candy from strangers). I would push up my sleeves and reach into the cavernous pumpkin with my little hands and then pull out fistfuls of the pumpkin’s “brains.” I’d rinse them under a strainer, spread them out on a cookie sheet and bake them until they became brown and crispy. I’d sprinkle them lightly with salt and eat them warm, right out off the pan.

These days, I rarely cook whole pumpkins, but I’ve found that the seeds in most winter squash can be prepared similarly. In fact, I tend to prefer smaller, more delicate squash like acorn squash for seed consumption, since the seeds’ shells are smaller, thinner and, in my opinion, quite edible themselves.

As for the actual squash here, this is a very simple preparation of a naturally delicious winter vegetable. Serve it warm with roasted meats (it doubles as a starch and a vegetable) or cold in a green salad with lots of olive oil.

Ingredients

  • 1 medium acorn squash $1.50
  • 1 1/2 tbsp extra virgin olive oil Pantry
  • 3 tsp, divided Ancho chili powder, plus more to taste $1.50 for 1 oz.
  • salt and pepper Pantry

Recipe Serves 2

Directions

  1. Preheat oven to 400 degrees F.
  2. Line 2 baking sheets with parchment and set aside.
  3. Use a sharp knife to cut the squash in half, lengthwise. 
  4. Use a spoon to scoop out the seeds and any stringy flesh attached to them. Place seeds in a strainer and run cool water over them, using your fingers to move them around and remove the excess flesh. 
  5. Wrap the rinsed seeds in a clean dishtowel and press to remove liquid. 
  6. Spread seeds out on one of the prepared baking sheets, and sprinkle with salt, pepper and 1 tsp chili powder. Set aside.
  7. Use a sharp knife to slice the squash halves into (approximately) 1 1/2" wedges, using the natural ridges in the rind for guidance. 
  8. Arrange slices on the second baking sheet.
  9. Drizzle the olive oil over the wedges, concentrating on the flesh, then sprinkle liberally with the remaining chili powder, salt and pepper.
  10. Place both baking sheets in the oven. 
  11. After about five minutes, you'll hear the seeds begin to pop loudly (like popping corn). After 8-10 minutes, the seeds should be nice and brown. 
  12. Remove from the oven and add more salt, pepper and/or chili powder if desired. 
  13. Let cool and then immediately eat, or store in an airtight container for up to a week.
  14. Let the squash cook for a total of 30 minutes, until soft in texture and golden brown.
  15. Serve immediately or chill and serve cold.

Oniony Egg Salad in Endive Cups

  • Prep Time 0:15
  • Cook Time 0:10
  • Estimated Cost $3.75
  • 22 Comments

I screw around with food a lot.

I add pumpkin to mac and cheese, honey to meatballs and broccoli to traditional Italian meat dishes, and I don’t feel guilty about it for a second. Flavors, in my book, are meant to be played with.

But there is one food I don’t like generally like messed with; a food so integral to my childhood and hence, adult comfort food regime, that I like to keep it exactly the way it has always been. That food is egg salad, and I like mine the way my mother made it, with eggs, mayonnaise, salt pepper and dried dill. Anything else seems superfluous and therefore less-comforting.

But today I am feeling adventurous…and also way too carbed-out from last week’s indulgences to eat anything starchy. So, I’m going just a little bit defiant on traditional egg salad. Not only am I messing around with the flavors, adding chives and fresh lemon juice and omitting the dill, I’m eating it in peppery endive cups…to great results.

I never rebelled much as a teenager, but check me and my renegade egg salad out now.

Ingredients

  • 6 eggs $1.50
  • 3 tbsp mayonnaise Pantry
  • 2 tbsp finely chopped red onion (about 1/6 medium onion) $0.50 for a whole onion
  • 1/2 bunch chives, chopped finely (reserve some for garnish) $1 for a bunch
  • 1 small wedge of lemon $0.50 for a whole lemon
  • salt and freshly-ground pepper to taste Pantry
  • 1 whole head of endive $0.25

Recipe Serves 2-3

Directions

  1. Place the eggs in a pot and cover with cold water.
  2. Turn heat to high, cover pot and bring water to a boil.
  3. Turn off the heat, cover, and let sit, undisturbed. for 8 minutes.
  4. Bring the whole pot to the sink and gently pour out the hot water.
  5. Turn the tap to cold water and let run over the hot eggs for 1 minute.
  6. Turn off the tap and let eggs sit in the cold water for 2 minutes, until cool to the touch.
  7. Crack and peel each egg, and then place in a mixing bowl.
  8. Add the mayonnaise and then mash gently with a fork (I like to leave the the egg mixture somewhat chunky).
  9. Stir in the onion and chives and squeeze the lemon over the mixture.
  10. Stir gently and add salt and pepper to taste.
  11. Place in the refrigerator while you prepare the endive.
  12. To prepare the endive, cut off the end so the leaves come apart easily. Divide them.
  13. To assemble, use a small spoon to scoop about 1 or 1 1/2 tbsp of egg salad into the cup of each endive leaf.
  14. Arrange the salad-filled endive leaves (I like to do this in the shape of a star, as pictured) If you have extra egg salad left over, serve it with the filled leaves.
  15. Garnish the whole thing with the extra chives and serve.

Buttermilk Biscuits

  • Prep Time 0:10
  • Cook Time 0:16
  • Estimated Cost $3.50
  • 9 Comments

Last weekend I flew to Nashville to surprise my best friend Caitlin for her 30th birthday. We had one of those magical weekends with just the right balance of going out, staying in and simply enjoying sweet togetherness (mad props to her boyfriend Dale who kindly tolerated three straight days of Caitlin and me acting like we were in junior high). Anyway, I came back to San Francisco thinking about how lucky I am to have such a special friend in my life…and also about biscuits.

Biscuits all over Nashville are out of control, but I didn’t know I cared so much about them until I ate the ones at Loveless Cafe. Light and fluffy but insanely buttery on the inside with a crisp and even-more-buttery exterior. We spread them with fresh butter and jam (though they didn’t need either) and when we ran out, we hungrily requested more. I was uncomfortably full at the end of the meal, but it was worth it.

Admittedly, these are not as extraordinary as the ones at the Loveless, but they’re hot, fresh and buttery and they do the trick.

Ingredients

  • 2 cups all-purpose flour plus more for rolling and baking Pantry
  • 4 tsp baking powder Pantry
  • 1/4 tsp baking soda Pantry
  • 3/4 tsp salt Pantry
  • 4 tbsp very cold unsalted butter, cut into pieces $1.50 for a stick
  • 1 cup very cold buttermilk (if you don't have buttermilk, add 1 tbsp lemon juice or white vinegar to a cup of regular milk and let sit for 5 minutes) $2 for a pint

Recipe Serves 6

Directions

  1. Preheat oven to 450 degrees F. Lightly flour a baking sheet and set aside.
  2. Use your hands to rub the butter into the flour, until the mixture resembles small peas (work quickly, you don't want the butter to melt).
  3. Form a little well in the center of the mixture and pour in the buttermilk. Stir together to form a very sticky dough.
  4. Lightly flour a flat, clean surface and knead the dough about 5 times, just until it holds together. Press it until it is about 1 1/2” thick. 
  5. Use a biscuit cutter, wine glass or drinking glass to cut 3” circles out of the dough, reworking the scraps until all the dough has been cut.
  6. Arrange the biscuits on the floured baking sheet so they touch one another lightly.
  7. Bake for 13-16 minutes, until puffy and golden-brown. 
  8. Serve hot.

Pumpkin-Goat Cheese Dumplings in Brown Butter

  • Prep Time 0:20
  • Cook Time 0:08
  • Estimated Cost $10
  • 3 Comments

Looking for an appetizer or side dish that will make everyone think you’re a gourmet chef, while exerting as little effort as possible? Look no further. These only take a little bit of time to assemble and taste like a hybrid of a Japanese gyoza potsticker and a pumpkin ravioli. Easy and delicious—just make sure you have a big pan with a fitted lid.

Ingredients

  • 1 15-oz. can pumpkin puree (not "pumpkin pie filling") $1.50
  • 1/8 tsp ground nutmeg $1.50 for 1 oz.
  • 2 tsp brown sugar Pantry
  • 1/2 tsp each salt and pepper Pantry
  • 4 oz. crumbled goat cheese $4
  • About 30 round wonton wrappers $2 for a 12-oz package
  • 2 tbsp unsalted butter $1 for a stick
  • 1 tbsp extra virgin olive oil Pantry

Recipe Serves 4

Directions

  1. In a mixing bowl, combine pumpkin, nutmeg, brown sugar, salt and pepper. Stir well to combine.
  2. To assemble dumplings, lay a wonton wrapper on a clean, dry surface. Brush the edges lightly with water and place about 1 tsp of pumpkin mixture in the center of the wrapper. Add a goat cheese crumble or two.
  3. Fold wonton in half and press the edges to seal completely. Place on a clean plate. Repeat until all wrappers and filling are used up.
  4. Heat the butter and oil together in a large frying pan over medium heat, until the butter begins to brown lightly. 
  5. Working in batches, cook the dumplings on both sides until they are lightly golden brown and crisp on the bottom.
  6. Pour 2 tbsp water over the whole pan and quickly cover the pan with a fitted lid. Allow the dumplings to steam with the lid on for about 1 minute. Remove lid (keeping heat on) and let the excess liquid evaporate for a few minutes until dumplings become lightly crisp again.
  7. Remove from pan and serve immediately (alternately, keep warm on a baking sheet in a 200 degree oven until ready to serve).