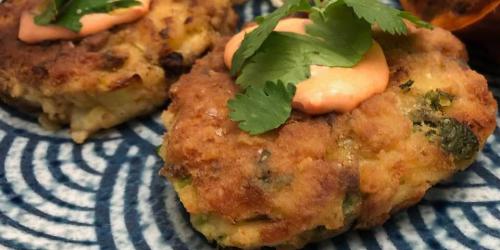
BrokeAss Gourmet

BrokeAss Gourmet

Crispy Fish Cakes

  • Prep Time 20 minutes (plus 3 hours to chill)
  • Cook Time 25 minutes
  • Estimated Cost $18
  • 84 Comments

When my daughter was about three months old, my husband and I went with a group of friends and their kids to the park in our neighborhood. Most of the other kids were between ages three and five, and they happily zipped without pausing from the monkey bars to the swingset to their parents for a snack refuel, and back again. I sat with a few other adults while nursing Anna on a bench.

"You know," one of the husbands turned to me with a wry smile, "parenting doesn't really start until your kid turns three."

"Oh, good," I replied without making eye contact with him as I shifted Anna to my other breast. "I'm glad to hear that I've been missing all this sleep in vain." 

After an awkward pause, we all had a tension-breaking laugh and then continued chatting about work and kids and preschool choices (eek), but his stupid comment stayed with me for days after our park date. I had taken a few months off from working to focus on taking care of my daughter, and though I missed having a professional world to play in every day, I was so absorbed in the minutia of new motherhood that I hardly had time to think about it. But if what I was doing wasn't "real" parenting, and the work life I had spent so many years building was on pause, then what was I supposed to call the way I spent my days? Was I merely a living, breathing diaper-changing milk machine/couch?

A few months later, I've been at this for long enough to know that there is no such thing as "real" parenting--that taking care of a child is a moving target because their brains are developing so quickly that nothing is the same from one day to the next. So too is my identity: I am a parent and a professional, and the two are not mutually exclusive. All of which brings me to these fish cakes.

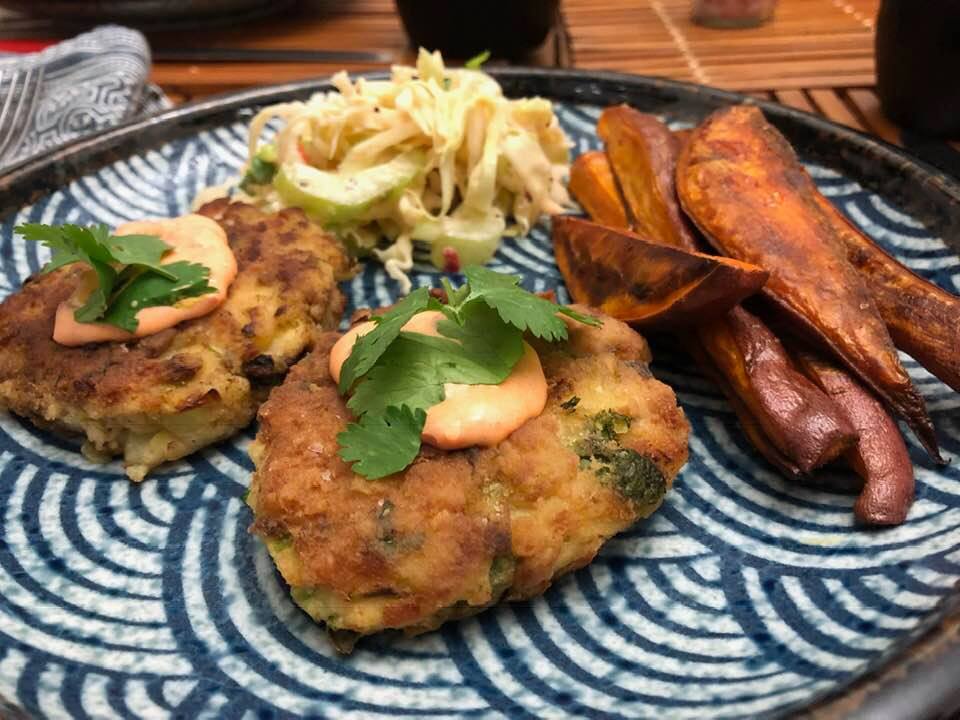
The recipe, which is adapted from this one from The New York Times, is of many worlds. Flavorwise, the fish cakes are both a New England style crab cake and a Thai tod mun pla. They are sort of latke-esque (making them perfect for that mid-Hanukkah latke burnout), and yet they're also a protein-rich entree. They are just as good with steamed rice and garlicky broccoli as they are with crispy potatoes and creamy coleslaw. 

They are very easy to make, but they do have to chill in the fridge for a few hours before you cook them, so they require a little bit of forethought, but it's worth it. Also, these don't *need* the spicy mayonnaise dipping sauce I call for in the recipe, but they are seriously improved by it.

Give them a try, for Hanukkah, or just because it's Thursday. They are magical, delicious, and multifaceted, just like you.

Ingredients

  • 2 tablespoons coconut, olive, or neutral oil, plus more for frying Pantry
  • 1 pound boneless, skinless firm white such as cod or tilapia $8
  • salt and pepper Pantry
  • 1 medium or 2 small russet or yellow potato(es), peeled and sliced very thinly (you should have about 2 cups of peeled, sliced potato) $1
  • 2 eggs $3 for 1/2 dozen
  • 3 garlic cloves, chopped, divided Pantry
  • 1 large handful cilantro leaves and stems, chopped $1 for a bunch
  • 1 1-inch piece ginger, peeled and grated $0.50
  • 3 scallions, white and green parts, finely chopped $1 for a bunch
  • 3-4 small Thai chilies or 1/2 jalapeño, chopped finely (leave the seeds intact if you can handle the heat) $0.50
  • 4-5 fresh makrut lime leaves, de-stemmed and chopped finely optional but recommended
  • 1 lime, zested, 1/2 juiced, 1/2 cut into wedges) $0.50
  • ⅓ cup panko bread crumbs $2.50 for 12 ounces
  • ½ cup mayonnaise Pantry
  • 2 teaspoons (more or less to taste) Asian chili sauce, such as sambal or sriracha Pantry
  • ½ cup all-purpose flour Pantry


Recipe Serves 4

Directions

  1. In a large skillet over medium heat, heat the oil until sizzling.
  2. Season the fish with 1 teaspoon salt and the a few pinches or grinds of pepper, add to pan and cover with water. Let cook for 3 minutes on one side. 
  3. Flip fish and continue cooking until just cooked through.
  4. Remove the fish from the pan and transfer to a plate. Let cool for 5 minutes.
  5. While the fish cools, add the potatoes, 1/2 teaspoon salt and more water if needed to just cover. Bring to a boil, reduce to simmer, cover and cook until tender, about 10 minutes.
  6. Flake the fish in a large mixing bowl. 
  7. Drain the potatoes and add to the fish. Use the back of a fork to roughly mash the potatoes with the fish.
  8. Add the eggs, 2 of the chopped garlic cloves, cilantro, ginger, scallion, chiles, makrut leaves, lime zest, and panko, and combine. Season with salt if needed. Cover and chill for at least 3 hours.
  9. While the fish mixture chills, stir the lime juice together with the Asian chili sauce and the mayonnaise. Cover and chill until serving time.
  10. Place flour on a plate. Form generous 1/4 cup fish patties about 1/2 inch thick. Dip patties into flour to lightly coat each side.
  11. In a large, preferably nonstick skillet, heat 1/8 inch of coconut oil over medium heat.
  12. Cook fish cakes until golden brown, about 5 to 8 minutes each side, adding more oil as needed. Move to a paper-towel-lined plate.
  13. Serve fish cakes with the spicy mayonnaise and lime wedges for squeezing.

Guiltless Pleasure Pumpkin Cheesecake

  • Prep Time 20 minutes, plus 6 hours to freeze
  • Estimated Cost $15.50
  • 59 Comments

I realize it may not be what you expect from a food professional, but I really don't care much for pumpkin pie...or most pies, really. The filling is usually gloppy, the crust is nearly always either too dry or undercooked, and after a heavy meal (like, uh, the one pumpkin pie is most associated with), it's really the last thing I want to eat. 

So, it's funny that I made my way to this pie, which I have now eaten for breakfast three of the past seven days and cannot wait to make for my family (especially my pumpkin pie snob little brother who was extremely displeased with me three years ago when I made a Thanksgiving pie out of fresh butternut squash instead of the standard canned pumpkin pie filling he loves so much) this holiday season. 

One night a few weeks ago, while making chicken korma (a curry dish, thickened with ground cashews), it occurred to me that the lusciousness the soaked and pureed nuts brought to the korma could possibly, with the addition of pureed pumpkin and some spices, form the basis of a creamy pie filling, and since I love pureed cashews, maybe I would like that more than a regular pumpkin pie? Upon experimentation and with inspiration from this recipe from Minimalist Baker, I found that full-fat coconut milk (do not buy "lite" coconut milk for any reason whatsoever, OMG), added nice body and a surprising lack of coconut flavor, which would be quite unwelcome in a pumpkin pie, along wiith coconut oil, maple syrup (buy grade B -- it adds a richer maple flavor which works really well here), apple cider vinegar for tang, and a flurry of warm spices (cinnamon, cloves, and nutmeg) yielded the flavor and texture combination I was looking for. A sweet pecan crust completed the holiday theme.


Unlike most pies and cheesecakes, the filled mixture doesn't need to be baked. 

It freezes overnight (at least 6 hours) and then thaws slightly in the fridge until you're ready to serve.

Tradition usually calls for whipped cream (or whipped coconut cream), but as previously stated, I like bucking tradition, so I top it with more cinnamon and pomegranate seeds, which serve the double function of underscoring the tartness of the "cheesecake" and looking like beautiful jewels.

It's worth mentioning that this pie is vegan, paleo, gluten-free, and dairy-free, but don't make it for those reasons--make it because it's freaking delicious.

Ingredients

For the crust

  • 1 1/2 cups raw pecans $4
  • 1 cup pitted medjool dates $5
  • 1/4 teaspoon salt Pantry
  • dash ground cinnamon Pantry

 For the filling

  • 1 1/2 cups raw cashews $3.50
  • 2 tablespoons lemon juice or apple cider vinegar Pantry
  • 1/4 cup full-fat coconut milk $1.50
  • 1/4 cup grapeseed or coconut oil Pantry
  • 1/2 cup maple syrup (use Grade B for a stronger maple flavor) Pantry
  • 1/3 cup pumpkin puree (canned is fine) $1.50
  • 1/2 teaspoon salt Pantry
  • 1/4 teaspoon ground nutmeg Pantry
  • 1/3 teaspoon ground cinnamon Pantry
  • Pinch of ground cloves Pantry
  • 1 1/2 teaspoons vanilla or dark rum Pantry
  • optional toppings: whipped cream, whipped coconut cream, ground cinnamon, fresh pomegranate seeds

Recipe Serves 8

Directions

  1. Cover the cashews with water and soak for at least an hour.
  2. Place all crust ingredients in a food processor and pulse until mixture resembles a crumbly dough and sticks together when a clump is pinched.
  3. Line a 9-inch springform pan with parchment paper. 
  4. Wet your hands in cool water and press the crust with into the bottom of the lined springform pan to completely cover.
  5. Drain the cashews, then puree in a blender or food processor along with the remaining filling ingredients until very smooth and creamy (let the machine run for at least 2 minutes).
  6. Pour the filling into the crust-lined springform and smooth with an offset spatula or scraper.
  7. Freeze at least 6 hours (preferably overnight) until the filling is firm.
  8. Let thaw in the refrigerator, then slice iand serve cold, plain, sprinkled with cinnamon, or topped with whipped dairy or coconut cream, or pomegranate seeds.

Naptime Soup

  • Prep Time 10 minutes
  • Cook Time 1 hour
  • Estimated Cost $6
  • 50 Comments

Oh hey there, it's been a minute. Since I last posted, I've had a few things going on. I published a really fun book. Oh, and I had a baby.

Yup. A really cute one.

I spent the first 17 weeks of my pregnancy throwing up all day long ("morning sickness" is a misnomer to say the least), the next 15 weeks feeling pretty okay, and the remaining 9 weeks (she arrived about a week past her due date) fighting a weird cough and some lovely acid reflux. 

But then, she made her arrival and our lives were forever changed. I was treated to home cooking and takeout, thanks to some lovely friends who organized a meal train on our behalf, plus cooking courtesy of my generous mom who stayed for a week after Anna was born, to provide extra support. But once our core crew of friends and relatives had visited, held the baby (after washing their hands, obvs), and then bid us goodbye and good luck, I knew I needed to get back in the kitchen.

I know it sounds weird, but after our reality was permanently altered by the addition of the cutest human ever by way of a major medical event (giving birth is no joke!), plus the fact that I went from being just a regular person who happened to have boobs to a full-service dairy farm/breastaurant, I wanted to get back to preparing my own food -- it helped to resume something from our previous life.

Oh, and I had a bunch of fun new dietary restrictions. Yup, for the first four or so months of her life, Anna had reactions to my milk when I ate dairy, eggs, nuts, soy, wheat, or citrus, so basically everything tasty. 

Between having less time, fewer hands to cook/eat with at once, and a slew of foods on the "no" list, I knew I had to come up with something nutritionally dense but easy to keep on hand, and so this soup was born, so to speak (well, reborn, I guess--I've made more than a few pureed root vegetables soups in my time, and on this blog). 

The genius of it is that it's actually incredibly simple--just some orange root veggies, whatever you've got on hand, plus garlic, ginger, and broth or water. The fun comes in the garnishes, and that means built-in versatility. I like to make a big pot of it and divide it into storage containers that stay in the fridge. When naptime rolls around, I heat up a little bit, and then jazz it up depending on my mood. My current favorite combination, which I've eaten pretty much every day in the past week is a little gochujang paste, a swirl extra virgin olive oil, a few drops of sesame oil, sliced scallions, and toasted sesame seeds. I also love a little miso paste and a handful of chopped cilantro. But just about everything (including just a small shower of black pepper and a pinch of flaky salt, or even nothing at all) is delicious.

I usually eat it with a toasted English muffin topped with egg salad (eggs are, thankfully, back on the menu now) and the baby monitor in close view.

And the best part? It's a very family-frieindly food :-) 


Ingredients

  • 2 pounds peeled, chopped sweet potatoes, carrots, winter squash, or a mixture of whatever you've got on hand $5
  • 2 tablespoons extra virgin olive oil, plus more for the pot pantry
  • salt and pepper to taste
  • 1 onion, diced $0.50
  • 4 cloves garlic, chopped pantry
  • 1 1-inch piece ginger, peeled and chopped $0.50 
  • 4 cups water or vegetable broth
  • optional mix-ins: sesame oil, sesame seeds, chopped cilantro, sliced scallions, gojuchang, miso paste, sriracha

Recipe Serves 6

Directions

  1. Preheat the oven to 400 degrees F.
  2. In a large bowl, toss the root vegetables of your choosing in the olive oil and salt and pepper, and divide between two rimmed baking sheets. 
  3. Roast for 25-30 minutes, tossing halfway through, until very tender and browned in spots.
  4. Heat a large, heavy-bottomed pot over medium-high heat.
  5. Sauté the onion until soft and slightly browned.
  6. Add the garlic and the ginger and sauté with the onions for 1 minute.
  7. Add the roasted roots and the broth or water.
  8. Stir well and add salt and pepper to taste.
  9. Reduce heat to medium and cook, covered, for 20 minutes, or until the vegetables are soft enough to easily squish with the back of a fork.
  10. Puree by either working in batches, using a food processor or blender, or use an immersion blender and puree right in the pot.
  11. Serve plain or with one or two of the mix-ins added directly to the bowl.

Cauliflower Queso Fundido

  • Prep Time 10 minutes
  • Cook Time 33 minutes
  • Estimated Cost $8.50
  • 112 Comments

I almost didn't post this recipe. 

I wasn't thrilled with the above photo of the finished dish (we were in a rush to eat dinner and the light wasn't the best, so I just snapped a few and figured I'd edit them to my liking, but none were particularly great), and if you know anything about food blogs, you know the photos are a pretty big part of why people are compelled to read a post. 

But then, two bites into my first Cauliflower Queso Fundido-stuffed taco, embellished with a little guacamole, cilantro, and a few slivers of bright, crunchy shallot, I decided you needed to have this recipe ASAP, and I needed to get over myself. Maybe I'll reshoot the photos one day when I have more time (or next week, when I inevitably make this again). Or maybe I won't, and that will be okay too.

Sometimes it's hard not to overthink appearances. If you spend much time on social media (and if you're reading this, I'm guessing you do--or you are an older relative of mine who checks this website every few weeks to see what I'm up to, and if so, hi! I love you!) you are familiar with the bizarre, Instagram-filtered, scarily perfect world it can sometimes feel like. I almost never do my nails, but on the wrong day, a scroll through my Insta feed will have me convinced I need a gel French manicure STAT (or to get bangs, or to lose 15 pounds, or to start using self-tanner, or to somehow afford an all-white marble kitchen re-do...). I love looking at pretty pictures, but I don't always love how too much of it makes me feel about my own life.

But then comes a realization: photos are just moments. They're never the whole picture, so to speak. And sure, in the right moment, in the right light, with the right filter, things can *seem* intimidatingly perfect. The important thing to remember is that most likely, the reality is flawed, dimpled, messy, and yeah, maybe a little ugly, because that's how life works. But in this case, no bad lighting or less-than-beautiful beauty shot can take away from just how delicious this cheesy, melted, slightly spicy cauliflower thing is. 

It starts, as so many of my favorite things do, with a rimmed baking sheet of cauliflower and chopped onions in olive oil with salt and pepper.

Roast 'em until they're tender and brown.

Then layer them in a shallow, heavy-bottomed pot (or a cast iron or a baking dish), with roasted green chilies and cheese.

One more layer.

Pop it under the broiler and top with fresh cilantro.

You could just dive in with a fork or a crunchy chip, but my fave way to eat this is rolled in warm corn tortillas with all the fixings. You won't miss the meat.

Taco magic.

P.S. This is a slab of marble, not an actual marble countertop. I don't know any bloggers who actually have fancy marble countertops. We're literally faking every surface we purport to put food on. Who eats tacos right off the counter anyway? 

Ingredients

  • 1 medium head cauliflower, cored and cut into florets $2
  • 1 medium onion, diced $1
  • 2 tablespoons extra virgin olive oil Pantry
  • 1 teaspoon each of salt and pepper Pantry
  • 1 4-ounce can diced green chilies $2
  • 1 1/2 cups shredded jack, pepperjack, or cheddar cheese $3.50
  • chopped cilantro, for garnish Optional

Recipe Serves 2-3

Directions

  1. Preheat the oven to 400 degrees F.
  2. Toss the cauliflower and onions with the olive oil and salt and pepper. 
  3. Spread on a rimmed baking sheet.
  4. Roast for 20 minutes, until the cauliflower begins to brown.
  5. Stir the pan, then return to the oven for 5-7 minutes.
  6. Remove from oven and let cool for 5 minutes.
  7. While the cauliflower cools, preheat the broiler to high.
  8. In a shallow oven-proof or baking dish, spread half of the roasted cauliflower-onion mixture on the bottom of the pan.
  9. Spoon on half of the green chilies.
  10. Sprinkle on half of the shredded cheese.
  11. Repeat with the remaining ingredients for the second layer.
  12. Broil for 3-5 minutes, until the cheese is bubbly and slightly browned on top.
  13. Top with the cilantro, if using.
  14. Serve hot, with chips or warm tortillas.

Eggless Egg Salad

I attended elementary school in the early heyday of the Lunchable, AKA the ultimate cafeteria lunchtime trade item. Tiny plastic cartons with dividers separating a stack of cheddar cheese, a stack of golden butter crackers, and some slimy pink lunchmeat (usually turkey or ham) were the Hidden Valley Elementary School fourth grader's ticket to trading her way to an optimal lunch. It was the lunchbox equivalent of a royal flush.

My lunchbox, on the other hand (My Little Ponies from first through third grade, scrunchy brown bags with my name scrawled on them, so as to not look like such a baby from fourth grade onward), with its sprouted, meatless contents never got me far in the midday meal barter game. My mother, who had embraced the whole-foods-bulk-bin-health-food-co-op approach to food in the 1980s, packed my lunch with the kinds of life-affirming foods nutritional gurus like Drs. Weil and MacDougall would have given their stamp of approval: apple "purses" (whole apples, cored and filled with peanut butter and raisins), rice cakes, sliced vegetables (she tried to get me excited by calling them "crudité," as if I cared about seeming chic and french while I ate my carrot sticks at recess), and today's subject: eggless egg salad, a creamy blend of soft tofu, turmeric (for flavor and egg-like color), onions, celery, a little mayonnaise and fresh dill. She would pack it in a little Tupperware container, with crackers (obviously not Ritz--think brick-like, seeded, bran-heavy crackers) or on a sprouted whole wheat bagel.

While I craved the sort of schoolyard clout that came with having Lunchables in my lunch (other big ticket items: fluffy, crustless white bread and American cheese sandwiches, Oreos, and any sort of flavored chip or cheese puff), I secretly loved my hippie lunches. But the other kids teased me for eating tofu (then a relatively uncommon food in American households) and so I often took to eating them in the girls' bathroom to avoid taunting. And despite my actual preferences, I asked my mother to pack me something a little more "normal" so as to spare me being called, "Tofu Girl" at lunchtime.

"That is a very stupid nickname and there is no way I'm giving you white bread and chips for lunch, Gabrielle," she told me. Gabrielle, my full first name, was what she called me when she meant business. "Just ignore the teasing and eventually they'll get bored and stop."

I pushed back. "But nobody will ever trade with me if you keep giving me all this healthy stuff!" 

"Good," she replied. "I don't want you eating their crappy food anyway."

I sighed. Eggless egg salad it was, and thus began my first lesson on the wisdom of doing something that doesn't look cool and doesn't win me any popularity points, but is the right thing to do anyway. The next day I decided to start eating lunch in the cafeteria again, opting out of the lunchtime trade. And she was right: I ignored the teasing and it eventually it stopped. 

So here's to my mom, and all moms, who stood their ground, when it would have been so much easier to just give in to their whining children. They taught us to be strong, to be true to ourselves, and to eat our gross-looking lunches out in the open, despite the naysayers. 

Eggless egg salad is one of my favorite quick vegetarian protein sources, even to this day. It starts with soft tofu (you could use medium or firm tofu, but it won't have that egg-white-like texture, plus celery, shallot (you could use regular or green onions too), fresh dill, plus cayenne for spice, and turmeric for flavor and egg-like color.

You smush up the tofu so it looks like crumbled hard-boiled eggs. This part is fun.

Stir everything together, with a little mayonnaise and mustard to bind and flavor it, as well as a little salt and pepper.

Let it chill in the fridge for at least 30 minutes (this improves the texture). 

Eat on a toasted bagel (or on lightly dressed greens, or with crackers or "crudité," or by itself). Listen to your mom. Ignore the haters.

Ingredients

  • 14 ounces soft tofu $1.50 
  • 1/4 cup mayonnaise (use eggless mayonnaise for a vegan version) Pantry
  • 1 stalk celery, diced small $1.50 for a bunch
  • 1/2 medium shallot, diced $0.50 for a whole shallot
  • 1/2 teaspoon ground turmeric $1.50 for 1 ounce
  • 1/2 teaspoon cayenne pepper $1.50 for 1 ounce
  • 1 tablespoon (or more to taste) your favorite mustard $2.50 for 6 ounces
  • salt and pepper to taste Pantry

Recipe Serves 4-6

Directions

  1. Drain the tofu and place it in a mixing bowl.
  2. Use your clean hands to crumble it, being careful not to overwork it--a few squeezes will do.
  3. Gently fold in the mayonnaise, mixing well to distribute evenly.
  4. Str in the celery, shallot, spices, and salt, and pepper to taste.
  5. Chill for at least 30 minutes.
  6. Serve plain, with crackers, over greens, on toast, or on a bagel.