BrokeAss Gourmet

BrokeAss Gourmet

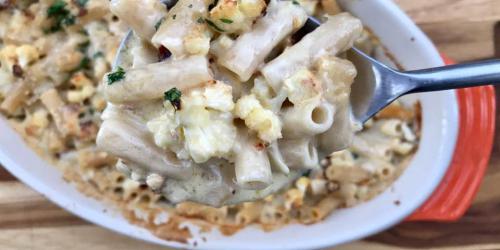
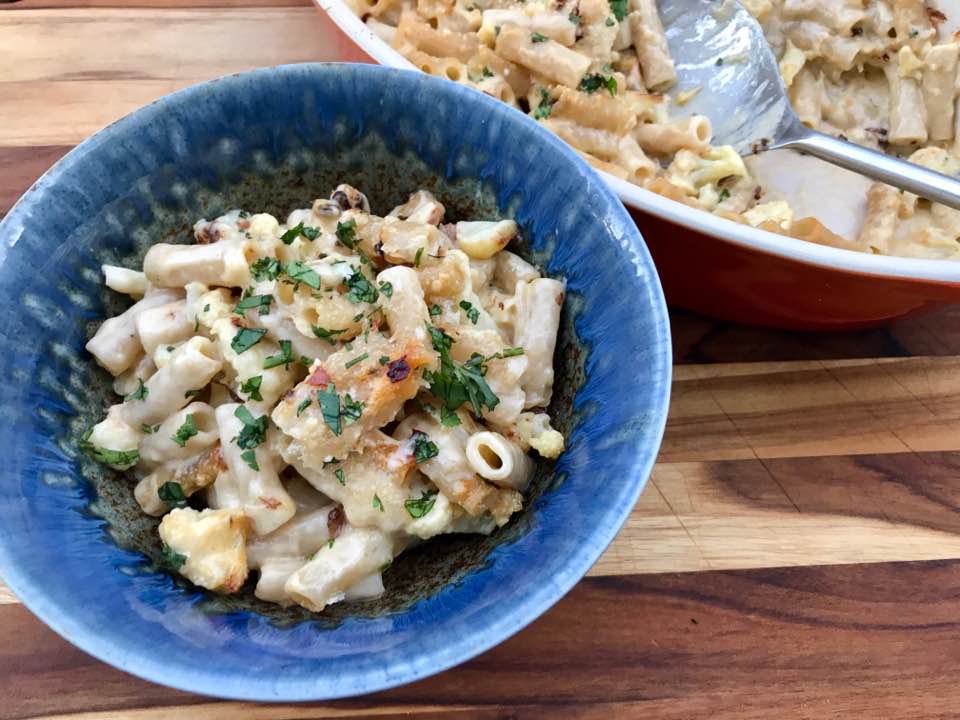
Macaroni + Cauliflower + Cheese

  • Prep Time 5 minutes
  • Cook Time 50 minutes
  • Estimated Cost $10
  • 88 Comments

I've been thinking a lot about moderation lately. It's such an appealing concept, to eschew extremes and live in the middle, in a happy medium, where, like a 2017 Goldilocks, you have just enough (and not too much) of everything. 

In reality though, like everything else, saying you do something "in moderation" is actually much easier than actually putting it into practice, especially when it comes to food. Let's say you want to reduce the amout of sugar you eat and so you decide to make after-dinner treats something you only have in moderation. It's a breeze to say you "eat dessert in moderation" (look at you, you're so in control yet relaxed and fun!), but then friends come over for dinner one night and of course you're gonna serve dessert. But they don't finish it all, so you're left with unfinished ice cream in your freezer or half a cake on your counter. What are you going to do, throw it away? Of course not. So you eat dessert every night for a week because, well, you ought to finish it, right? And once that week is up, it's tempting to just pick up more ice cream and cake the next time you go shopping, because suddenly it's a habit. 

But we also know just completely swearing off dessert isn't the way to go, because as soon as a you make a particular food "bad" you only want it more, and that's not helpful (anyone who has ever vowed not to pick up the phone when someone you desperately want to sleep with but know you shouldn't even talk to calls knows how this feels). What, are you going to arrange your life so you're never in the same room as dessert (or "Don't Pick Up!!!")? Of course not. You just resolve, again, to have less of it.

But for the moments when that's not easy, here's my proposition: instead of completely giving in to unhealthy treats in excess and then starting the whole cycle over the next week, why not modify them a bit so they don't entirely derail your progress, thereby making it easier to stay on track? Take, for example, today's recipe: a traditional mac + cheese that happens to be about 60% roasted cauliflower.

This is not some bullshit low-fat sauce, nor do I deign to suggest that cauliflower is a reasonable substitute for pasta. I would never insult you like that. This contains both a decadent, legit cheese sauce and real macaroni--it's just tempered with a hefty dose of roasted cauliflower. It's not "healthy" per se, but it's a whole lot more so than the regular stuff. Also, because cauliflower contains so much sating fiber, you may find (as I did), that one smallish bowl is all you need.

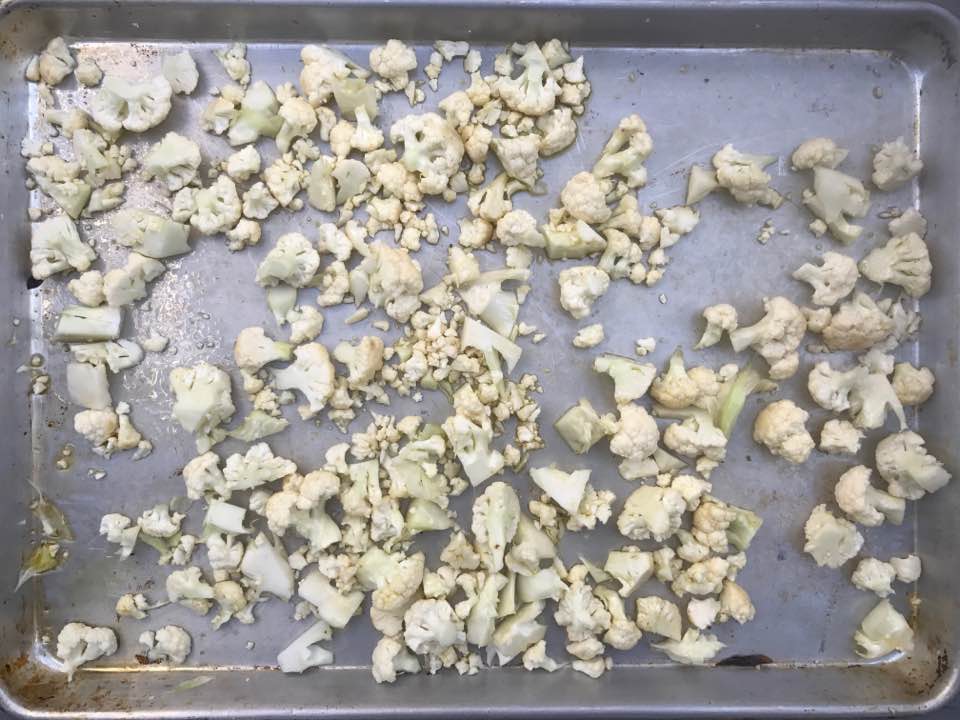
It's not exactly Easy Mac, but it's not much harder. Start with cauliflower cut into smallish florets--ones about the same size as the pasta you're using. Toss them with olive oil and a touch of salt (be careful with the salt in this recipe, as each element gets salted individually and the cheese is salty--taste as you go.

While it roasts, cook a little pasta in salted boiling water and make a classic cheese sauce.

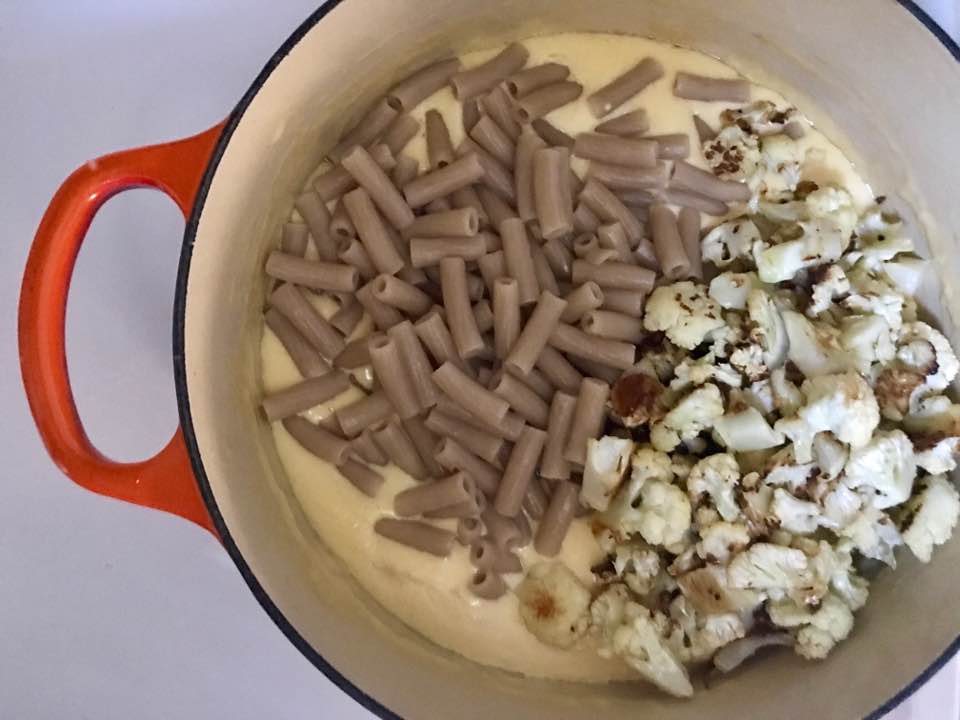
Fold the cooked cauliflower and pasta into the cheese sauce and add just a little bit of this recipes secret ingredient: the pasta's cooking water. 

Scrape it into a baking dish and pop it in the oven for about 20 minutes.

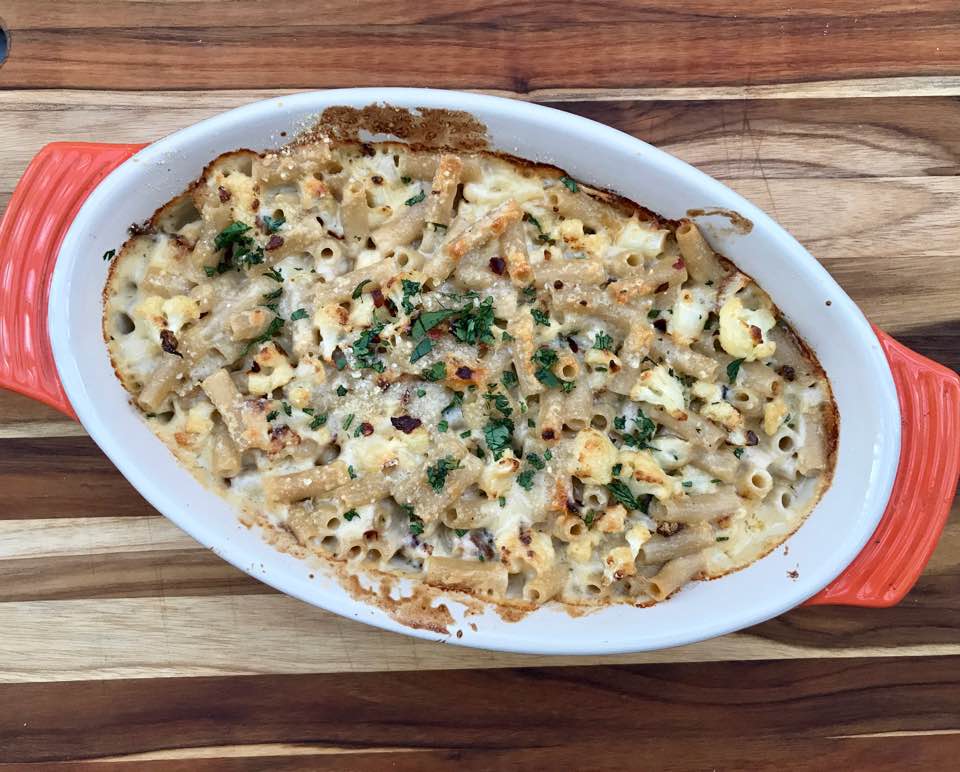
A touch of parsley and some chili flakes are all it needs.

The most delicious way to honor your cravings and your resolve at the same time.

Ingredients

  • 1 medium head cauliflower, cored and cut into small florets $2
  • 2 tablespoons extra virgin olive oil Pantry
  • salt and pepper Pantry
  • 4 ounces elbow macaroni or other small cut pasta (like penne or rotini) $2 for 16 ounces
  • 1 tablespoon unsalted butter $1 for stick
  • 1 tablespoon flour Pantry
  • 1 1/4 cups milk (preferably whole) $1.50 for a pint
  • 5 ounces medium or sharp cheddar cheese, shredded $3.50 for 8 ounces
  • chili flakes and chopped parsley, to garnish optional


Recipe Serves 4

Directions

  1. Preheat the oven to 400 degrees F.
  2. Toss the cauliflower with the olive oil and a pinch each of salt and pepper.
  3. Spread in an even layer on a baking sheet and roast for 20 minutes until tender and browned in spots. Once the cauliflower has cooked, remove it from the oven but leave the oven on.
  4. While the cauliflower roasts, cook the macaroni in salted boiling water according to package directions. 
  5. Drain, reserving 1/2 cup of the cooking water.
  6. Make a roux by melting the butter in a heavy-bottomed pot over medium heat and whisking in the flour. 
  7. Let cook whisking constantly for about a minute.
  8. Whisk in the milk, stirring continuously until the sauce begins to thicken.
  9. Whisk in the cheese and season to taste with salt and pepper. Continue whisking until the cheese is completely melted and cook for another 2-3 minutes. The sauce should be very creamy.
  10. Fold the cooked cauliflower, cooked pasta into the cheese sauce. 
  11. Stir in the reserved cooking water until completely incorporated.
  12. Scrape the mixture into a baking dish and bake for 20 minutes, until bubbly and browned on top.
  13. Serve hot, garnished with chili flakes and parsley if desired.

Garlic Sweet Potato Fries

  • Prep Time 10 minutes
  • Cook Time 34 minutes
  • Estimated Cost $5.50
  • 364 Comments

I didn't really start dating until junior high (and I use the word "dating" loosely--it was mostly just note-passing and hand-holding), but from the time I was in kindergarten, I always harbored at least one crush--usually a secret one, disclosed only to my closest girlfriends and usually my mom. I almost never shared my feelings with the object of my affection (way too scary!), but my feelings would churn and build inside, rendering me distracted and flustered whenever I encountered my crush of the moment.

But despite my in-the-flesh nervousness, there was no denying that having a crush made my day-to-day so much more fun. Whether I was re-routing my walk from biology to algebra so I could pass by a certain someone's locker, or doodling our names next to each other on my lab notebook (though, even in the marriage fantasies of my youth, I kept my last name), the preoccupation was more energizing than depleting.

As I got older and started to develop passions other than boys, I found I recognized the dizzy, slightly obsessive thought patterns that surrounded my artistic process. When I was excited about a play I was acting in or a piece I was writing, I'd once again encounter that familiar high school crush-like frenzy, only instead of Trevor from Western Civ, I'd become fixated on my project du jour, mulling over every detail, imaginging my future with the project.

I'm sure you're not surprised to learn that recipes and ingredients fall into the crushable category as well (remember my cauliflower obsession of 2015?). I tend to discover a dish or ingredient, and then cook it over and over again until I'm either sick of it (almost never happens) or I feel like I've perfected it. My current food crush is these garlicy sweet potato fries. Instead of the orange-fleshed garnet yams I usually use, I'm using the sweet potatoes I just cannot get enough of lately: purple-red skinned, beige-interior Japanese sweet potatoes (which are very good for you, and will apparently make you as beautiful as Olivia Munn's BTW). These have the sweet, nutty flavor of yams, but the baking integrity and firmness of regular potatoes, making them the most perfect oven fry sweet potato, in my opinion.

I like to use ones that are roughly the length I want my fries to be, and I never peel them (the skin is full of nutrients and I like its texture). I just cut them into relatively thin fries.

I toss them in olive oil, sprinkle them with salt, and bake until they get brown and crispy. Then I let them cool--do not skip this step! It helps make them crispy.

I toss them with the fixings of the ball park garlic fries my dad and I used to share at baseball games (because like all of my crushes, they remind me a little bit of my father): another drizzle of extra virgin olive oil, a touch of salt, chopped raw garlic, parsley, and Parm.

They're the perfect side for burgers, tacos, or even scrambled eggs. Try them tonight and get ready to start crushing.

Ingredients

  • 2 medium Japanese sweet potatoes, cut into thin fries $1.50
  • 3 tablespoons extra virgin olive oil, divided Pantry
  • salt Pantry
  • 2 cloves garlic, finely minced Pantry
  • 3 tablespoons grated Parmesan $4 for 6 ounces
  • 1 handful fresh parsley, chopped Pantry
  • 1 teaspoon red chili flakes, optional

Recipe Serves 2

Directions

  1. Preheat oven to 400 degrees F.
  2. On a rimmed baking sheet, toss the sweet potatoes with 2 tablespoons of the olive oil.
  3. Spread the sweet potatoes out so they are not touching.
  4. Sprinkle lightly with salt.
  5. Bake for 20 minutes on one side, then flip and bake for 12-14 minutes on the other side, until brown and crispy.
  6. Let cool for 5 minutes (this step is crucial, as it helps crisp them up!).
  7. Toss with the remaining tablespoon of olive oil, a pinch of salt, the garlic, Parmesan, parsley, and red chili flakes, if using.
  8. Serve immediately.

DIY Matzo

  • Prep Time 5 minutes
  • Cook Time 4 minutes
  • Estimated Cost $0
  • 54 Comments

I made a fun video on how to make matzo from scratch with BimBam! Check it out here, and see below for the recipe.

Happy Passover! 

Ingredients

  • 4 1/2 cups sifted all-purpose flour, plus more for rolling Pantry
  • 1 teaspoon regular salt Pantry
  • 2 tablespoons extra virgin olive oil, plus more for brushing Pantry
  • 3/4 cup warm water (plus more if needed)
  • flaky sea salt (like Maldon), for sprinkling (optional) 

Recipe Serves 8-10

Directions

  1. Place a large rimmed baking sheet into the oven and preheat to 500 degrees F.

  2. In a large bowl, mix together the flour, regular salt, olive oil, and warm water until everything comes together to form a dough. If the dough seems dry, add a little more water, a tablespoon at a time.

  3. Divide the dough into 8 pieces. 

  4. On a lightly floured surface, use a rolling pin to roll a piece of dough out as thinly as possible. 

  5. Repeat with the remaining dough pieces until you have 8 flat pieces.

  6. Use a fork to prick holes in the surface of the dough (this lets some of the air out during baking, so it cooks more evenly).

  7. Lightly brush the matzo pieces with water or olive oil, then sprinkle with the flaky sea salt.

  8. Working in batches, carefully place as many dough rectangles as can fit onto the pizza stone or baking sheet without touching. 

  9. Bake until the matzo is golden brown, about 2 minutes.

  10. Using tongs, carefully flip the matzo pieces and continue to bake until the other side is golden brown, about 2 minutes.

  11. Use tongs to remove the finished pieces and repeat with the remaining dough rectangles. 

Category:

Tags: , , ,

Share this Recipe: Share on Facebook Tweet This! Pin it on Pinterest

Hummus from Scratch

  • Prep Time 1 hour 15 minutes
  • Cook Time 1 hour 15 minutes
  • Estimated Cost $6
  • 45 Comments

I remember the first time I had real hummus. Not the goopy stuff that comes in a tub. You know that stuff: it's more mealy than creamy, and it never doesn't taste like the refrigerator it's stored in after being opened. Sometimes it comes in flavors like jalapeño or cilantro, but no amount of flavoring is enough to make up for its lack of freshness and lousy texture. 

The real stuff, which I tasted for the first time as an eighteen-year-old in Tel Aviv, is ethereally creamy, rich with olive oil, redolent of fresh lemon, lots of garlic, and good tahini, plus just enough salt to make it pop. It was revolutionary to me just how good it was, scooped onto a warm piece of hot-out-of-the-oven pita (which was also massively different than the bagged kind my mother bought at the grocery store back in the states). The hummus was somehow fuffy and luxurious at the same time, and much more flavorful than its off-white appearance let on. 

Though many countries claim hummus as their own, the chickpea-tahini-olive oil-lemon-garlic preparation of hummus is Egyptian in origin. Its complete name, ḥummuṣ bi ṭaḥīna means "chickpeas with tahini" in Arabic. And while, yes, it is available in plastic containers at your local grocery store, hummus made from scratch us in its own category. I order it regularly at my favorite neighborhood Middle Eastern restaurant, Old Jerusalem, but making it from scratch is a very close second. Here's how:

Start with dry chickpeas. Don't give in to the desire to use canned--they're really not as good. Besides, $5 worth of dry chickpeas will last you a whole lot longer than $5 worth of canned beans.

 If you have the time, soak them overnight, with some baking soda. If, like me, you are less patient, do the quick soaking method and stir some baking soda into the chickpeas and water, simmer for a few minutes, then cover for 10 minutes. This helps loosen the peels, and as you will find, this is the key to the smoothest, creamiest hummus.

 See how easily they come off? This process takes a little time, but trust me it's worth it. 

As you can see, a few peels remain. This is okay, the majority of the rest will float up during cooking.

The beans cook low and slow. Don't worry about them getting too mushy--they're just going to be pureed.


After cooking for a long time, it's into the food processor with tahini, olive oil, lemon, garlic, and salt.

Don't forget the extra olive oil to garnish. No, this is not a low-fat food. Don't ever bother with a hummus that claims to be low-fat!

I like to top mine with zaatar, an oregano-based herb blend spice-and-herb blend. If you can't find zaatar, sumac, paprika, chopped parsley or cilantro, or even just  freshly ground black pepper works nicely.

Don't you just want to dive in with a hot piece of pita?

Ingredients

  • 2 cups dried chickpeas $1.50 (buy in the bulk section for the best price)
  • 3 tablespoons baking soda Pantry
  • 1/4 cup extra virgin olive oil, plus more to garnish Pantry
  • 1/4 cup tahini $4 for 8 ounces
  • juice of 1 lemon $0.50 
  • 3 cloves garlic, roughly chopped Pantry
  • 2 teaspoons salt (more or less to taste) Pantry
  • zaatar Optional 

Recipe Serves 8-10

Directions

  1. Pick over the dried chickpeas and remove any that are still green.
  2. Put the chickpeas in a large heavy-bottomed pot, and add enough water so the chickpeas are under about 2 inches of water.
  3. Stir in the baking soda.
  4. Cover the pot and bring to a boil over high heat.
  5. Reduce the temperature to medium and let simmer for 5 minutes. 
  6. Let the chickpeas sit in the pot, covered for 10 minutes. 
  7. Turn off the heat and drain the chickpeas in a colander or strainer.
  8. Run cold water over the chickpeas until they are cool to the touch.
  9. Working in small batches, rub a handful of chickpeas between your hands to remove the peels. 
  10. Repeat until most of the peels have been removed from the chickpeas.
  11. Place the peeled chickpeas back in the pot and cover with 2-3 inches of water. Cover the pot with the lid.
  12. Bring to a boil, then reduce heat to medium-low.
  13. Let the pot simmer for 1 hour and 15 minutes.
  14. Once the chickpeas have finished cooking, lift the lid and use a slotted spoon to remove any peels that floated to the top during cooking.
  15. Drain the chickpeas in a colander or strainer and run cold water over them to bring them to room temperature.
  16. Place the chickpeas in the bowl of a food processor. Run the machine until all lumps disappear and the chickpeas are very smooth 
  17. With the machine running, stream in the olive oil.
  18. Add the tahini, lemon juice, garlic, and salt and blend until the hummus is completely smooth.
  19. Scrape the hummus into a serving bowl, and garnish with a heavy sprinkle of zaatar and a generous drizzle of olive oil.
  20. Serve with fresh vegetables, pita, pita chips, kebabs, or anything else you like.

Spaghetti with Short Rib Ragu

  • Prep Time 10 minutes
  • Cook Time 3 hours, 15 minutes
  • Estimated Cost $17.50
  • 34 Comments

For so many years of my life, Valentine's Day served as this horrible life marker, wherein I would be merrily rolling along through my nice, fun life and then, all of a sudden, it was February 14th and, in the absence of a romantic relationship, suddenly my life felt like it lacked meaning. It was as if everyone I saw was blissfully in love, and proving it to the world with candy hearts, boxes of chocolate, bouquets delivered to the office, and reservations at romantic restaurants while I was completely alone in the world. 

And it wasn't just limited to Valentine"s Days when I was single. If I happened to have a boyfriend (or a sort-of boyfriend/guy-who-didn't-realize-I-thought-of-him-as-my-sort-of-boyfriend as the case usually was) on V-day, the anxiety over whether he would demonstrate his affection for me in a quantifiable way, per every Valentine's Day trope I had seen or heard of, was even worse than how I felt when I didn't have a partner. Because of course he wouldn't, and of course I wouldn't be able to overcome the disappointment, live in the moment, and enjoy whatever the day brought my way. In the end, the feeling was always the same: I wanted more love than I felt was available to me and it sucked hard.

When I met Evan, romance was the last thing I was looking for in life. I had just started earning a living as a full-time writer and I was so career-happy I didn't even know what to do with myself. My life-long dream of publishing a book was about to come true, and I genuinely looked forward to every day. My social life was just peachy, and for the first time in a long while (perhaps thanks to a string of romantic failures the year before and subsequent therapy and self-reflection), I had zero interest in seeking out any form of serious romance.

Then, of course, things changed. Once Evan came into my life, I quickly realized I never wanted him to go, and he found he didn't want to either. Things were a little clunky in the beginning, as they tend to be when two people who are not used to having to answer to anyone decide to meld pieces of their lives. It took us a little while to figure out exactly what love would look like for us, but we did it, and now, five years later, we're here.

And while he is the king of my heart, and will be celebrated tonight with a romantic home-cooked dinner (more on that in a minute), I'd like to time travel for a moment and send a message to my younger self, the smart, cute, funny girl who is stuck in an alternate dimension in the 90's or mid-00's, feeling sad because some dumb boy didn't give her flowers or take her out to dinner on an arbitrary corporate greeting card holiday: You are fine. Love is weird and creeps into life unexpectedly. Candy hearts are not a measure of how much you are loved. Go out and have fun. 

Meanwhile, here in 2017, let's make some short rib ragu, perfect for your Valentine, Galentine, BFF, or #1, AKA yourself.

I'm starting by searing about a pound of boneless short ribs (the kind with bones in are fine too, just double it to 2 pounds) in a little olive oil in a Dutch oven.

Let's take them out. Look how beautiful they are.

Next, like any ragu, we're going to cook some vegetables. Here, we're going with aromatics: onion, lots of parsley, and garlic.

Next up is broth, to deglaze the pan, and some chopped tomatoes. This is going to be our braising liquid and eventual sauce.

In go the short ribs, settling in for a 3 hour bath.

3 hours later, the sauce is cooked down and the short ribs are falling apart, and out they come. These are so tender, you barely have to pull the forks into the meat.


Back into the pot, where you can see everything has completely cooked down.

Spaghetti, meet short rib ragu. I'm sensing a real love connection. 


Ingredients

  • 2 tablespoons extra virgin olive oil Pantry
  • salt and pepper Pantry
  • 1 pound boneless short ribs $8
  • 1 medium yellow onion, diced $1
  • 1 large handful fresh flat-leaf parsley, plus more for garnish $1 for a bunch
  • 3 cloves garlic, chopped Pantry
  • 2 15-ounce cans beef broth, warmed on the stove $3 
  • 2 15-ounce can chopped tomatoes $3
  • 8 ounces dried spaghetti (or any other thin, long-strand pasta) $1.50 for 16 ounces

Recipe Serves 4

Directions

  1. Heat the oil in a large dutch oven or heavy-bottomed pot (with a fitted lid) over medium-high heat.
  2. Lightly salt and pepper the short ribs on both sides.
  3. Brown the short ribs in the hot oil for 2-3 minutes on each side, until a thick crust forms.
  4. Remove the short ribs from the pan and set aside. 
  5. Add the onions, parsley, and garlic to the pan and brown well, for 3-4 minutes.
  6. Deglaze the pan by pouring in the warm broth and scraping the bottom of the pan with a wooden spoon to loosen any stuck bits.
  7. Add the tomatoes and season with 1/2 teaspoon each of salt and pepper.
  8. Return the short ribs to the pot.
  9. Turn the heat up and bring to a boil, then reduce heat to medium-low.
  10. Simmer for about 3 hours, until the sauce has greatly reduced and the short ribs are very tender.
  11. Remove the short ribs and transfer them to a cutting board.
  12. Use 2 forks to shred the meat, then return it to the pot and stir well.
  13. Taste for seasoning and, if necessary, add a little more salt.
  14. Reduce the heat to low so it continues to simmer.
  15. Bring a pot of salted water to a boil and cook the spaghetti according to package instructions. Be sure to reseve 1/2 cup cooking water.
  16. Transfer the cooked pasta (without rinsing), plus 1/2 cup reserved cooking water to the simmering ragu and let cook together for 2-3 minutes.
  17. Serve the pasta in bowls, garnished with a little more chopped parsley.