BrokeAss Gourmet

BrokeAss Gourmet

Haran's Peanut Butter Square Chippy Cups

  • Prep Time 0:15
  • Cook Time 0:20
  • Estimated Cost $10
  • 53 Comments

Today is my friend Haran's birthday, so, I decided to make one of his favorite desserts --Peanut Butter Square Chippy Cups.

Peanut butter squares are a kind of a "youngest sibling," residing beneath the ubiquitous fame of their big sister, the Blondie, and their older brother, the Peanut Butter Cookie. That said, they have established their own fanbase amongst cookie and bar enthusiasts, and when situated next to them at a picnic or bakesale, will stand up and sing, "look at me! I am a neologism!" while their older siblings are ignored. 

A legend surrounds the roots of this hybrid dessert, still whispered from time to time in the halls of Lakeshore Middle School in Mequon, Wisconsin. The old story goes that a homeroom teacher, speaking in the kind of prophetic/exhausted state that goes with being with adolescents for too many hours, attempted to demonstrate the kind of care that goes into writing a book report. 

  "You have to make a plan. A recipe. You can't just throw a bunch of flour in a bowl, add some butter and 2 eggs and there you go, 'PEANUT BUTTER SQUARE CHIPPY CUPS!'"

Well, Haran claims to have been there on the day these words were spoken. And while the first actual P.B.S.C.C. was not baked until some years later (bringing Mr. Kellett's prophecy to fruition), the salty-sweet-chocolate combo proved that indeed, you can't just mix a bunch of ingredients together and make magic. It takes a great recipe. And, in this case, a memory like Haran's. He's a great fellow, and such a likable guy, I believe you will find this recipe to be almost as much fun as reminiscing with him.

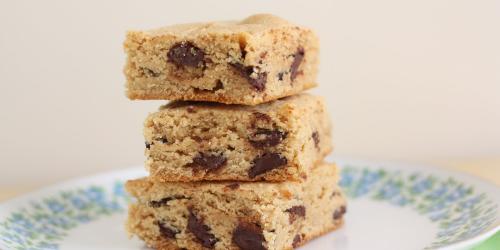
These are basically like classic blondies, but with a fun (and delicious!) twist: chopped (or mini) peanut butter cups stirred in. As they bake, the peanut butter cups melt into little globules of indulgent, creamy, peanutty goodness, situated in a buttery vanilla base. They're a refreshing take on brownies--and a great way to use up the peanut butter cups you inevitably have laying around post-Halloween.

Happy Birthday Haran!

Ingredients


  • 1 1/2 cups (packed) dark brown sugar ​Pantry
  • 1/2 cup (1 stick) unsalted butter, melted ​$1 for a stick
  • 2 eggs, lightly beaten ​$1.50 for 6
  • 1 tsp vanilla extract (use the real stuff--not imitation) ​$4 for 4 oz.
  • 1 1/2 cups all-purpose flour ​Pantry
  • 1/2 tsp baking powder ​Pantry
  • 1/2 tsp salt ​Pantry
  • 6 oz. peanut butter cups, chopped (or use the really little ones from Trader Joe's) $3.50 for 12 oz.

Recipe Serves 9-12

Directions

  1. Preheat the oven to 350 degrees F.
  2. Lightly grease a 13" x 9" baking pan (a great trick: use the wrapper from the butter for this).
  3. In a large bowl, whisk together the brown sugar, butter, eggs and vanilla just until fully incorporated.
  4. In a separate bowl, combine the flour, baking powder and salt.
  5. Gently fold the dry ingredients mixture to the brown sugar mixture.
  6. Stir in the chopped (or mini) peanut butter cups.
  7. Spread into the prepared pan.
  8. Bake for 18-20 minutes or until a toothpick inserted near the center comes out clean.
  9. Let cool before cutting into bars and serving.

Category: Meals

Tags: , , ,

Share this Recipe: Share on Facebook Tweet This! Pin it on Pinterest

Blistered Serrano Chilies

  • Prep Time 0:05
  • Cook Time 0:07
  • Estimated Cost $2.50
  • 50 Comments

My friend Brian made this tapas classic using Japanese shishito peppers at lunch a few weeks ago, and I found them impossible to stop eating. Slightly sweet and plenty salty, with that charred, primal umami flavor made burned them permanently into my mind (pun intended, duh). So naturally, I hit him up for the recipe and he kindly obliged.

This afternoon, while perusing my favorite neighborhood Asian specialty shop, I searched high and low for shishitos, but couldn't find them. What I did find, however, were some gorgeous fresh serranos. 

Serranos are generally quite spicy--spicier than my beloved jalapeños, but I knew I could coax some of that heat out using Brian's technique. 

The result? Chilies that were spicier than the shishitos, but addictive in their own right. I topped them with nothing more than a sprinkle of salt, but I'm thinking that next time I might add a squeeze of fresh lemon too.

One last note: don't toss out the oil after you cook the chilies! The serranos impart a touch of heat and a lovely flavor--try it in sauces and dressings.

Ingredients

  • 1/4 cup extra virgin olive oil Pantry
  • 1 lb serrano (or shishito or padron) chilies $2.50
  • sea salt (or other good, coarser salt--I used Himalayan pink salt from Trader Joe's) Pantry

Recipe Serves 8-10

Directions

  1. Cut a small (1/4") slit in the bottom tip of each chili.
  2. Heat olive oil in a medium, heavy-bottomed pot over medium heat. 
  3. When the oil is very hot, add the chilies (you may have to work in batches).
  4. Cook them, stirring occasionally, allowing the chilies to blister and char. 
  5. Turn off the heat and use tongs or a slotted spoon to remove the chilies from the hot oil. Transfer immediately to a serving plate or bowl.
  6. Sprinkle generously with salt.
  7. Serve immediately.

Autumn Sweet Potato Cakes

  • Prep Time 0:30
  • Cook Time 0:30
  • Estimated Cost $8
  • 47 Comments

I'm a little embarrassed to admit this, but I have become increasingly fond of frozen, bagged kale.

Yeah, I know. 

But really, hear me out. First of all, it's incredibly convenient and wildly versatile. Use it any way you would use frozen spinach or cooked fresh kale.

It's cheap too. I've seen it at Trader Joe's and Whole Foods, usually for around $1.50 for a 16-oz. bag. Even more awesome, the frozen kale stems that come with the leaves are little and tender and totally delicious. How many times have you de-stemmed a bunch of fresh kale only to find yourself left with a whole lot less edible kale than you remembered buying? Not the case with frozen kale, and I love any food that inhibits waste.

In these savory, decadent cakes, mashed sweet potatoes are transformed into a loaded latke of sorts, stuffed with some of my favorite fall flavors: cranberries, garlic, sage and, of course, kale. Serve them as a side dish with grilled meats, or as the main event, perhaps with some herbed white beans and a crunchy chopped salad.

Note: You could also make these using fresh, steamed kale or frozen, thawed and drained spinach.

Ingredients

  • extra virgin olive oil Pantry
  • 1/2 medium onion, sliced into thin rings $0.50 for whole onion
  • 3 medium garnet yams (orange sweet potatoes), peeled and diced $2
  • 3/4 cup thawed frozen chopped kale, drained $1.50 for a 16-oz. bag
  • 1 clove garlic, minced Pantry
  • 1/4 cup dried cranberries $2 for a 12-oz. bag
  • 1/2 tsp each salt and pepper Pantry
  • 2 fresh sage leaves, minced $1 for a bunch
  • 1 egg, lightly beaten $1.50 for 6
  • 1/2 cup crumbled goat cheese or feta optional
  • 1/8 cup flour (or more, as needed) Pantry

Recipe Serves 4-6

Directions

  1. Heat 2 tbsp olive oil in a medium frying pan over medium-low heat.
  2. Add the sliced onions and let cook, stirring very occasionally (you want them to caramelize, so just leave them alone and you prepare and cook the cakes--about 30 minutes).
  3. Meanwhile, bring a medium pot of salted water to a boil. Add the peeled, diced sweet potatoes and cover. 
  4. Let the sweet potatoes cook for about 8 minutes, or until forktender.
  5. Drain the cooked sweet potatoes and transfer to a bowl. Mash with the back of a fork or a potato masher until mostly smooth.
  6. Stir in the kale, garlic, cranberries, salt, pepper, sage, egg, goat cheese or feta (if using), and flour. 
  7. Stir gently to combine.
  8. In a large, heavy-bottomed frying pan (or a flat griddle), heat 2-3 tbsp olive oil over medium heat. 
  9. Use wet hands to form patties of 1/4 cup sweet potato-kale mixture.
  10. As you form patties, place the patties into the hot oil (you'll need to work in batches so as to avoid crowding).
  11. Cook the batches for 4-5 minutes on each side, making sure that a golden-brown, crisp crust forms on each side.
  12. Once all
  13. Drain the cooked cakes on paper towels and serve hot, topped with a few strands of caramelized onions.

Pepperjack Pupusas

  • Prep Time 0:10
  • Cook Time 0:06
  • Estimated Cost $5
  • 50 Comments

Apply a little technique to fresh, unfussy ingredients and eat better for less money. 

These simple pupusas (a classic Salvadorean stuffed tortilla) illustrate a very important point about BrokeAss cooking: when you buy whole, unprocessed ingredients and spend just a little extra time preparing them, the result is almost always less expensive, better for you and, most importantly, exponentially more delicious.

Pat the dough between your hands to make a circle.

Essentially, these pupusas are just like quesadillas, except creamy melted cheese is sandwiched between layers of a just-cooked dough made from masa harina, a coarse corn flour made from corn and lime juice (find masa harina in a good grocery store's bulk section or in the Latin American specialty store) instead of tortillas. As the dough is griddled, the cheese melts and it's time to eat. All you have to do is spend 5 minutes (less, when you get really good at it!) longer than you would on a quesadilla and you'll be on your way to a hot, fresh and unbelievably tasty treat--that's lower in fat and less processed than a typical quesadilla.

Griddle the pupusas.

It's probably the most important BrokeAss Gourmet principle: apply a little technique to fresh, unfussy ingredients and eat better for less money. 

Ingredients

  • 4 cups masa harina (buy it in the bulk section for the best deal) $1.50 
  • pinch of salt Pantry
  • 2 cups water 
  • 4 thinly-cut 1-oz. slices of pepperjack (or other creamy, meltable cheese) $3.50 for 12 oz.  

Recipe Serves 4

Directions

  1. Mix masa harina, salt and water together in a bowl to make a sticky dough (add a touch more water if it’s too crumbly after stirring well). Divide the dough into 8 balls.
  2. Coat your hands with masa harina and pick up a ball of dough. Pat gently it between your hands until you have a 6" circle. (Another approach is to place a ball between two pieces of wax paper and roll out, using hands or a rolling pin, into a 6” circle.)
  3. Set the finished circle on a plate coated lightly with masa harina. 
  4. Repeat with remaining balls of dough.
  5. To assemble a pupusa, place a slice of cheese atop one dough round. Top with a second dough round and pinch edges gently to seal, smoothing as you go.
  6. Repeat with remaining dough and cheese.
  7. To cook, heat an ungreased griddle or pan (preferably cast iron) over high heat. Cook the pupusas for 2-3 minutes on each side, or until lightly charred in places.
  8. Serve whole (or cut into halves or wedges) with cabbage slaw, salsa, guacamole, sour cream, or just on their own.

Spicy Beef Kale Rolls

  • Prep Time 0:30
  • Cook Time 0:45
  • Estimated Cost $18
  • 50 Comments

The tomatoes cook down with the honey and cinnamon, yielding a fragrant sauce that coats each roll with just enough sweetness. 

When I was growing up, my mother sometimes made traditional beef cabbage rolls. She would mix ground beef, rice and spices, roll it up in cabbage leaves, and cook them slow and low, in a spiced tomato sauce. My grandmother made a similar dish. It's a traditional Eastern-European dish, with endless variation possibilities. Some people add sauerkraut, some (like my friend Tori) combine chicken with the beef, and and some even go so far as to add ketchup or molasses to their sauce.

kale rolling

These are not my mother's or grandmother's cabbage rolls (though I'm certain she'd approve of them), and they're probably not your mother's or grandmother's cabbage rolls either. They are, however, pure comfort food.

In my version, I swap out the cabbage for kale, skip the rice, and stir spicy Asian chili sauce into my meat. The tomatoes cook down with the honey and cinnamon, yielding a fragrant sauce that coats each roll with just enough sweetness. 

These are great on their own, or they can be served with buttered egg noodles, rice pilaf or potatoes.


Ingredients

  • 2 tsp extra virgin olive oil Pantry
  • 1 onion, diced finely, divided $0.50 
  • 4 cloves garlic, minced, divided Pantry
  • 1/2 tsp cinnamon $1.50 for 1 oz.
  • 2 14-oz. cans crushed tomatoes $3
  • 2 tbsp honey Pantry
  • 1 tbsp plus 2 tsp apple cider vinegar $1.50 for 16 oz.
  • 2 large bunches of lacinato or other large-leaf, non-curly kale, rinsed and patted dry $3
  • 1 lb ground beef (80/20 or 85/15) $4.50
  • 1 large handful fresh cilantro or flat-leaf parsley leaves $1 for a bunch
  • 2 teaspoons (or more to taste) Asian chili sauce $1.50 for 8 oz.
  • 1 egg, lightly beaten $1.50 for 6
  • salt and pepper Pantry
  • 2 tsp soy sauce Pantry

Recipe Serves 4

Directions

  1. In a large pot (make sure it has a fitted lid), heat the olive oil over medium heat. 
  2. Add about 2/3 of the onion, half of the garlic and the cinnamon and stir well. 
  3. Cook, stirring occasionally, until the onions begin to soften, about 5 minutes. 
  4. Add the crushed tomatoes, honey and apple cider vinegar and stir well.
  5. Reduce heat to low, cover and let cook while you prepare the kale and beef.
  6. Use a sharp knife to gently slice the kale leaves off of their stems. Discard the stems and set the leaves aside. These will be wrapping for your meat filling.
  7. To make the beef mixture, combine the remaining onions and garlic with the ground beef, the cilantro or parsley, the chili sauce, egg, 1 liberal pinch each of salt and pepper, and the soy sauce. 
  8. Use your hands to combine the meat mixture well.
  9. Wash your hands well.
  10. Lay a kale leaf smooth side down.
  11. Use your hands (it helps if they are a little bit wet) to shape 2-3 tbsp of the beef mixture (depending on the size of your kale leaf--just use your judgment) into a cylinder shape.
  12. Starting at the widest part of the kale, roll the meat up, tucking the ends in, so the meat is completely encapsulated inside of the kale.
  13. Repeat with the remaining beef and kale.
  14. Season the sauce with salt and pepper to taste, then place the kale rolls, seam-side-down into the sauce.
  15. Turn the heat up to medium-low, cover the pot and cook the rolls for 25-30 minutes, or until the kale is soft and the meat is just cooked through.
  16. Use a slotted spoon to remove the rolls from the sauce and turn the heat up to medium-high.
  17. Cook the sauce for about 5 minutes, or until it thickens a bit. 
  18. To serve, spoon most of the sauce into bowls or onto plates and top with the kale rolls. Spoon a little more sauce on top of the rolls.
  19. Serve immediately.

Category: Meals

Tags: , , , ,

Share this Recipe: Share on Facebook Tweet This! Pin it on Pinterest