BrokeAss Gourmet

BrokeAss Gourmet

Spaghetti Carbonara

  • Prep Time 0:10
  • Cook Time 0:10
  • Estimated Cost $7.00
  • 6 Comments

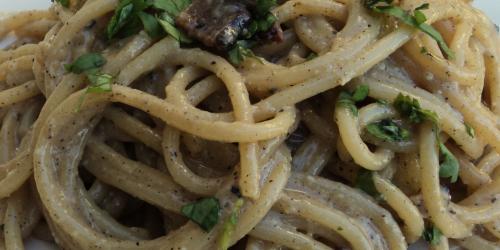
Admittedly, this is not a healthy dish, but once in awhile, especially if you are seriously lacking time and cash, it can be a glorious treat.

It’s decadent on its own, but nice add-ins include red pepper flakes, chopped fresh flat-leaf parsley, frozen green peas (they’ll defrost once they come into contact with the fresh pasta), broccoli florets, sauteed mushrooms, spinach or chard.

Also, don’t worry about bacteria from the raw egg—the heat of the pasta will take care of it.

Ingredients

  • 8 oz. dried spaghetti $1
  • 2 strips raw, uncured bacon $1
  • 3 cloves garlic, chopped Pantry
  • salt and pepper Pantry
  • 1 egg, lightly beaten $1.50 for 6
  • 1/2 cup grated Parmesan $3.50 for 8 oz.

Recipe Serves 2

Directions

  1. Cook spaghetti according to package directions in salted boiling water. Drain, reserving 1/4 cup cooking water.
  2. Heat a large dry frying pan over medium-high heat. Cook bacon strips for 2-3 minutes on each side, or until brown and crisp. Discard all but 1 tbsp bacon fat. Drain bacon on paper towels. Chop or crumble bacon.
  3. Cook the chopped garlic in the reserved bacon fat over medium heat for 30 seconds, or just until fragrant and season with pepper. Add cooked, drained pasta and reserved cooking liquid and toss together using tongs. Cook for 1 minute or until cooking liquid begins to absorb.
  4. Remove from heat and toss thoroughly with egg. Continue tossing pasta with one hand, to avoid scrambling the eggs, and add the Parmesan. Toss well. Add the crumbled bacon, season with salt and pepper to taste (careful with the salt--the bacon is already salty), and serve hot.

Apple, Cheddar and Bacon Quesadillas with Caramelized Shallots

  • Prep Time 0:15
  • Cook Time 0:06
  • Estimated Cost $7.00
  • 8 Comments

Honestly, I just wanted to make a quick quesadilla for dinner, clean up the kitchen and be done for the night, but you know me—I can’t just cook something and eat it like a normal person—I have to memorialize it. It just looked so pretty and the evening light was so lovely and my camera was sitting right there and I just couldn’t resist.

So here you go. Now I’m really turning off my computer.

Ingredients

  • 2 tsp extra virgin olive oil Pantry
  • 2 shallots, sliced thinly $0.50
  • 2 slices raw, uncured bacon $1
  • 2 whole wheat tortillas $2.50 for 6
  • 1 Granny Smith (or other tart) apple, sliced thinly $0.50
  • 2 oz. white or yellow cheddar cheese, sliced very thinly $2.50 for 8 oz.
  • salt and pepper to taste Pantry

Directions

  1. Heat the olive oil in a small frying pan over medium-low heat and add the shallots. Cook, stirring occasionally, for 8-10 minutes or until shallots are very soft.
  2. While shallots caramelize, cook the bacon on both sides in a large dry frying pan over medium-high heat until very crisp (2-3 minutes). Drain on paper towels and chop roughly. Reserve half of the bacon grease in the frying pan.
  3. To assemble the tortillas, place 1/4 of the bottom half of a tortilla in an even layer. Top with a layer of sliced apples and chopped bacon. Top with another 1/4 of the cheese. Fold tortilla over so you have a half circle. Repeat with the remaining ingredients.
  4. Cook the quesadillas in the bacon grease (or use olive oil if you prefer) for 2-3 minutes on each side, or until the tortilla is crisp and the cheese has melted.
  5. Serve the quesadillas cut into wedges, topped with the caramelized shallots.

Rustic Apple Tart with Buckwheat Crust

  • Prep Time 0:35
  • Cook Time 0:30
  • Estimated Cost $12.00
  • 10 Comments

In case you have any doubts about my wholesomeness (and I can certainly see why you might), please know that I spent my morning picking fresh apples from the Granny Smith tree in my backyard and making this modern version of classic apple pie.

Light, flaky buckwheat pastry envelops fresh apples with just a hint of sugar. This recipe, in fact, is actually pretty low in sugar compared to most apple pies with just 1/2 cup in the whole thing. There’s no syrupy mess surrounding the fruit—just a touch of sweetness and cinnamon.

See? It’s just as wholesome as I am. Now, if you’ll excuse me, I have orphaned kittens to rescue.

Ingredients

  • 1 stick very cold unsalted butter, cut into 1/2" cubes $1
  • 3/4 cup all-purpose flour plus more for rolling and baking Pantry
  • 1/4 cup buckwheat flour $3.50 for 22 oz.
  • 1/2 tsp salt Pantry
  • 1/8 cup ice water 
  • 4 Granny Smith apples, sliced thinly $2
  • 1/4 cup packed brown sugar plus more for sprinkling Pantry
  • 2 tbsp corn starch $2 for 10 oz.
  • 1 1/2 tsp cinnamon $1.50 for 1 oz.
  • juice of 1/2 lemon $0.50
  • 1 egg $1.50 for 12

Recipe Serves 4-6

Directions

  1. Preheat oven to 325 degrees F. Lightly flour a baking sheet and set aside.
  2. In a food processor, combine butter, flours, and salt. Pulse until mixture looks like small peas (this can also be done by hand using 2 forks or a pastry cutter). Slowly stream in ice water (you may not need it all) just until mixture comes together. Turn off machine and remove dough. Wrap in plastic wrap or wax paper and refrigerate for 10-15 minutes.
  3. In a mixing bowl, combine apple slices, brown sugar, corn starch, cinnamon and lemon juice. Mix well to ensure each apple slice is coated. Leave in refrigerator until dough has finished chilling.
  4. On a floured surface, roll the dough out into a 12" circle. Transfer the circle to the prepared baking sheet. Arrange the seasoned apple slices in a layered spiral, working from the outside in, reserving 2 1/2"-3" on the edge for the crust. Pour any liquid remaining in the bowl over the apple slices.
  5. Gently fold the reserved edge over the sliced apples and tuck in decoratively.
  6. Beat together the egg and 1/8 cup water. Brush, using a pastry brush, over the exposed crust (you may not use it all).
  7. Bake for 25-30 minutes. Crust should be golden-brown and shiny.
  8. Top with a light sprinkle of brown sugar and let cool.
  9. Cut into wedges and serve.

Tofu Sushi Rolls

  • Prep Time 0:20
  • Cook Time 0:20
  • Estimated Cost $8.50
  • 34 Comments

I used to work at an office that was equidistant to several great sushi restaurants. On a daily basis, lunchtime meant a tug-of-war between my sushi cravings and my self-restraint. Sadly, my love for the Japanese treat was often outweighed by desire to make rent.

If you, too are on a budget and work in a metropolitan area, chances are you are familiar with the sushi dilemma. Well, kiss it goodbye. This recipe makes enough for 2-3 lunches, so make it on Sunday night and enjoy it for lunch for the better part of the work/school week.

Ingredients

  • 1/8 cup soy sauce plus more for dipping Pantry
  • 2 tbsp extra virgin olive oil plus more for the baking sheet Pantry
  • 2 tbsp honey Pantry
  • 1" piece ginger, peeled and minced $0.50
  • 2 cloves garlic, minced Pantry
  • 4 oz. extra firm tofu, sliced into 1/2" thick pieces $1.50 for 14 oz.
  • 1 cup uncooked sushi rice $1.50 for 12 oz.
  • 2 tsp rice vinegar $1.50 for 10 oz
  • 6 sheets roasted sushi nori $1.50 for 10
  • 2 cups mixed greens $1
  • 3 green onions, sliced lengthwise and then into 3" strips $1 for a bunch

Directions

  1. Preheat oven to 375 degrees F. Lightly oil a baking sheet and set aside.
  2. In a medium bowl, whisk together olive oil, honey, ginger and garlic. Place sliced tofu in bowl and use hands to ensure each piece of tofu is coated. Let marinate for 10 minutes.
  3. While tofu marinates, cook the rice according to package directions. Once it's cooked, spread it on a cool plate and sprinkle with the rice vinegar. Let cool while the tofu bakes.
  4. Spread the marinated tofu on the prepared baking sheet and bake for 18-20 minutes (flipping half-way through). Remove and let cool for 5-10 minutes. Cut into 3" strips.
  5. To assemble the sushi rolls, lay a piece of nori on a clean, dry surface lengthwise and shiny side down. Wet your hands with cool water and spread 1/4 of the rice over the bottom 1/2 of the nori sheet.
  6. Place 1/4 of the greens evenly over the rice. Lay a few strips of tofu in a row on top of the greens. Place a few pieces of scallion along the tofu.
  7. Roll up tightly, starting at the bottom. Use a finger dipped in water to seal the end of the nori to the rest of the roll. Cut into sushi-size pieces (using a serrated knife helps). Repeat with remaining ingredients.
  8. Serve immediately with soy sauce or pack in an airtight container for your brown bag lunch. If you have any soy sauce packets lying around, tuck them in with the sushi.

Makes about 30 pieces of sushi.

Heirloom Bean-Vegetable Enchiladas with Green Chili Sauce

  • Prep Time 0:45
  • Cook Time 0:35
  • Estimated Cost $10.50
  • 86 Comments

One of my favorite items at the Mission Community Market farmers market in my neighborhood is the fresh heirloom beans available from Yerena Farms. Heirloom beans, like heirloom tomatoes, have been preserved over many years and possess a depth of flavor and a beautiful speckled exterior unlike any other bean. If you can get your hands on fresh ones, definitely do so. Otherwise, dried heirloom beans work well. Barring both, use dried or canned pinto beans.

Ingredients

  • extra virgin olive oil Pantry
  • 6 cloves garlic, minced, divided Pantry
  • 1 cup shelled fresh heirloom beans (or 2/3 cup dried heirloom beans, soaked or 1 cup canned pinto beans, rinsed and drained $1.50
  • salt and pepper Pantry
  • 4 green Anaheim chili peppers $1.50
  • 1 handful fresh cilantro leaves, roughly chopped $1 for a bunch
  • 3 tbsp half-and-half $1 for a pint
  • 1 small onion, diced $0.50
  • 1 small head broccoli (stems included), chopped finely $0.50
  • 8 button mushrooms, chopped finely $1
  • 1 1/2 cups shredded mozzarella or jack cheese $2.50 for 14 oz.
  • 8-10 6" corn tortillas $1 for 30

Recipe Serves 3-4

Directions

  1. Heat 1 tbsp olive oil in a medium pot over medium heat. Add 2 minced garlic cloves and cook for 1 minute, stirring frequently, until very fragrant. Add the beans, plus liberal amounts of salt and pepper. If using fresh beans, add just enough water to cover. If using soaked dried beans, add enough water to cover, plus 2 inches. If using canned beans, add only 1-2 tbsp water to keep the beans from drying out). If using fresh or dried beans, bring mixture, covered, to a rapid boil over high heat and then reduce heat and cook covered until beans are soft. This timing will vary, depending on what kind of beans you use. Fresh beans will take between 20 and 35 minutes, while dried beans will take between 40 and 50 minutes.
  2. While the beans cook, preheat broiler to high. Drizzle whole peppers lightly with olive oil and place on a baking sheet. Broil for 7-8 minutes on each side or until skin becomes very soft and lightly charred.
  3. Under cool running water, slip the peppers' skins off (they should come right off--if they don't, put them back under the broiler for a few minutes). Discard the stems and remove the seeds if you prefer a milder sauce (keep them in if you like spicy flavors). Chop the chilies roughly.
  4. Puree the chilies with 4 garlic cloves, 2 tbsp extra virgin olive oil, the cilantro, the half-and-half and salt and pepper to taste in a blender or food processor. Transfer to a medium bowl and set aside.
  5. Heat 1 tbsp extra virgin olive oil in a large frying pan over medium-high heat. Add the chopped onion and cook for 1 minute, or until fragrant. Add the broccoli and mushrooms and cook, stirring frequently, for 3-4 minutes, or until vegetables soften slightly. Remove from heat and transfer to a bowl. Drain the beans and add them to the vegetable mixture. Allow bean-vegetable mixture to cool for 5 minutes.
  6. Stir 1/4 of the Anaheim chili sauce into the cooled bean-vegetable mixture. Add 1 cup of the cheese and toss together.
  7. Preheat the oven to 375 degrees F and lightly oil a 9"x13" baking pan.
  8. Warm the tortillas for 30 seconds in the microwave to make them pliable. Assemble the enchiladas by dipping a tortilla into the sauce. Place about 1/4 cup filling in the tortilla and roll up. Place, seam-side down into the pan and repeat with remaining tortillas, placing rolled enchiladas as close to one another as possible. Once all enchiladas have been rolled, pour remaining sauce over the top. Top with the remaining cheese. Cover pan tightly with foil and bake for 25 minutes. Remove foil and bake for 8-10 minutes, or until cheese is bubbly and lightly-browned.
  9. Serve hot.