BrokeAss Gourmet

BrokeAss Gourmet

Pastrami Bacon

  • Prep Time 5 minutes
  • Cook Time 25 minutes
  • Estimated Cost $13.50
  • 18 Comments

When we got engaged this summer, Evan's parents decided to throw us a party in Wisconsin. A few weeks before our visit, they called to ask what kind of food we wanted for the party. Evan had one thing to say:

"All I want is a big kosher pastrami sandwich on rye." His parents were on it.

After much discussion of what kind of pastrami, and which brand of rye, we quickly discovered that it's actually not so easy to find kosher pastrami in Mequon, Wisconsin. His parents called local grocery stores to no avail, and even contacted a synagogue, but no such luck. Eventually they decided to do what we all do when we can't find the thing we're looking for: order it online.

They landed on the website for Grow and Behold, a company committed to pasturered, kosher meats. Knowing their son's appetite for pastrami, they ordered enough to feed a small village.  

When we arrived at their home, Evan made a beeline for the freezer to check out the goods. It was indeed pastrami, but it was also about 50% fat. 

That beef fat, which is actually delicious on hot pastrami, where it gets a little melty and is very flavorful, wouldn't be very good on the cold sandwich Evan had been envisioning. It would be flaccid and rubbery.

The party was still wonderful (no fatty pastrami could keep that from happening), and when it was all over, his parents put us on a plane with the leftover pastrami (hopefully the people on our plane enjoyed the meaty aroma wafting from row 23). They also arranged for the company to send us a second, hopefully improved, shipment of the pastrami to make up for the first one they sent. 

We received it.

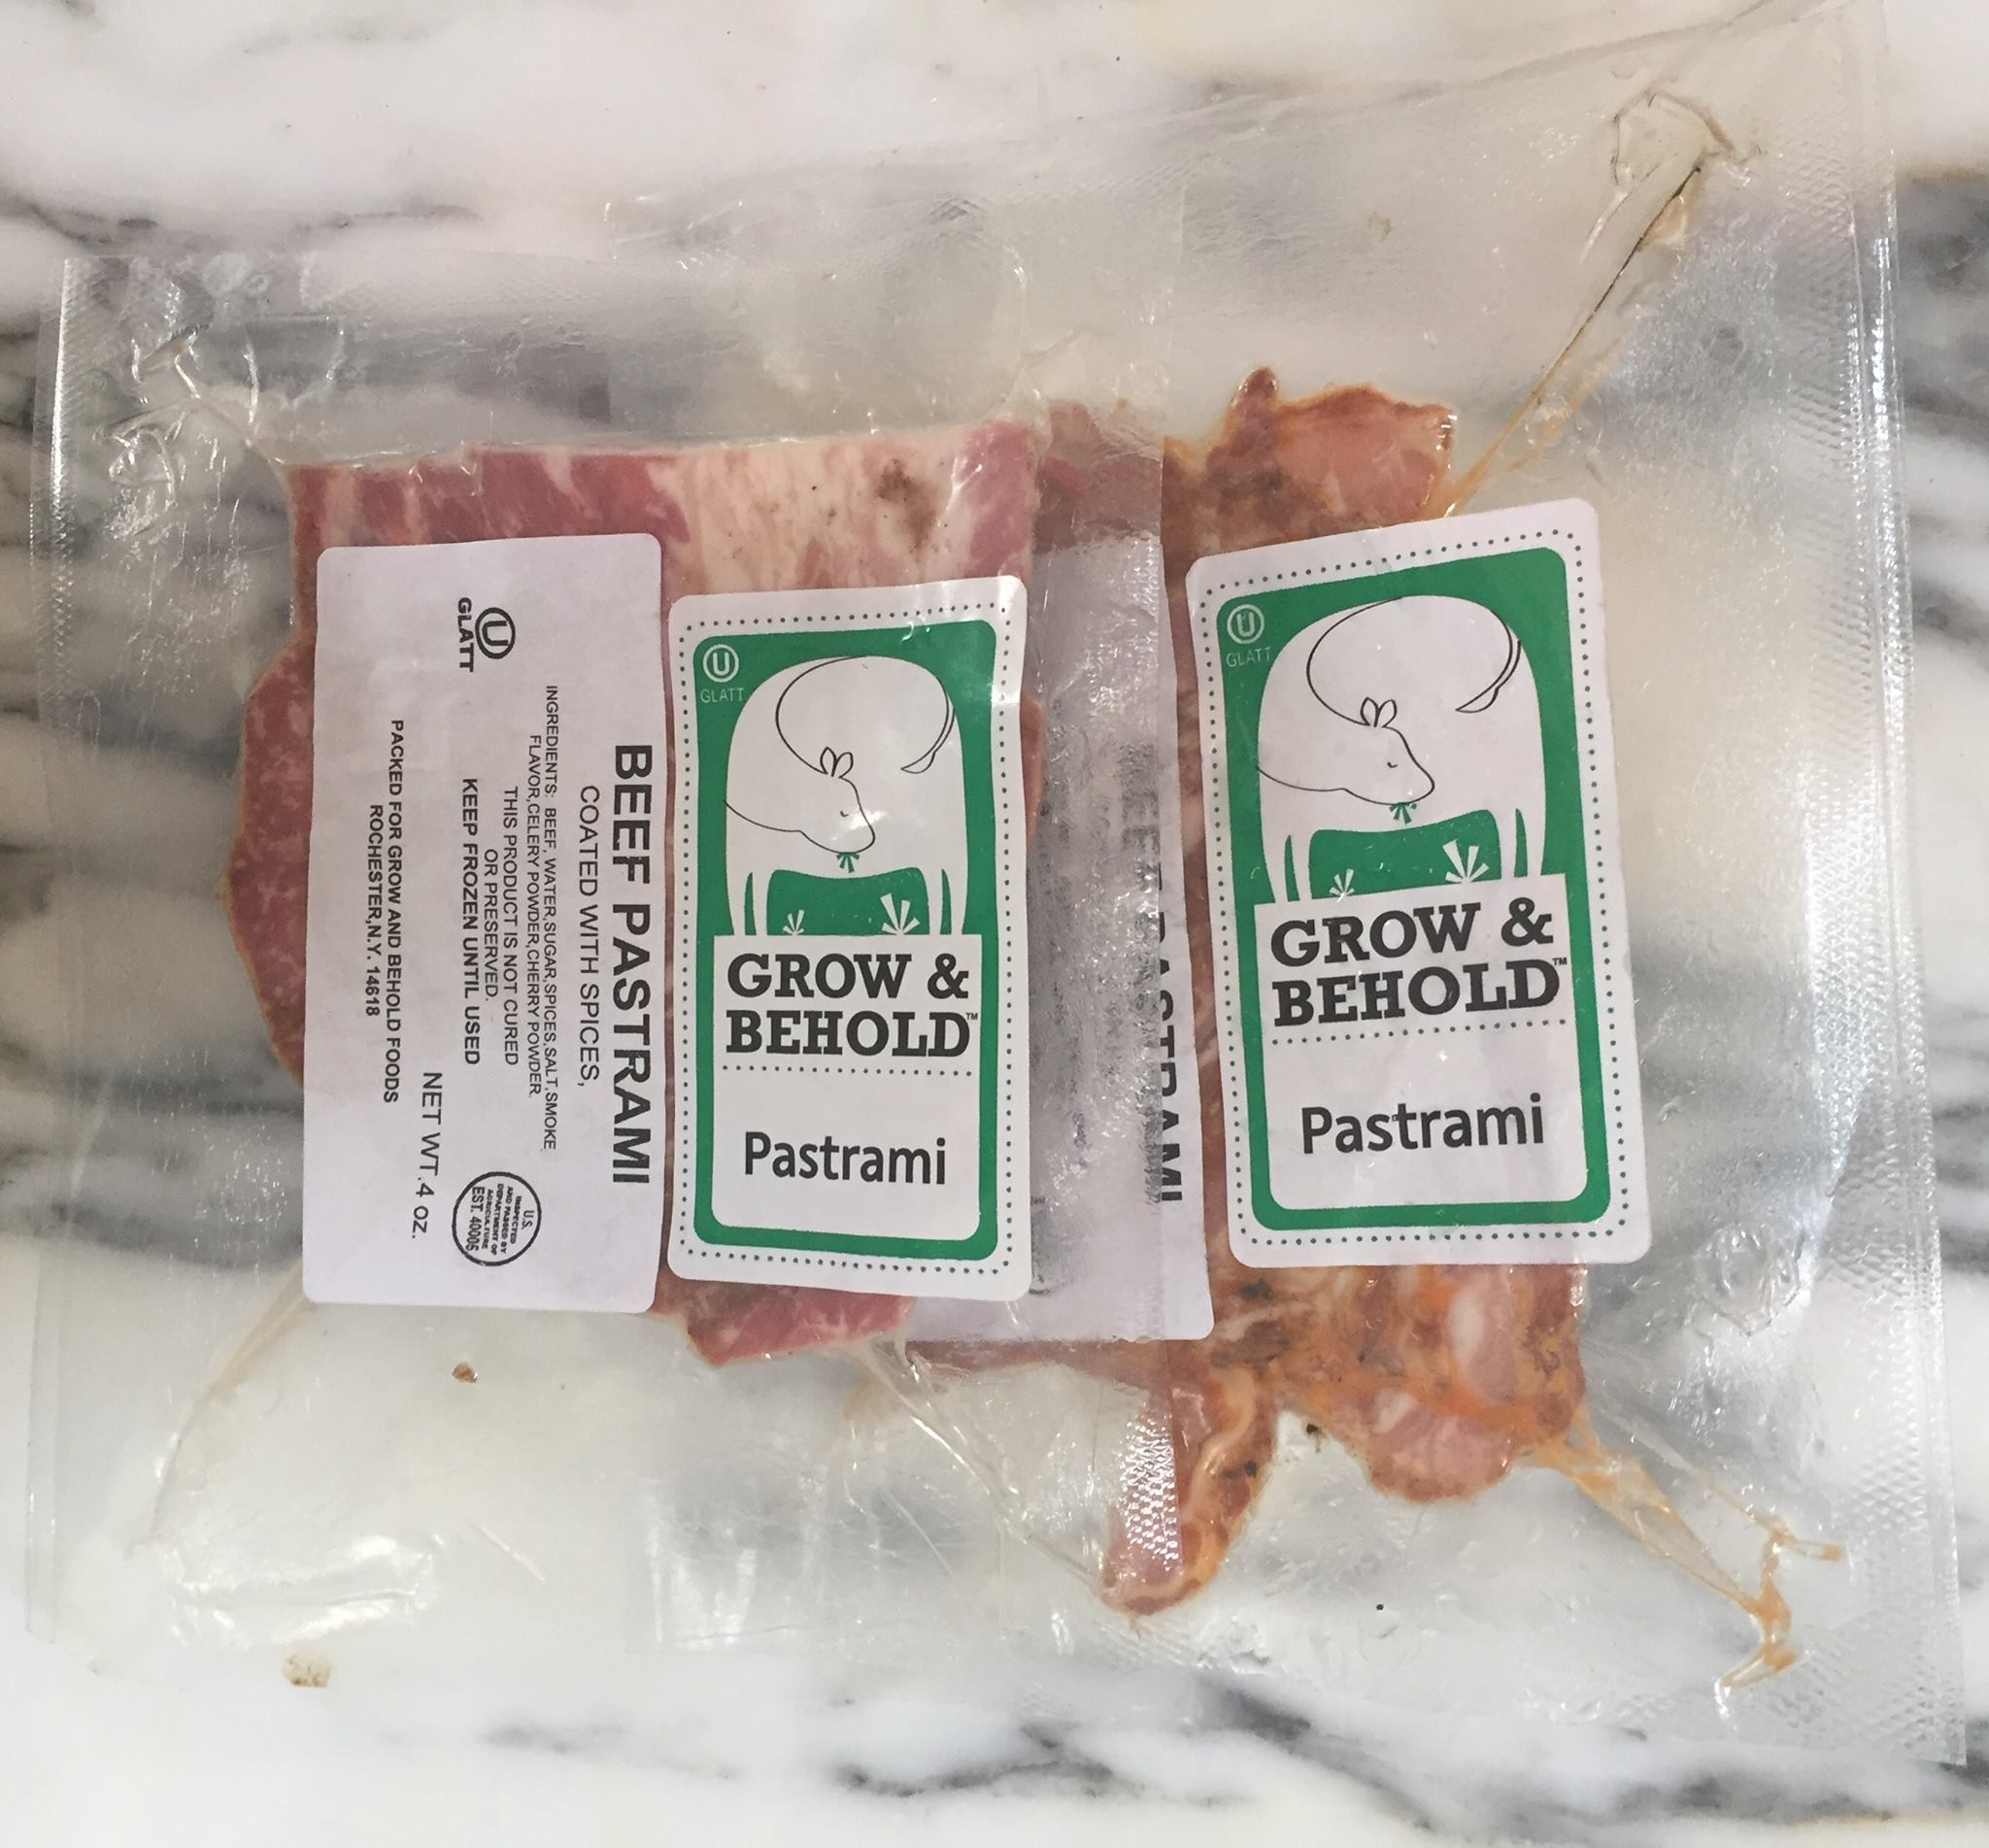
It was also a bit too marbled for our taste.

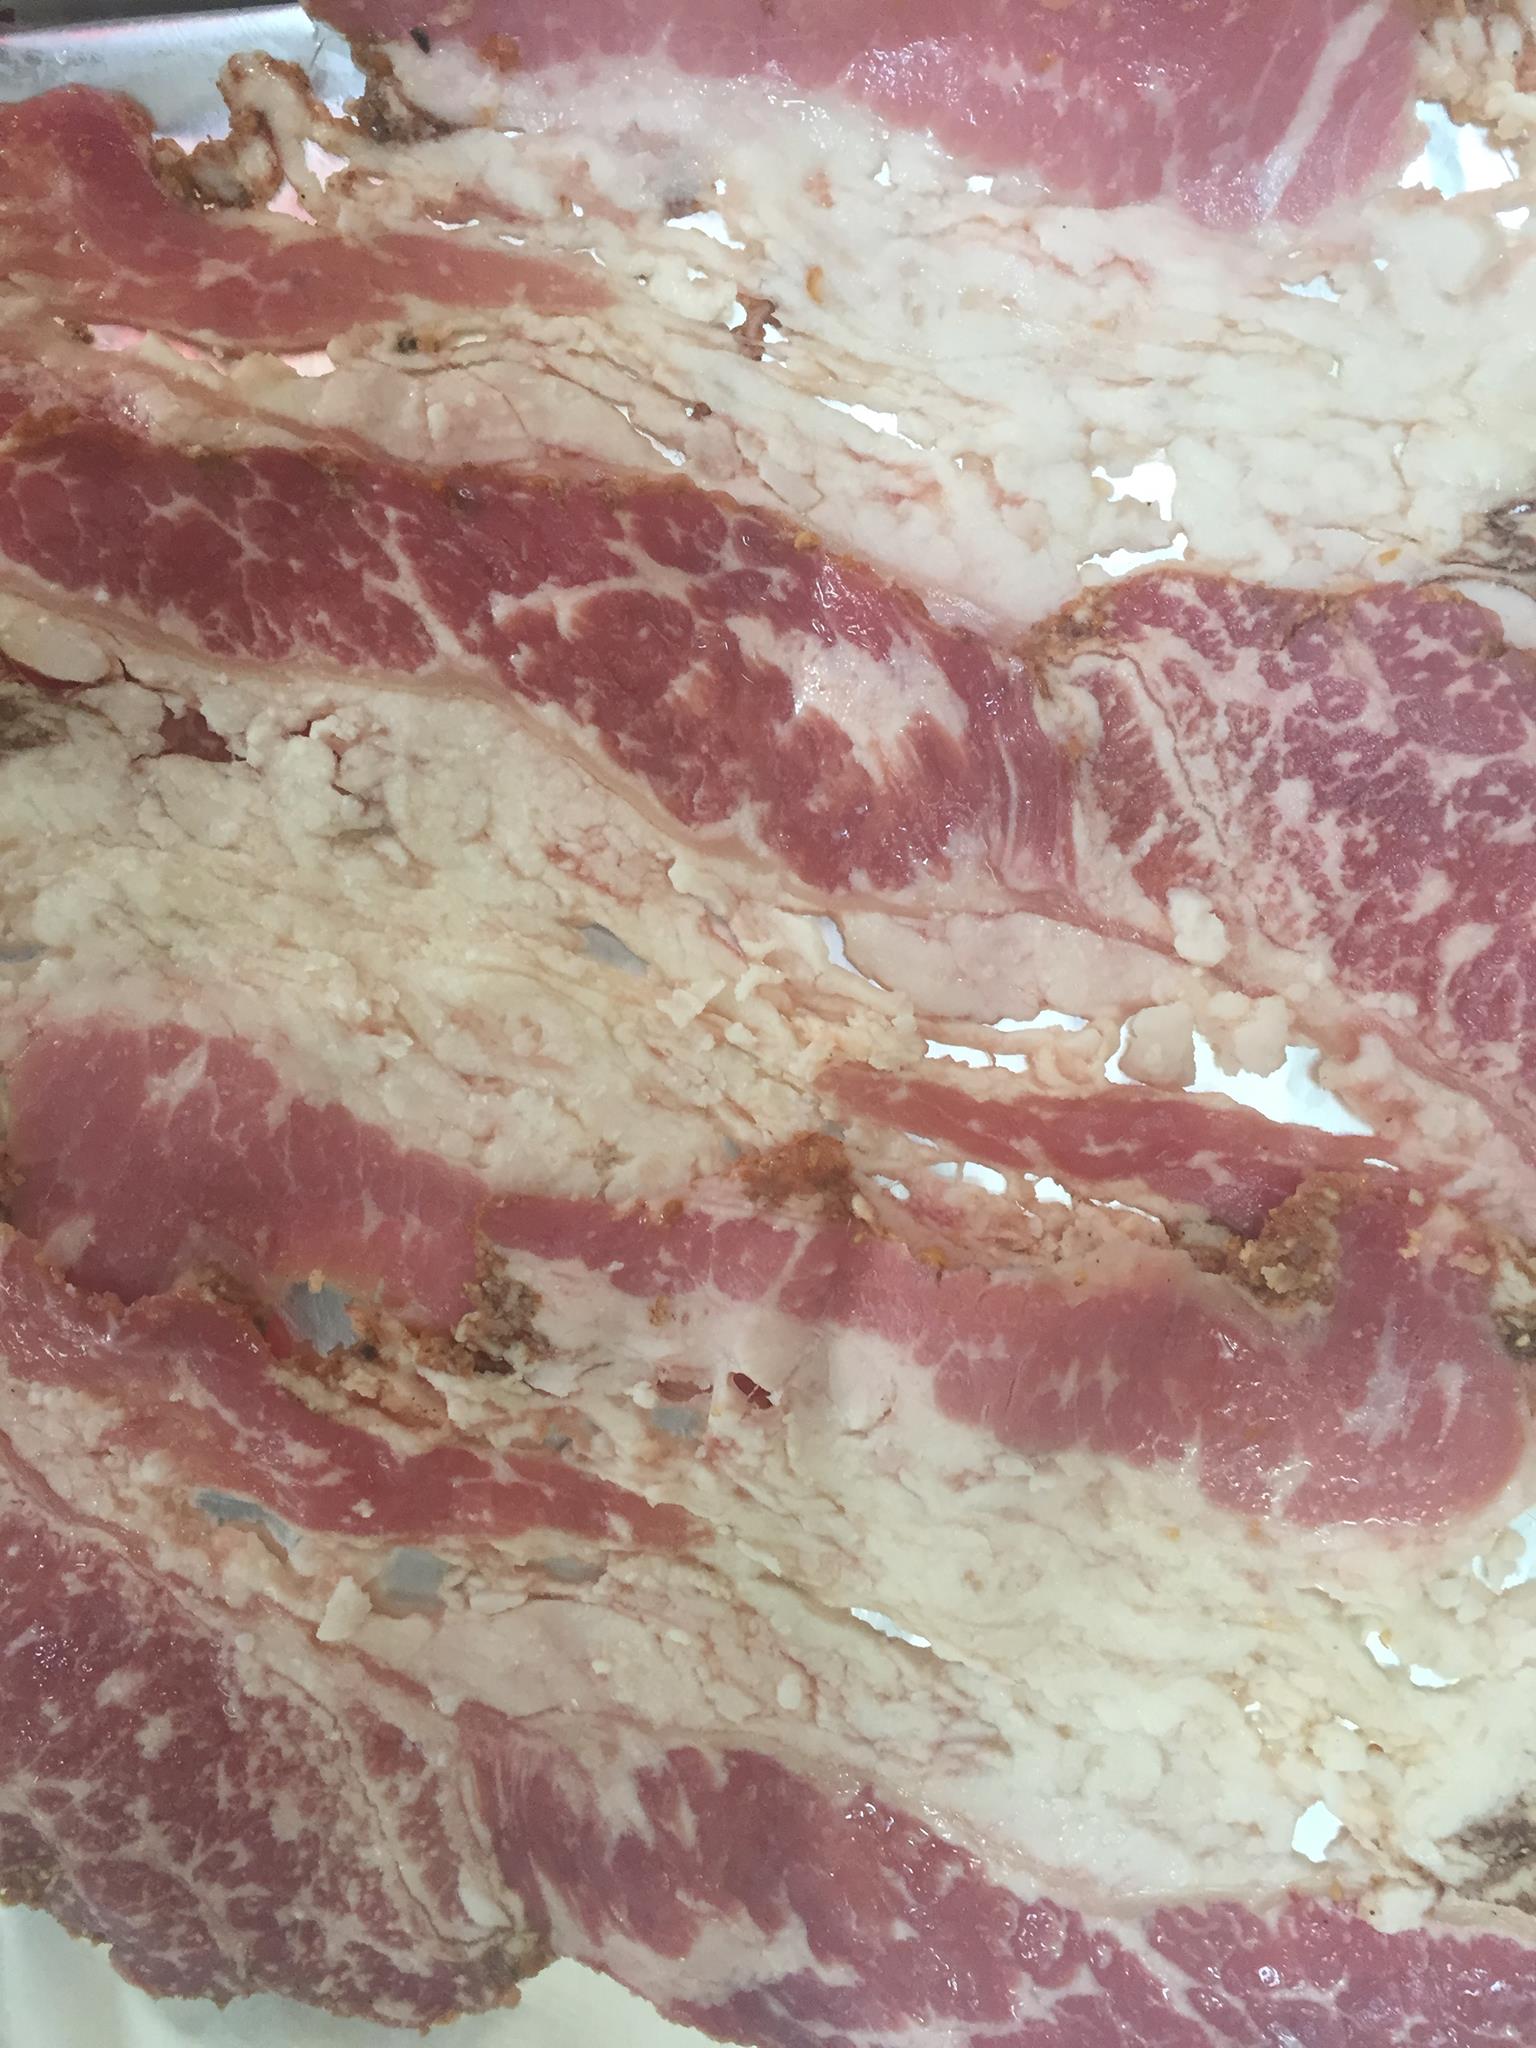
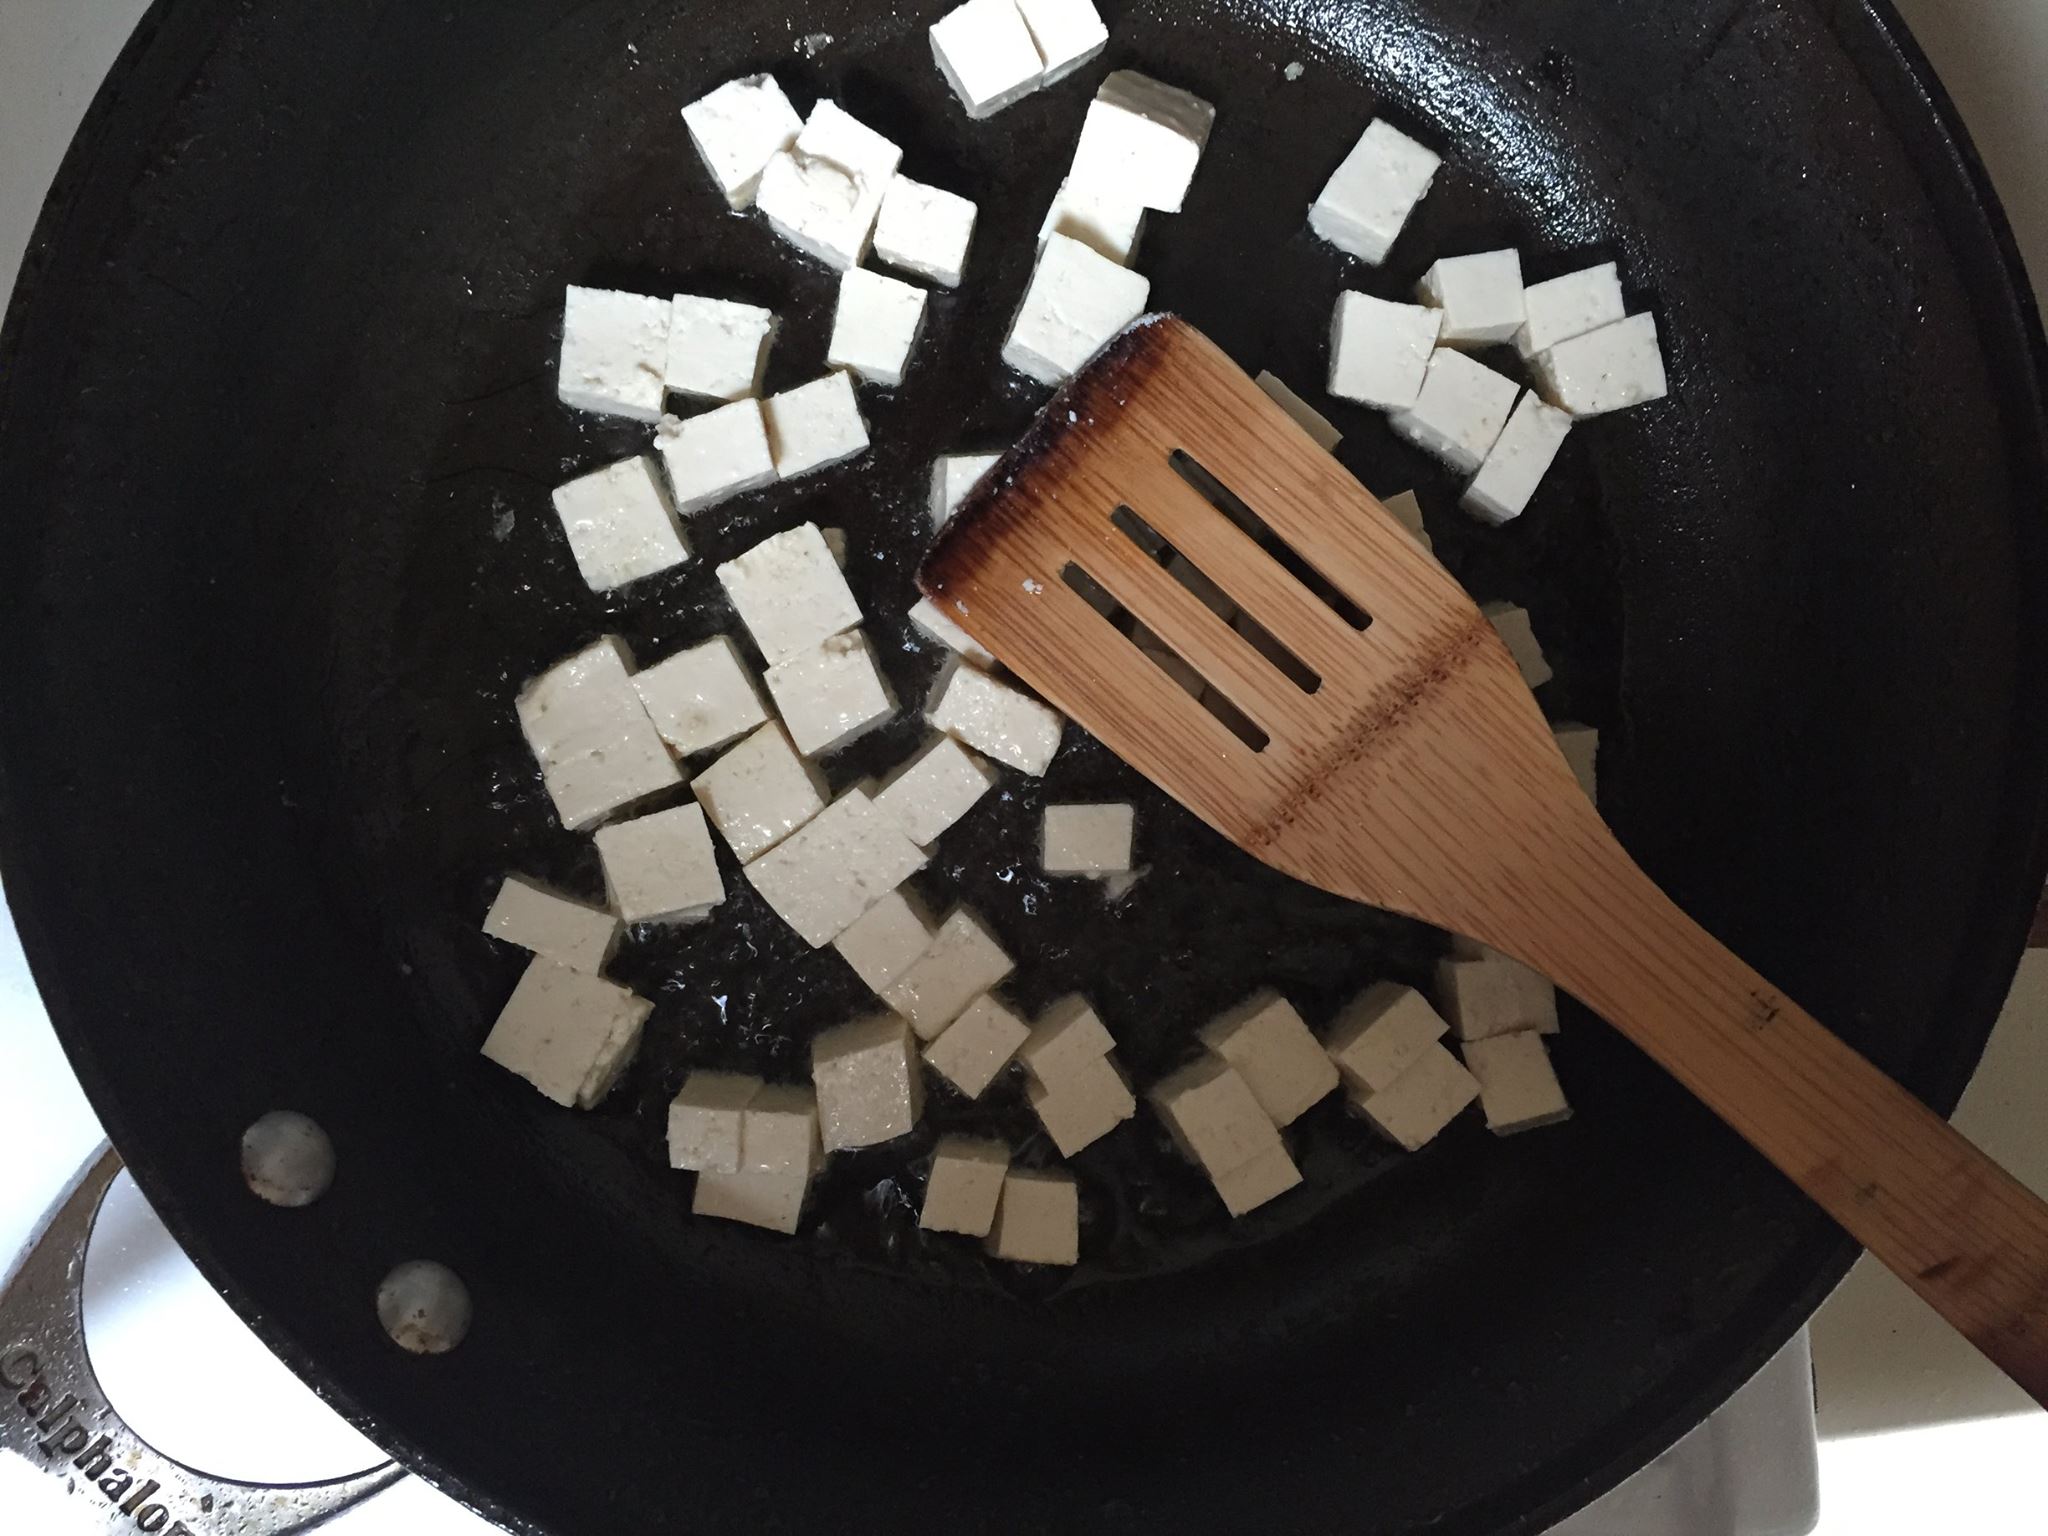
But it got me thinking: the pastrami didn't look too different from raw bacon in that it was mostly fat. And with bacon, the idea is to render that fat until most of it melts away and you're left with crispy pieces of meat.

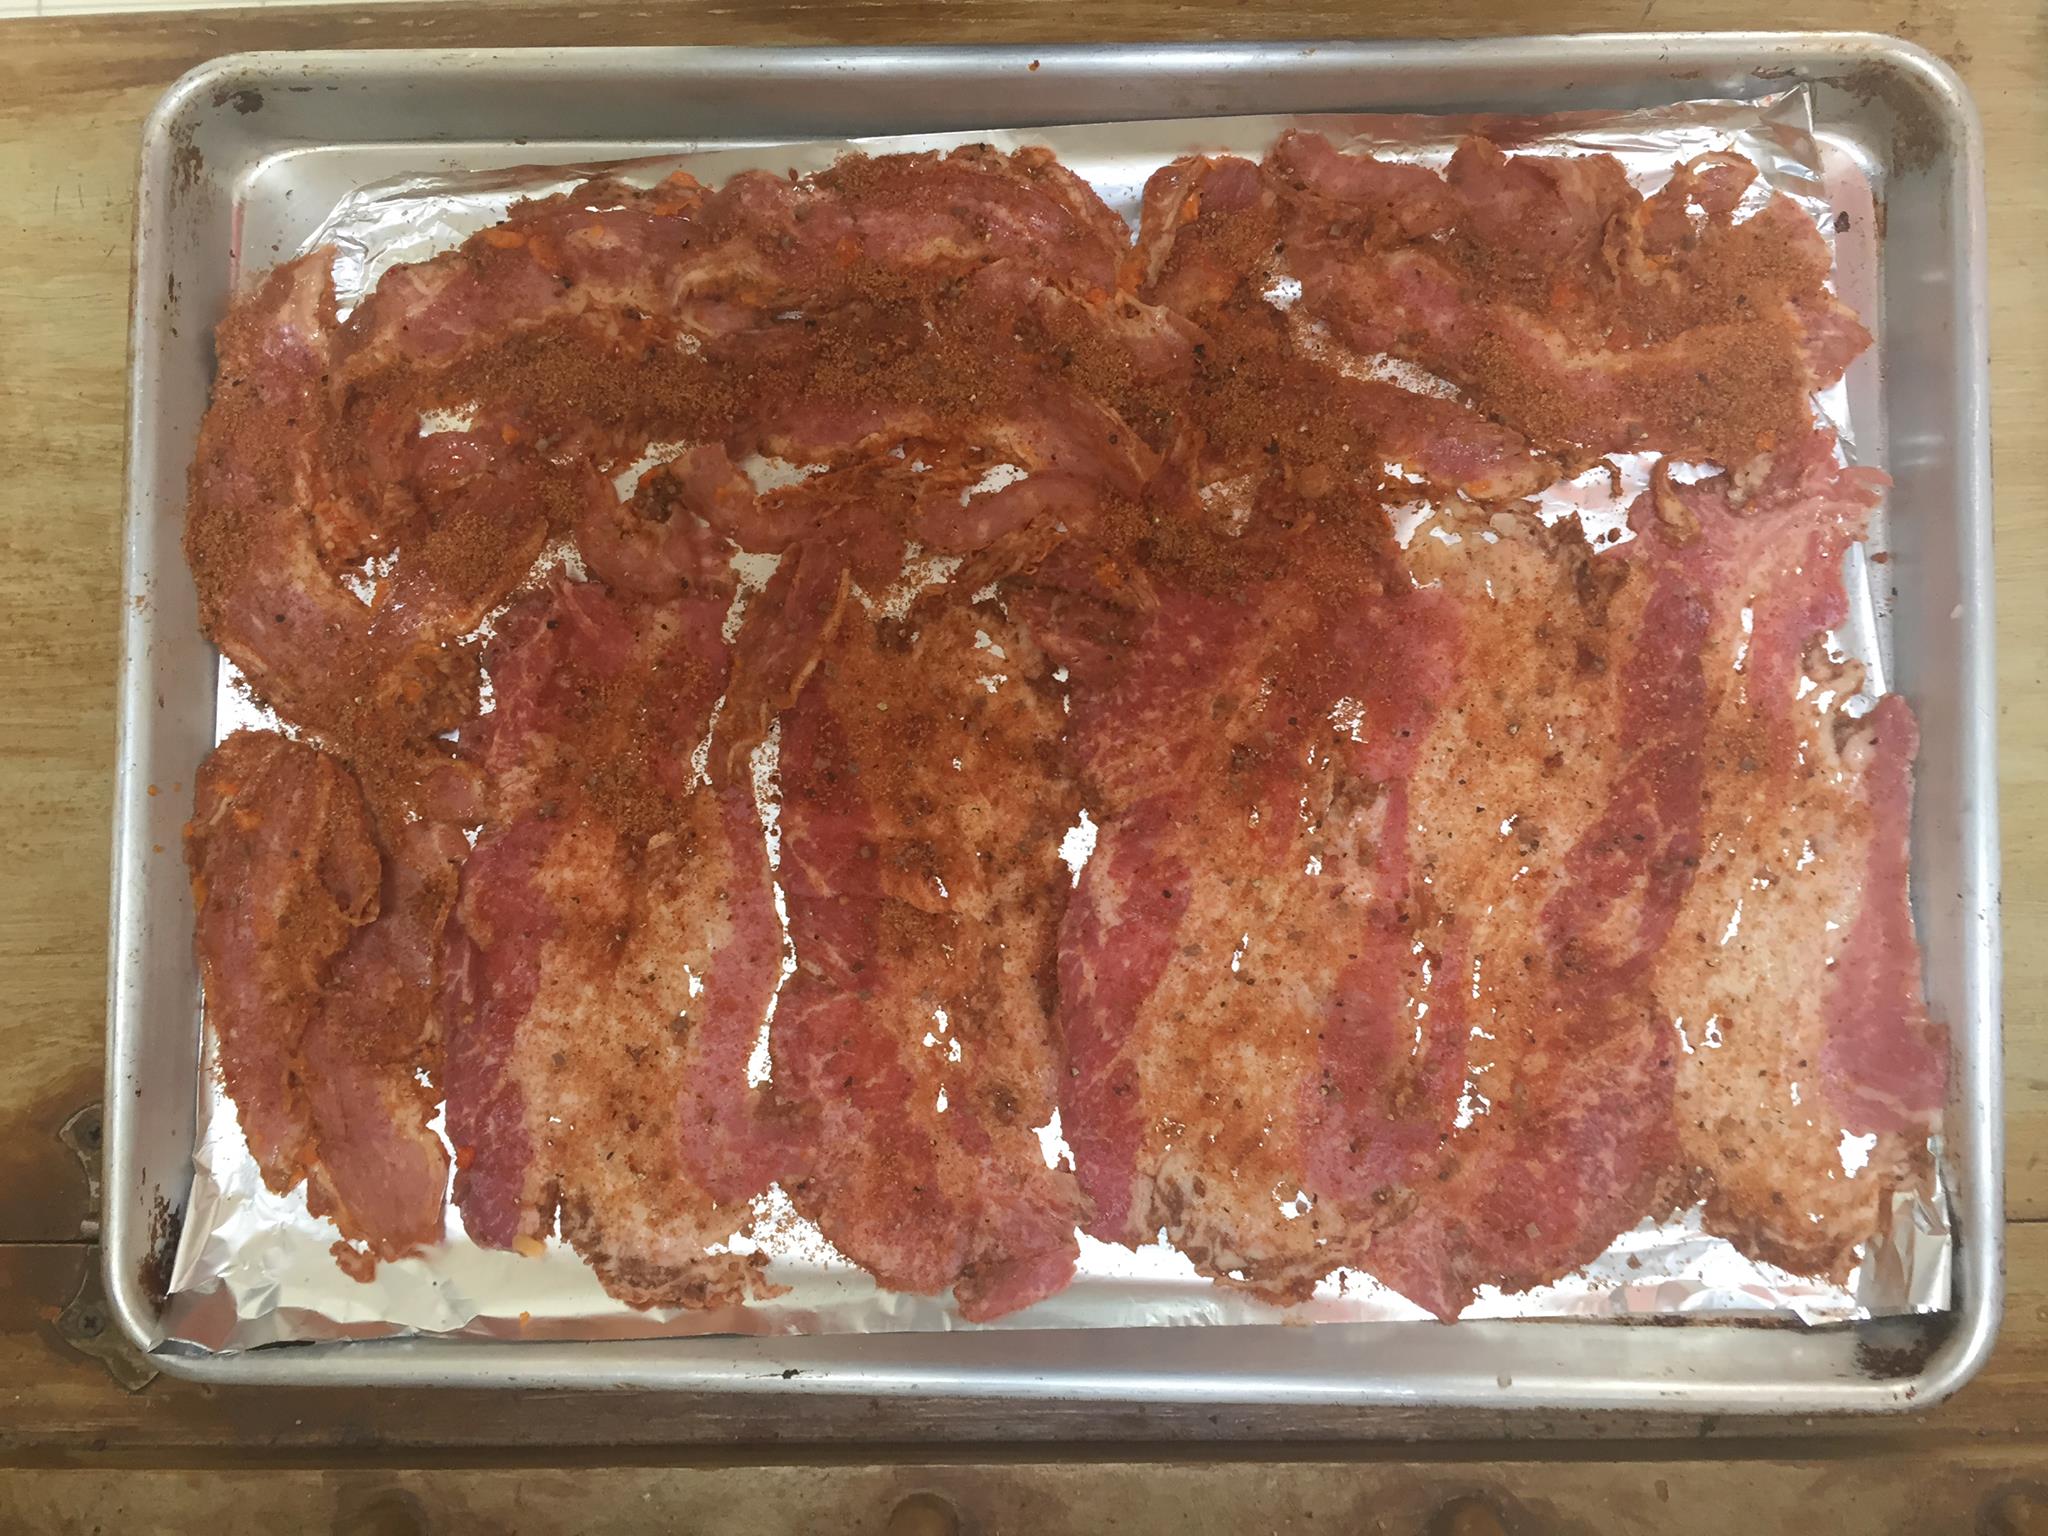
So I mixed up my trusty bacon spice mix of smoked paprika, brown sugar, pepper, and smoked salt.

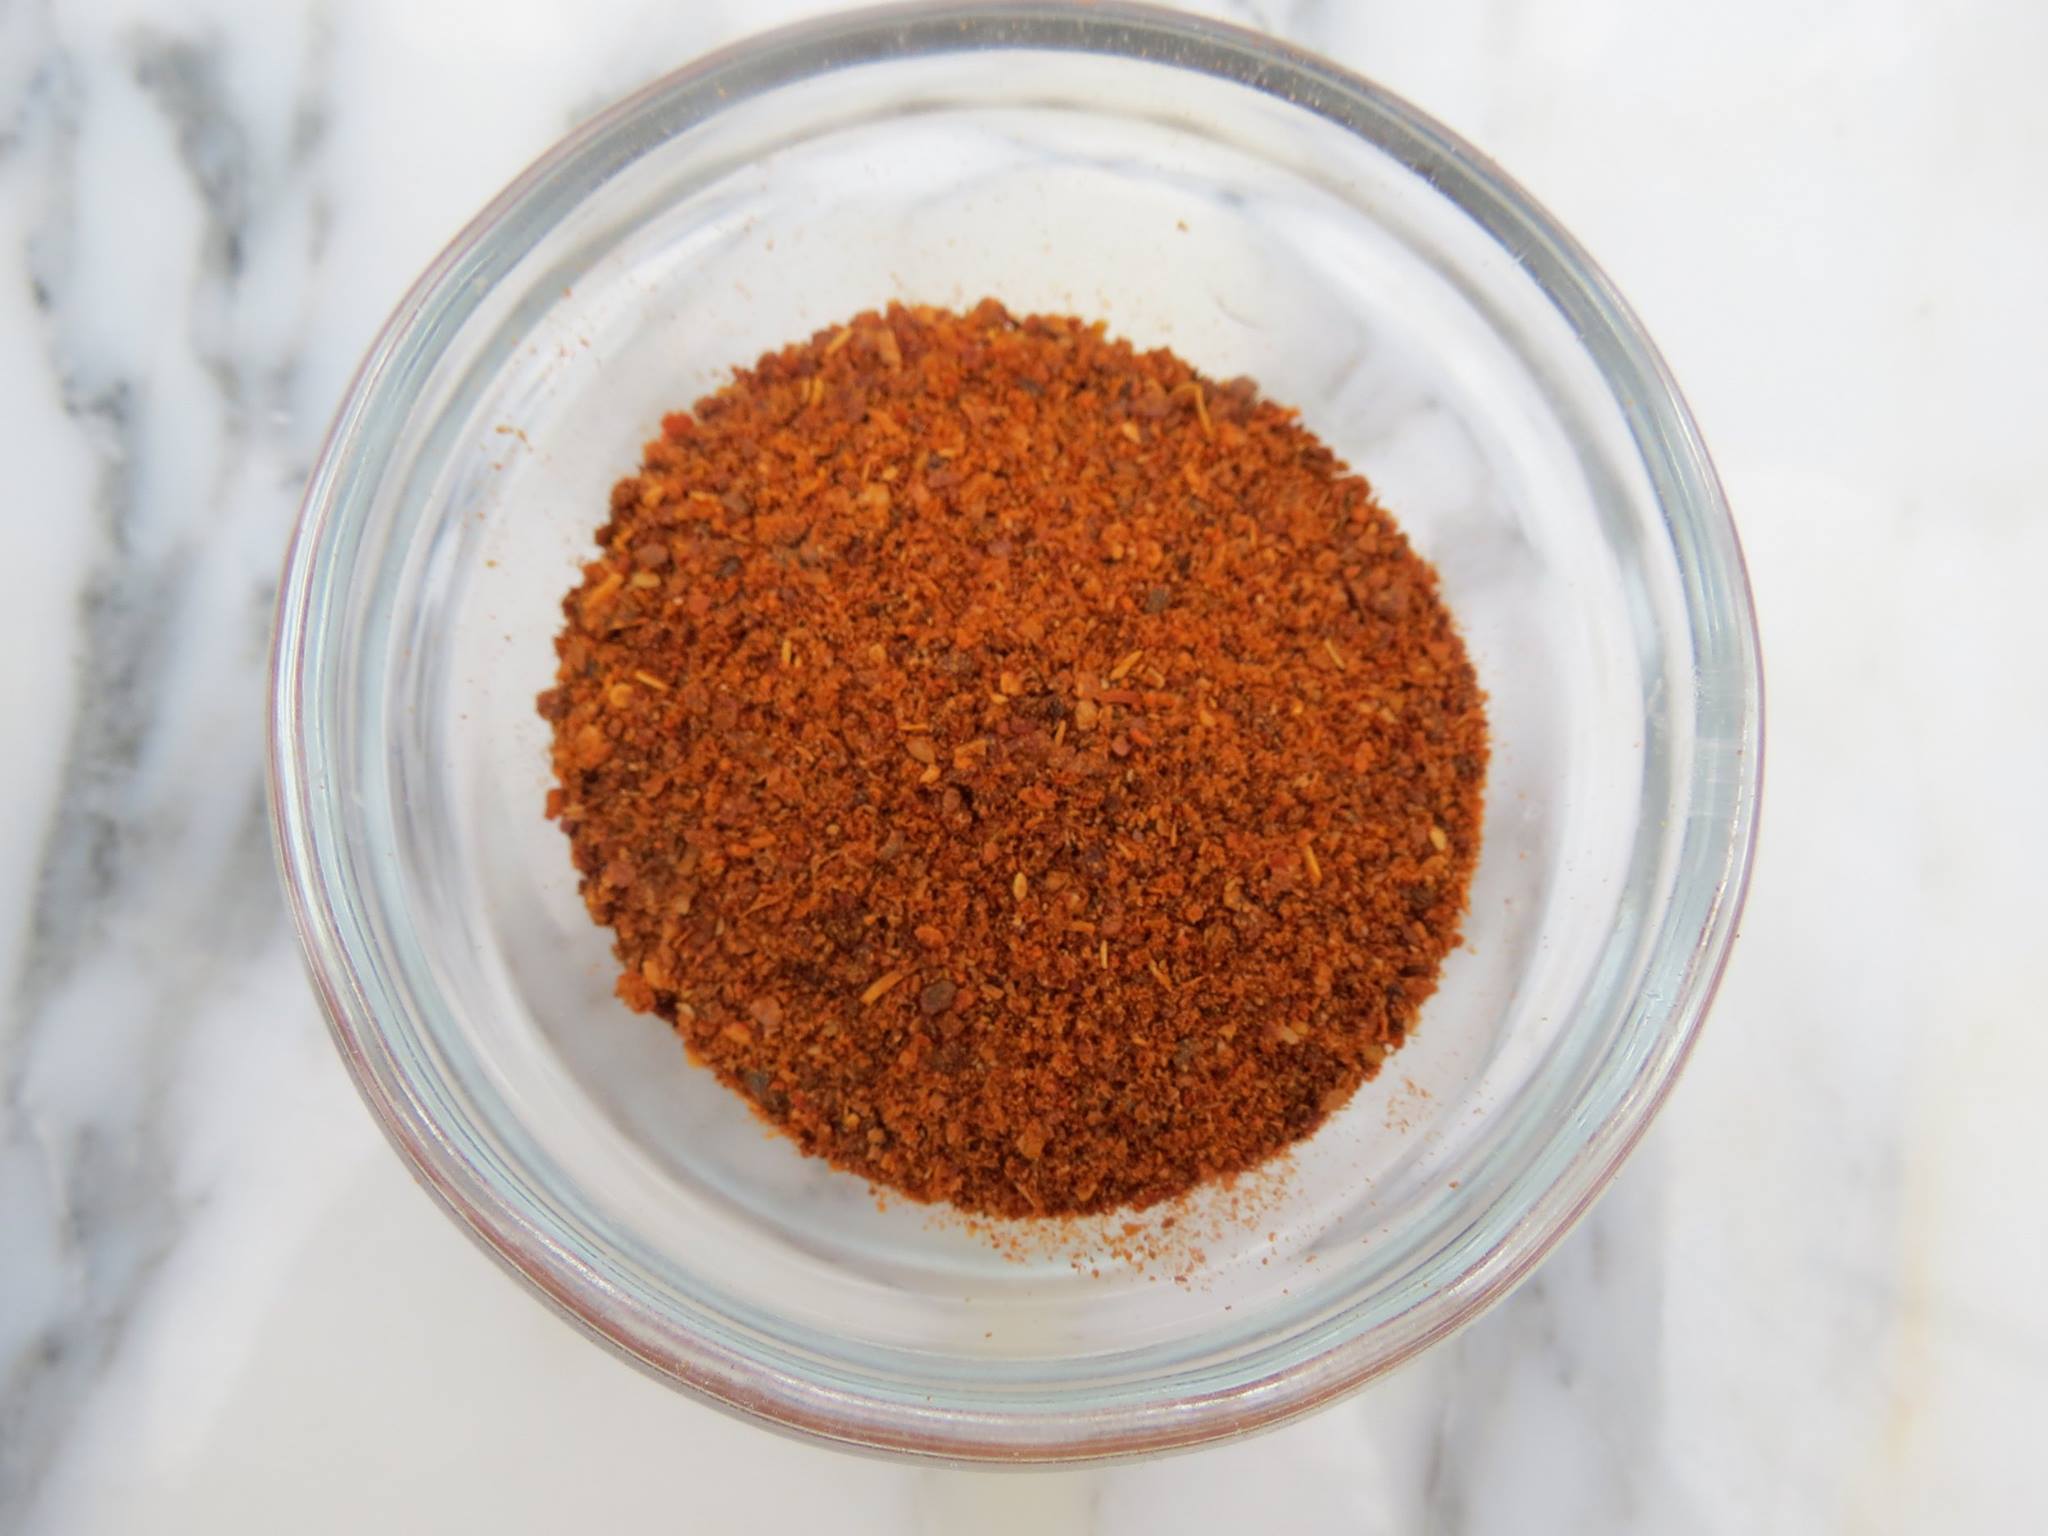
And sprinkled it all over the pastrami slices.

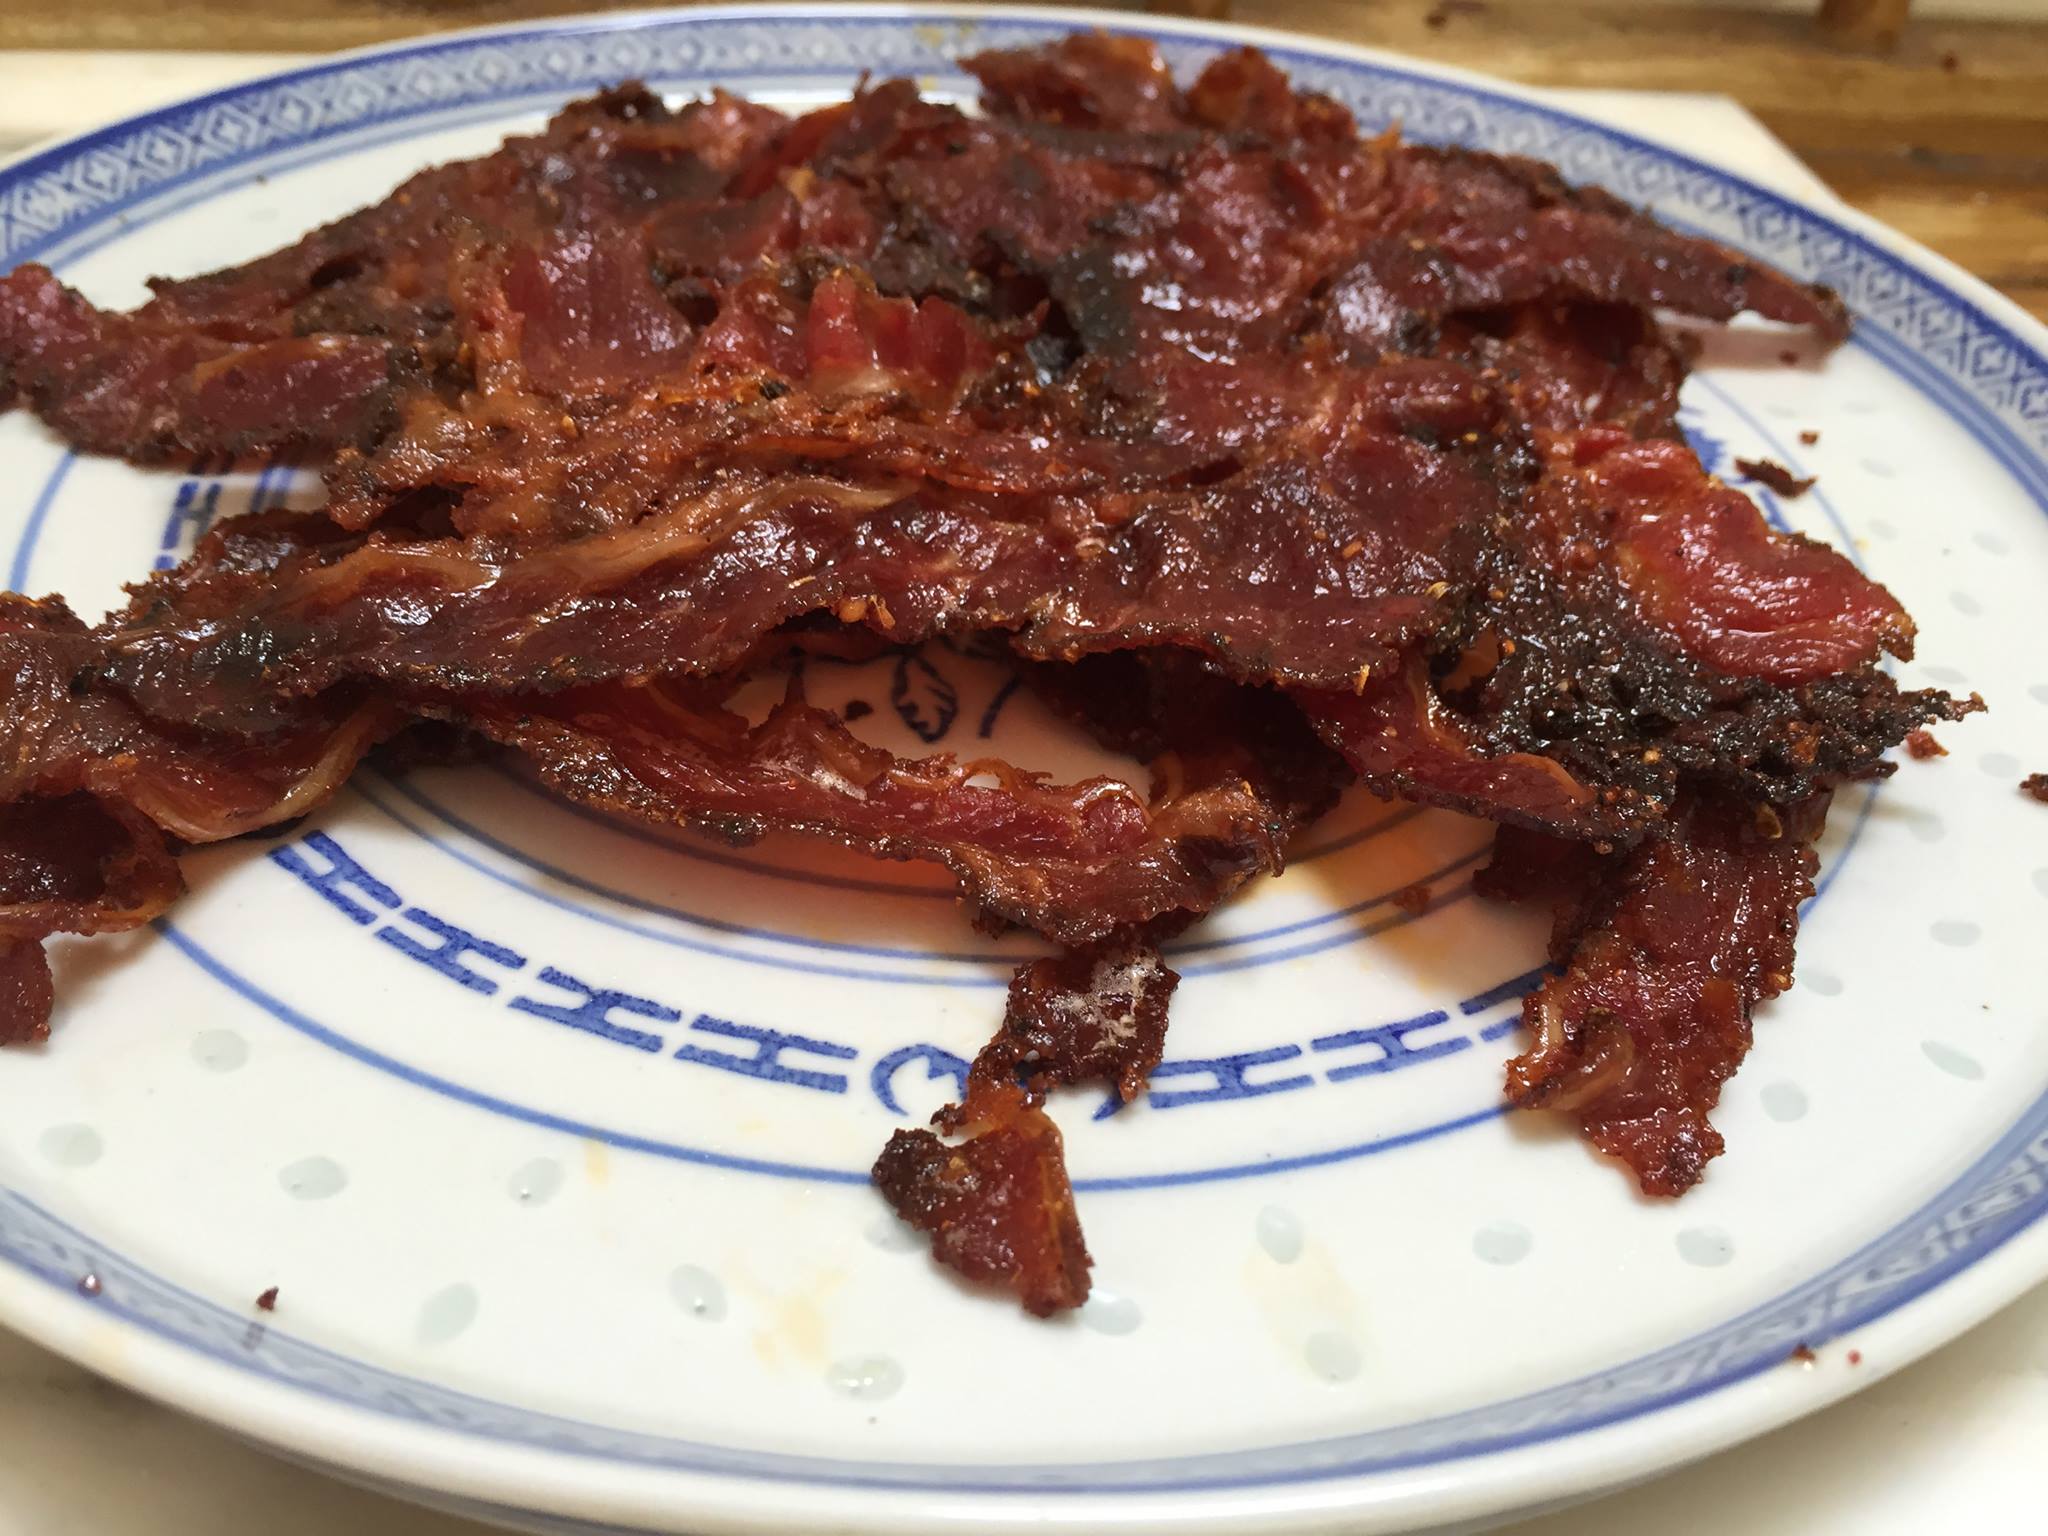
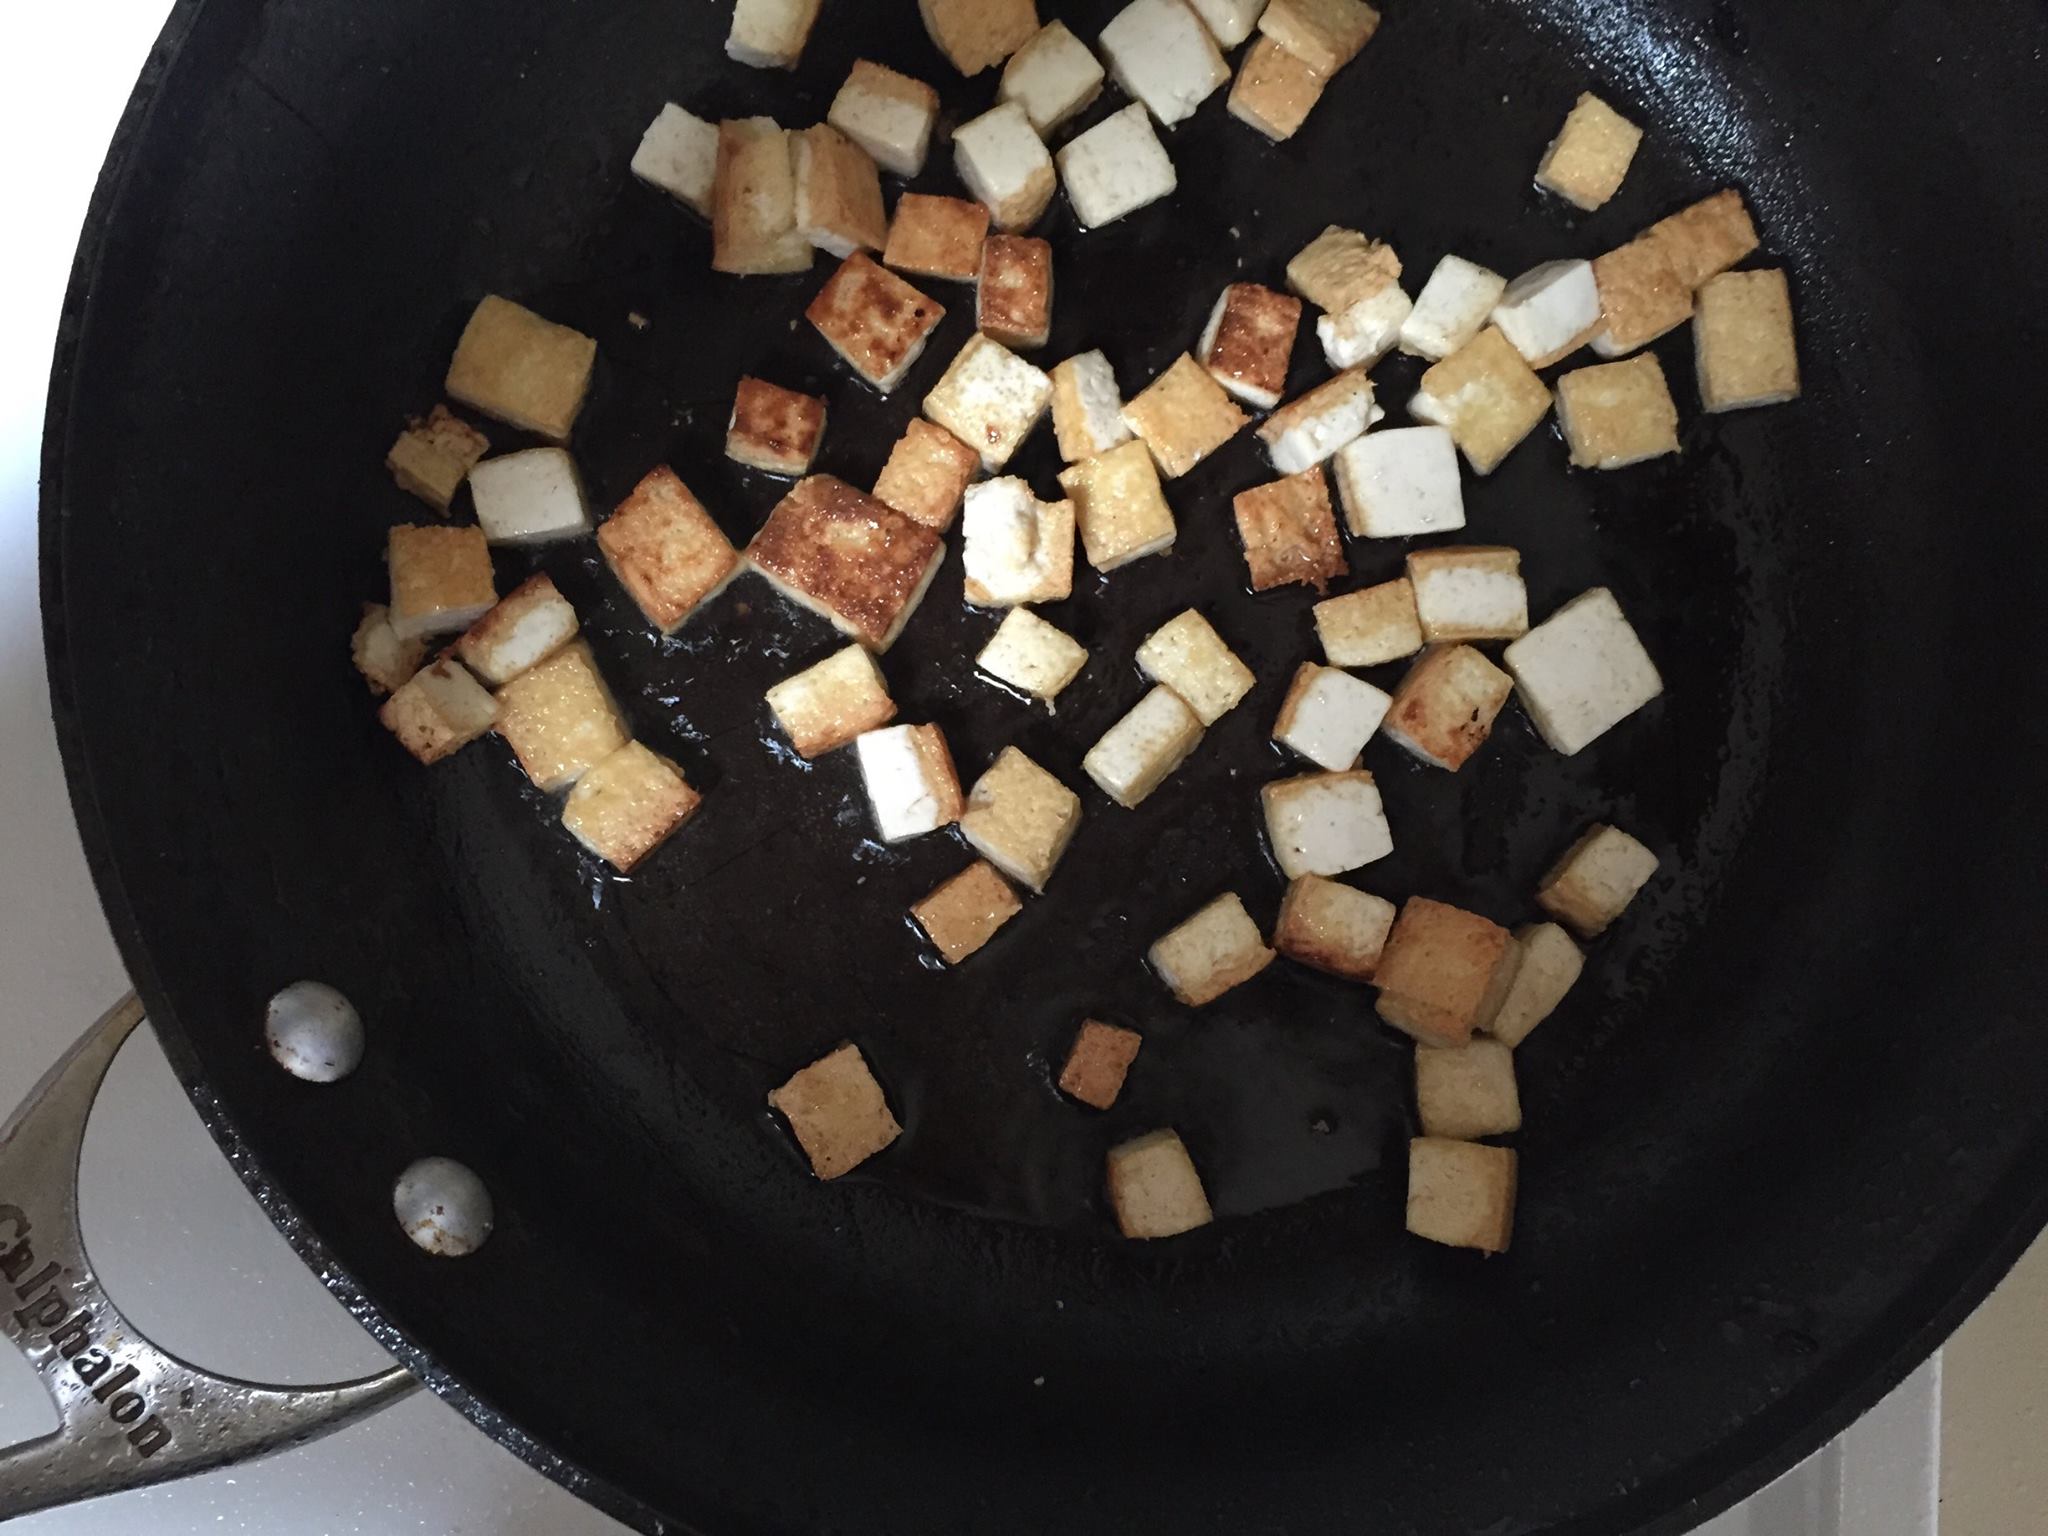
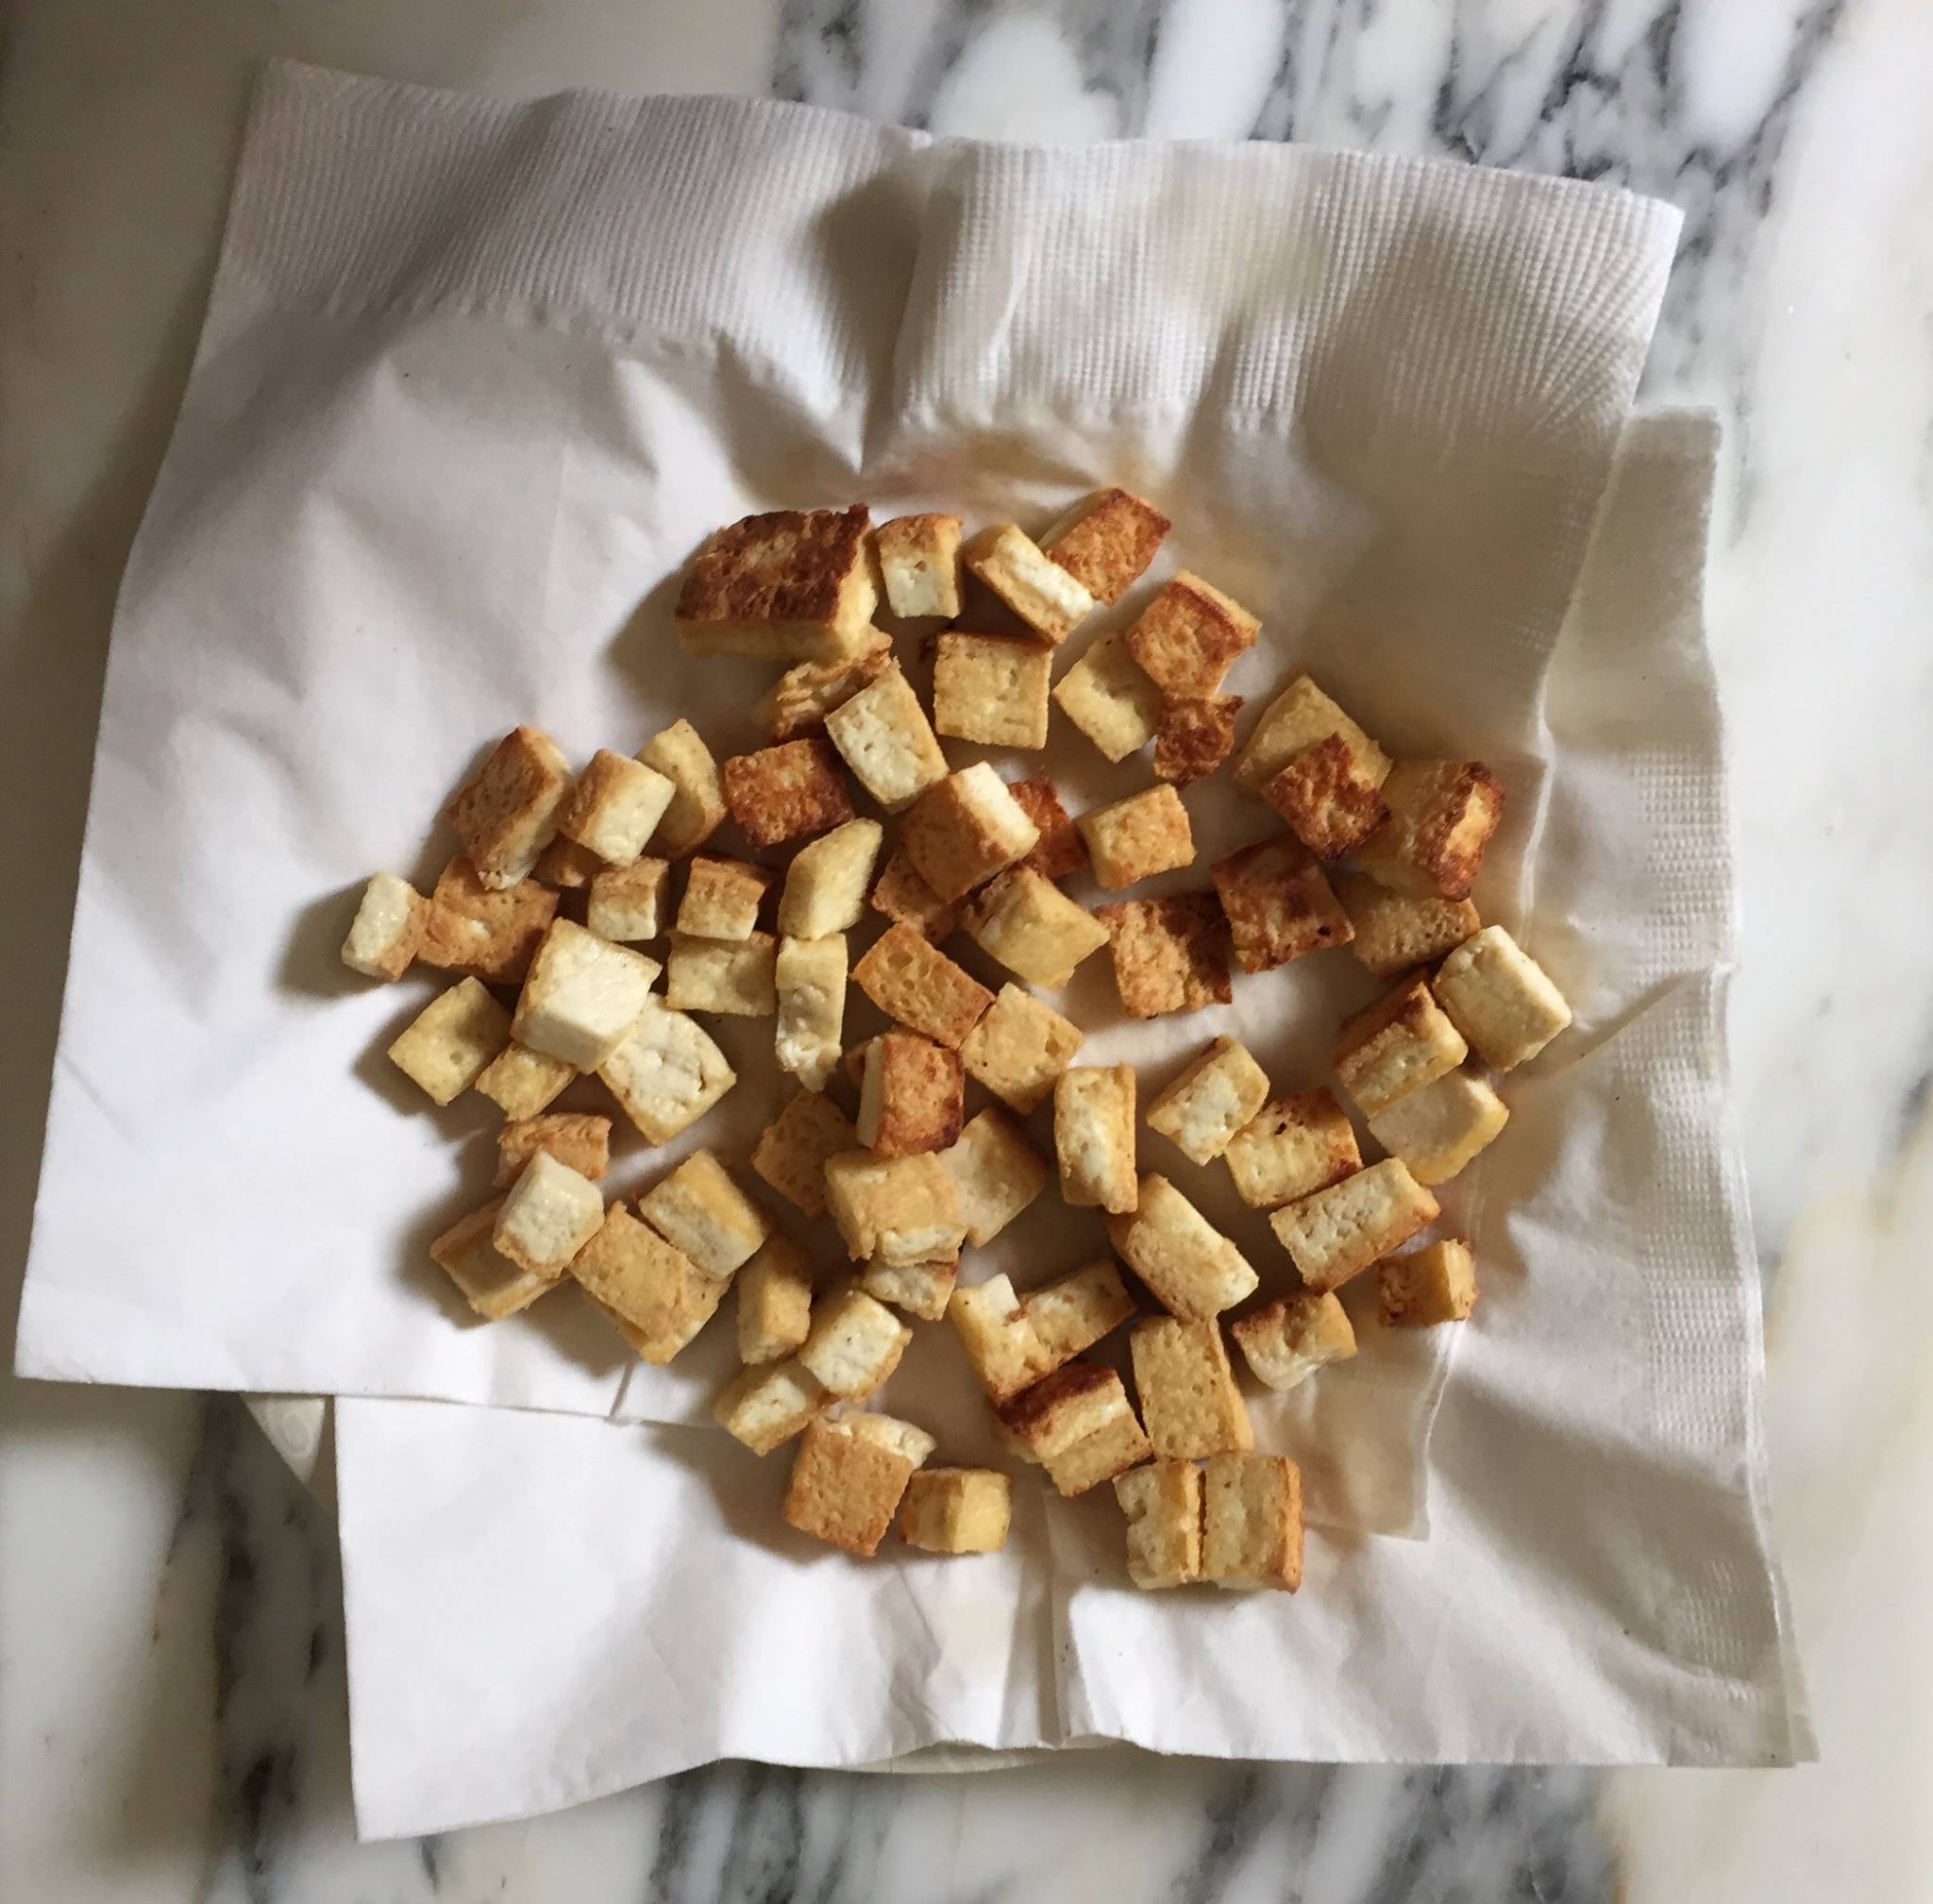
I baked them for about 15 minutes, then flipped them, and baked them for another 7 or so. After draining them on paper towels, the results were, as i'd hoped, pretty much like pork bacon.

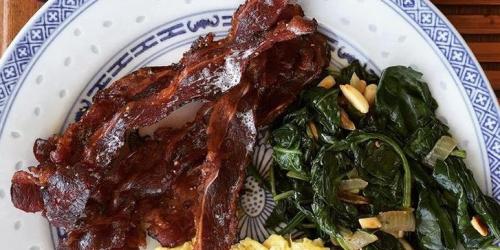
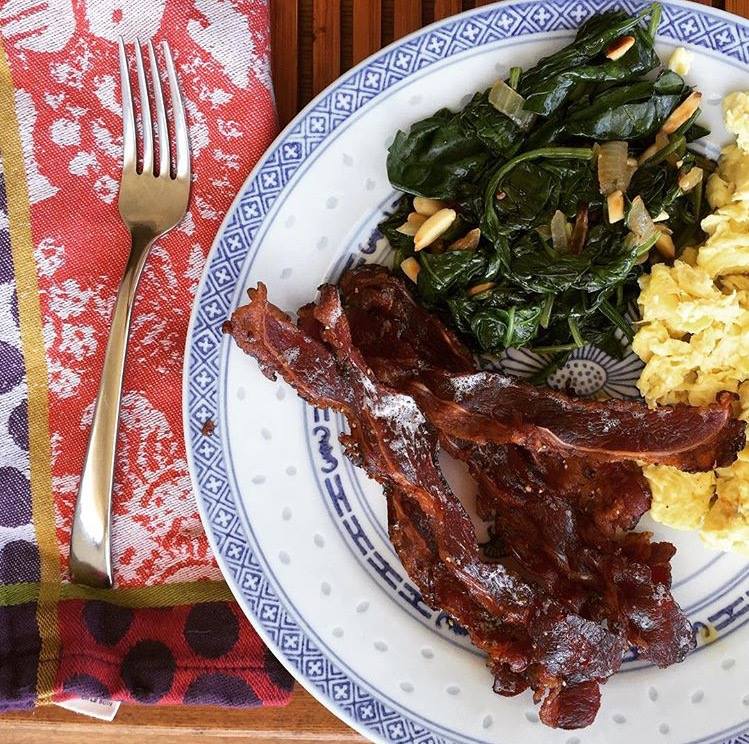
We ate it with scrambled eggs and garlicky spinach for breakfast. 

And since we now have about 47 pounds of this pastrami left in the freezer, we know it won't be long before we can make it again. 


Ingredients

  • 1 tablespoon brown sugar Pantry
  • 1 teaspoon smoked paprika $1.50 for 1 ounce
  • 1/2 teaspoon smoked salt (or regular salt) $2 for 3 ounces
  • 1 teaspoon ground black pepper Pantry
  • 8 ounces thinly sliced pastrami, ideally with some fat $10

Recipe Serves 4

Directions

  1. Preheat the oven to 375 degrees F.
  2. Line a baking sheet with aluminum foil.
  3. Combine the brown sugar, paprika, smoked (or regular) salt, and black pepper in a small bowl. Stir well to combine.
  4. Arrange the sliced pastrami on top of the foil, making sure not to overlap them. If necessary, start a second pan.
  5. Sprinkle the spice mixture all over the top of the pastrami slices, coating evenly.
  6. Bake for 15 minutes, until the pastrami is mostly crisp.
  7. Use tongs to flip each piece of pastrami.
  8. Return to the oven, and bake for another 6-8 minutes, until very crisp.
  9. Drain the pastrami bacon on paper towels.
  10. Serve hot.

Category: Meals

Tags: , , , , ,

Share this Recipe: Share on Facebook Tweet This! Pin it on Pinterest

I grocery shop more often than the average American. Firstly, because I am a professional food writer and recipe developer, and therefore require more groceries for the work I do. But also because I like to shop in small increments, buying only what I need for a few days at a time, which means everything (well, almost everything) in my refrigerate is fresh (and nothing gets wasted--I really hate waste).

So, every few days, I create an email to myself or open up the "Notes" app on my iPhone, and start to create a grocery list with ingredients for the meals I plan to cook in the next few days. It's generally a decent system (unless I accidentally delete the email or Note, which, clumsy phone user that I am, has been known to happen), but it's not perfect. 

But recently, I learned about a brand new cooking app called Hoorray! It's billed as a "social network for food enthusiasts," and it is. Users can share recipes, find recipes and save (like Pinterest, you can create collections of things to cook), and interact with their favorite food content creators (like Serious Eats). But as far as i'm concerned, the coolest thing about Hoorray is that it's a completely brilliant grocery list generator. 

This is what it looks like when you open it up. Like Facebook or Twitter, you have a feed based on whom you follow (so to speak).

Click on a recipe, and you're brought to easy-to-follow, scrollable content. See, for example, my recipe for Marinated Goat Cheese

So you scroll through your feed, checking out the recipes you'd like to cook. But rather than having to type out the ingredients your need (or go find a freaking piece of paper and a pen), you simply ask the app to send the ingredients to your grocery list, which gets handily created for you, with easy-to-use checkboxes for your grocery trip.

I'll be uploading recipes to Hoorray regularly in the coming weeks, and would love to see you on there. You can find me here:


To celebrate this exciting launch, the good people at Hoorray are giving me a $50 Williams Sonoma gift card to give out to one lucky BrokeAss Gourmet reader! To be eligible for this awesome giveaway, download Hoorray, create a profile, and comment on this post with your Hoorray handle. The winner will be chosen at random.

Hoorray is available for iOS and Android. Come cook with me!  

Category: Articles

Tags: , ,

Share this Recipe: Share on Facebook Tweet This! Pin it on Pinterest

Brown Butter Pumpkin Cauliflower Gratin

  • Prep Time 10 minutes
  • Cook Time 1 hour
  • Estimated Cost $11.50
  • 27 Comments

Recently, I read a recipe for a lightened-up mac and cheese, where half of the pasta had been replaced by cauliflower. I was intrigued. I'm not eating a ton of pasta these days, so I figured I'd give it a go using 100% cauliflower. And why not try it with my trusty brown butter-pumpkin combo?

My Brown-Butter Pumpkin Mac and Cheese is probably my most-searched recipe. I invented it a whopping five years ago, when I was looking for a way to lighten up some mac and cheese (read: eat mac and cheese more often), and so I added some canned purreed pumpkin to a cheese sauce. The resulting mac was creamy and cheesy, but the addition of pumpkin meant I needed significantly less cheese to make enough sauce to coat my pasta. It also added some much-appreciated fiber, along with its rich, nutty flavor, which gorgeously complemented the cheese.


Recently, I read a recipe for a lightened-up mac and cheese, where half of the pasta had been replaced by cauliflower. I was intrigued. I'm not eating a ton of pasta these days, so I figured I'd give it a go using 100% cauliflower. And why not try it with my trusty brown butter-pumpkin cheese sauce? 

I started by roasting a whole cauliflower with half an onion. 

Next, I browned some unsalted butter, just until it got nutty and really good-smelling.

I whisked in some pumpkin, milk, and sharp cheddar cheese, plus salt, pepper, and a touch of nutmeg, which works nicely with cheese and pumpkin, to make the sauce.

I stirred in the roasted cauliflower, right into the pot (all hail the multi-purpose Dutch oven!).

And topped the whole thing with a little more cheese.

Into the oven it went, and the result was astonishing.

I mean. Oof. Just, wow. 

I'm not going to lie to you and tell you it tasted like mac and cheese, mostly because this dish is delicious and worth making in its own right, mac and cheese-likeness aside. That said, if you're hankering for mac and cheese but, like me, you're keeping half-an-eye on your carb intake, this cheesy baked casserole will most definitely conquer that craving.  

Ingredients

  • 1 medium head cauliflower, cut into small florets $2
  • 1/2 medium onion, sliced $0.50 for a whole onion
  • 2 tablespoons extra virgin olive oil Pantry
  • salt Pantry
  • 2 tablespoons unsalted butter $1 for a stick
  • 1/2 (15-ounce) can pureed pumpkin $1.50
  • 1 cup plus a few big pinches shredded sharp cheddar cheese (about 1/2 an 8-ounce block) $3.50 for 8 ounces
  • 1 cup milk (preferably whole) $1.50 for a pint
  • pinch nutmeg $1.50 for 1-ounce 
  • black pepper

Recipe Serves 6

Directions

  1. Preheat the oven to 425 degrees F.
  2. Spread the cauliflower and onion on a baking sheet, drizzle with olive oil, and toss well to coat.
  3. Salt lightly.
  4. Roast the cauliflower and onions for 20-22 minutes, or until lightly browned and tender.
  5. While the cauliflower and onions roast, melt the butter in a large oven-proof pot (a dutch oven works well) over medium-high heat.
  6. Cook the butter just until it turns brown and gives off a slightly nutty smell.
  7. Add the pumpkin, cheese, and milk and whisk well until a creamy sauce forms (it may separate a bit, this is fine).
  8. Season with the nutmeg and salt and pepper to taste.
  9. Remove the roasted cauliflower and onion from the oven and leave the oven on. 
  10. Add the cauliflower and onion to the sauce right the pot.
  11. Stir well to coat.
  12. Top the cauliflower-cheese mixture with the reserved pinches of cheddar.
  13. Bake for 25-27 minutes, until bubbly and browned on top.
  14. Top with chopped parsley, if desired and serve immediately.

How to Cook Tofu that Doesn't Suck

  • Prep Time 5 minutes
  • Cook Time 10 minutes
  • Estimated Cost $2.50
  • 13 Comments

When you're making a stir-fry, noodle dish, or salad, you want tofu that is firm and meaty, with a crispy exterior. 

Tofu is a healthy, inexpensive, protein-rich food. It's easy to find, lasts a long time in the fridge, and has lots of good belly benefits, thanks to the fermentation process required to make it. What's more, it's both an alternative to meat, and delicious in its own right. 

Well, it's delicious if you cook it well. And sadly, many cooks do not.

Soft, creamy silken tofu is a wonderful thing, maybe slicked with chili oil, floating in savory miso soup, or in dessert form with fresh fruit. But when you're making a stir-fry, noodle dish, or salad, you want tofu that is firm and meaty, with a crispy exterior. Still, so much tofu is often overly oily or just poorly cooked, rendering it limp, floppy, and incredibly boring. Of course, deep-frying the tofu solves this problem, but that can be messy and a lot of work (not to mention a lot of oil). But don't worry, there's a better solution.

I first learned this tofu cooking method when my college roommate Emily gave me Didi Emmons' wonderful book Entertaining for a Veggie Planet for my twenty-first birthday. Didi dries the tofu before dicing it into cubes, salting it, and pan-frying it. She calls the resulting crispy cubes "tofu croutons," as they resemble the toasted bread cubes you might toss into a salad (and are excellent in salads). 

In my version, I follow Didi's instructions almost exactly, except I always use sprouted extra-firm tofu which doesn't retain much liquid. I love this kind from Wildwood, which comes in convenient 2-packs.

I gently pat its outside dry, cut it into 1/2-inch cubes.

I cook the tofu in 2 tablespoons of oil (I like to use coconut, but vegetable oil or grapeseed oil also work well) over medium-high heat, and salt it.

The tofu cooks in a single layer for 4-5 minutes, undisturbed (this is how it gets its lovely, crispy crust). Once one side has cooked, I give the pan a stir and let at least one more side get crispy.

Once it's crispy, I drain the tofu on paper towels or napkins and it's ready to go. There is usually a bit of oil left in the pan, which I usually use to fry onions or garlic for whatever I'm cooking.

Now the tofu is ready to use. Here it is on top of my favorite shirataki noodle salad

The cooked tofu will keep at room temperature in an airtight container for up to 4 hours, so it's a great-do ahead task if you want to use it later in the day. It's perfect to toss into stir-fries, salads, noodle dishes, burritos, tacos, or even eaten straight, maybe with some homemade peanut sauce.


Ingredients

  • 1 16-ounce package of extra-firm tofu, preferably sprouted $2.50
  • 2 tablespoons coconut, vegetable, canola, or grapeseed oil Pantry
  • a few pinches of salt Pantry


Recipe Serves 4

Directions

  1. Wrap the tofu block in a clean dish towel and gently pat dry.
  2. Cut the tofu into 1/2-inch pieces.
  3. Heat the oil in a large frying pan over medium-high heat.
  4. Add the tofu to the pan, salt it well, and let cook, undisturbed, for 4-5 minutes (check after 4 to make sure it's not burning), until a thick, golden-brown crust develops.
  5. Use a spatula or wooden spoon to flip the tofu as well as you can, to cook at least one other side untiul it is also golden-brown and crispy.
  6. Drain on a paper towels or napkins to remove any excess oil.
  7. Use immediately, or within 4 hours. 

Lemon-Blueberry Sparklers

One of the magical things about living in the Bay Area is that, just as summertime is ending for everyone else, our warm weather season is just beginning. Around September in San Francisco, parks and beaches fill up, picnic season extends into late November, and it's not uncommon to detect swimsuits peeking out from under tank tops as people go about their days.

Another great thing about having summer in autumn is that, even though we're acting like it's summer, fall produce is still available, lining the bins outside our neighborhood grocery stores with yams, gourds, and winter greens. 

Labor Day Weekend marks the beginning of Fall for most people, but for us, it's just the start of our fun in the sun. Inspired by this fusion season, I love to celebrate the flavors and foods of both seasons. This usually means grilling pizzas (a major summer activity around here) with wintery fall toppings, like this White Pizza with Brussels Sprouts.

 Or this Green Pizza with Parsley-Sundried Tomato Pesto.

And even though those pizzas contain enough vegetables on them to qualify as a hearty serving, I still make salad. Since brussels sprouts and broccolini run a bit bitter, I like to balance it out with a hearty, slightly sweet fig-studded salad, like this one with kale and goat cheese.

As for beverages, wine and beer are a little obvious. Sure, this summer-fall feast would be great with a crisp Viognier, or even a good Pinot, but I prefer to balance the fall-heavy flavors in my food with something lighter--more reminiscent of summer. Something that reminds people of sweet, bubbly memories of long, happy days and time spent in the sun.

Enter: lemon-blueberry sparklers.


Sweet, effervescent Mike's Hard Lemonade is mixed with gently muddled blueberries and fresh mint leaves, and served over ice.

I usually make several glasses at once, since the fruit and mint need to be pummeled, and it's easier to do several at once. You could also serve this in a punch bowl or pitcher--just encourage guests to get some of the blueberry-mint mixture in their cups, along with the sparkling lemonade.

I often like to serve a non-alcoholic version as well, for kids and/or non-drinkers, made with sparkling lemonade (I like the kind from Trader Joe's). 

You can definitely make this using frozen blueberries (they're a great way to enjoy this year-round), but why not take advantage of the beautiful in-season fresh berries that will be available for the next few months?


Just add sunshine.


Disclosure: I'm a Mike’s VIP sponsored blog partner. I was compensated by Mike's Hard Lemonade for this post, but the opinions and recipe are my own. Please consume alcohol safely and legally.


Ingredients

  • 1 pint fresh blueberries $3.50
  • 1 large handful fresh mint leaves $1.50 for a bunch
  • ice
  • 1 24-ounce bottle Mike's Hard Lemonade $4

Recipe Serves 4

Directions

  1. Divide most of the blueberries between highball glasses (reserve a few for garnish).
  2. Divide the mint leaves between the glasses.
  3. Use a cocktail muddler or the handle of a wooden spoon to gently smash the blueberries and mint in each glass.
  4. Fill each glass with ice cubes.
  5. Pour the hard lemonade over the ice.
  6. Use a long spoon or a chopstick to gently stir the bottom of the glass, mixing it with the hard lemonade. This should turn the beverage purple-ish.
  7. Serve immediately.